
The Roster Athletics Meets website is the main interface for athletes, coaches, parents, and clubs, where they can find all information and register participants for competitions organised on the Roster Athletics Platform. This user guide covers the main features, including how to create your account and register for your first competition.
Please note: the screenshots and descriptions of some activities may not exactly reflect how the website operates on a mobile device.
The guide is arranged as follows:
To start, go to https://meets.rosterathletics.com/.
Searching for competitions
The default view displays a set of filters that you can use to find your competitions of interest and a list of Highlights competitions.
Find your competition by typing the name in the Search field or using the Country (you can select the My country option to find competitions based on your current location) and Date fields (you can easily set the range to the past or next week or month).

The system displays the competition date and start time in the competition time zone, but you can toggle it to your time zone by clicking the competition date and time.
If you have found the competition you want to register for, click its name or the View link.
Competition view
Once you are in a competition, you will see competition details and multiple tabs below.

The About tab includes two sections:
- About - information about the competition (the field can be empty if the organiser has not provided any information).
- Competition manual - PDF containing all detailed information related to the competition (the field can be left blank if the organiser has not uploaded the file).
Events
The Events tab lists all events sorted by gender and event name. Next to each event are the following columns:
- Gender - event's gender,
- Age group - event's age group,
- Registration (optional) - registration status (if enabled),
- Price (optional) - if registration is enabled,
- Qualification standard (optional) - qualification standard mark that must be met by the participant for this event before approval.
- Max. participants (optional) - the maximum number of participants that can register,
- Day (optional) - the day the event starts (for the lowest stage).

The registration status may be as follows:
- Pending - initial state, not yet open to public registration.
- Open - registration is open for sign-ups. Click on it to go to the Registration tab.
- Closed - registration is closed, and no further sign-ups are allowed.
- Excluded - these events are not open to public registration.
Search
The Search tab allows you to search by the athlete's name, relay team or club/team. With this tab, you can view your athlete's results from all events in a single view without opening the results.

Click the athlete or relay name to go to the start list or results.
Schedule/Start lists/Results
The Schedule/Start lists/Results tab includes the list of events with all start lists and results. You can filter the list by the event name, date, gender and age group. Click the event name to go to the start list and results.
Participants
The Participants tab lists all athletes and relay teams on the start lists for all events.

There is a set of filters to select from, followed by a set of fields to sort from.
The data filters include Event type, the name of the Club/school affiliation, Country, Age group, and Gender. You can also hide individual disciplines of the combined event.
Once a set of filters (or no filters) has been chosen, you can sort the athletes by several fields, including Gender, Event, Club/school, Country, Participant/athlete name, Bib number, Age group, event Start time, PBs, SBs, or SRs. To enable a sorting field, simply tap the oval field, and it will turn blue. You can enable multiple sorting fields, and the fields' priorities are from left to right. You can drag and drop the fields in the order of their importance.
Participants or coaches can quickly review the entire list of athletes and ensure everything is in order.
Please note: the list of participants does not refresh automatically after making changes to the start lists. Please wait a moment to see the updated lists.
Registration
To register yourself or someone else for the competition, click the Registration button. Click Log in to see the list of your managed athletes and relays. If you do not have an account yet, click Sign up, then refer to the Participants: Creating and managing your account guide for details on setting it up.

Once logged in, you must accept the Terms and Conditions and/or Anti-doping Declaration provided by the organiser. This step is not mandatory if the organiser has not provided the Terms and Conditions or Anti-doping Declaration for this competition.
You may also be asked to add your contact details (e-mail address and phone number). It's important so that organisers can reach out to you in case of any schedule changes or questions regarding your registrations; however, you may choose not to provide your contact details.
Managing athletes and relay teams
After accepting the terms, you can view the list of all athletes and relays you manage and register for the competition. If the athlete/relay you want to sign up for is not on your list, click the Add athlete/relay button or go to the Account → Athletes & relays and create a new athlete/relay. Please see the Participants: Creating and managing your account user guide for more details.

Please be aware that you can hide (or restore) athletes/relays on the Athletes & relays list if they are no longer active.
Questionnaire
If the organiser has added a questionnaire, you will need to answer the questions before selecting events. Click the Fill in questionnaire button to proceed, answer all questions and click the Submit button.
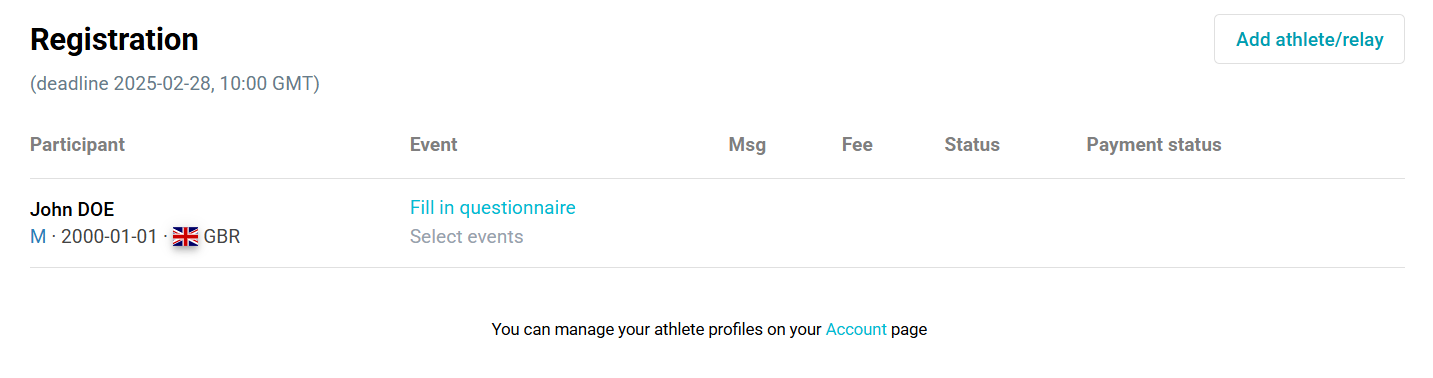
Please note: Once you submit the questionnaire, you will not be able to edit it.
Picking events
To register an athlete/relay, click the Select events link visible next to the athlete's/relay's name. You will see a new Pick events window.

The list shows all applicable events the selected athlete/relay can choose from, including those that match the athlete's/relay's gender and age group (if age group verification is enabled). You can filter the event list by clicking the Event column header.
Before picking events, please select a club/school if applicable. To do this, click Add a club to the profile below the athlete's name, then select the correct club/school for the athlete's profile. For more information on adding clubs or schools to the athlete profile, see the Participants: Creating and managing your account guide.
If an athlete is a member of multiple clubs, you can switch between them by clicking on the club name and selecting the right name from the list.

If an athlete is not a member of any club, select the Unattached option in the athlete profile.
If you are a verified member of a club which has a profile in the Roster Athletics system, you can use group payments, provided they have been enabled for the given competition and supported by your club. Group payments allow you to register for the competition while your club’s representative pays the entry fee.
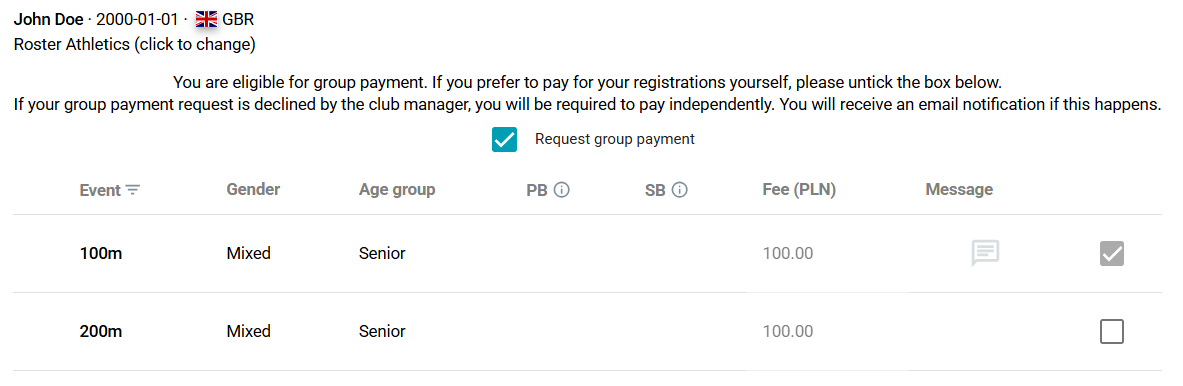
If you do not see the group payment option, make sure that:
- The correct club is shown under the athlete's name,
- The athlete's profile has been verified,
- Group payments for the given competition have been activated by the club’s representative,
- The Request group payment box is checked
The above also applies to club discounts. The competition organiser can set a discount for all registrants or only for verified members of a specific club. To see the list of discounts available to you, click Click here to view discount details under the club name.
You can edit club assignments at any time (even after registration). To do this, click on the Select events link.
To pick an event, click the checkbox on the right in the row for the respective event. Clicking the checkbox will make PB (Personal best), SB (Season best), SR (Seeding result), and Message fields active. If the checkbox is not clickable, the event registration has not yet started or has been closed.

To add PB, SB, and SR, type results in HH:MM:SS.ss format (e.g., 2:19:20 for a marathon or 10.95 for 100m) or MM.mm format (with a period as the separator). Once entered, records can only be changed if the athlete/relay has not yet been approved by the organiser (Pending approval status). Changing the record is only possible by entering a better result.
If the event has a qualification standard, you will need to enter the required records to register. Depending on the status of the qualification standard verification set by the organiser, you will not be able to register for the event if your record does not meet the standard (Strict), or you will be able to register (Open).

If the organiser enabled the option allowing participants to provide their own BIB number, you must add the BIB in the BIB number field. You can add the same or different BIB numbers for each event.

From the Pick events window, you can also send a message to the organiser. Click the Message icon to notify the organiser of any additional support information or reasonable adjustments you would like them to know about.

Sending a message will start a special chat with the organiser. You can open it by clicking the message icon under the Msg column. The icon will be light grey if there are no messages, dark grey if there are no new messages and blue if there are unread messages. You will receive an email notification if the organiser sends a new message.

You can register a single athlete/relay for several events at once. When you have selected all the appropriate events, click the Register button. If registering more than one athlete/relay, repeat the above steps for each athlete or relay.
Selecting relay members
If you register a relay, you can add relay members to the team. To do so, click on the icon placed below the relay name.

In the Relay members window, click the Add button. In the new window, click the plus icon next to the athletes you want to select for your team.
Please note: You can add members to the relay only from the list of athletes associated with your account. If an athlete is missing, add him/her to your account by following the steps described above.

When you select all relay members, click the Close button. If you wish to change the order, click the Reorder button, then use the arrow icons to change the athletes' positions. When ready, click the Save order button.
You can add, remove or change the order of the relay members until the event start time or the check-in deadline (if the check-in feature is enabled).
Purchasing additional items
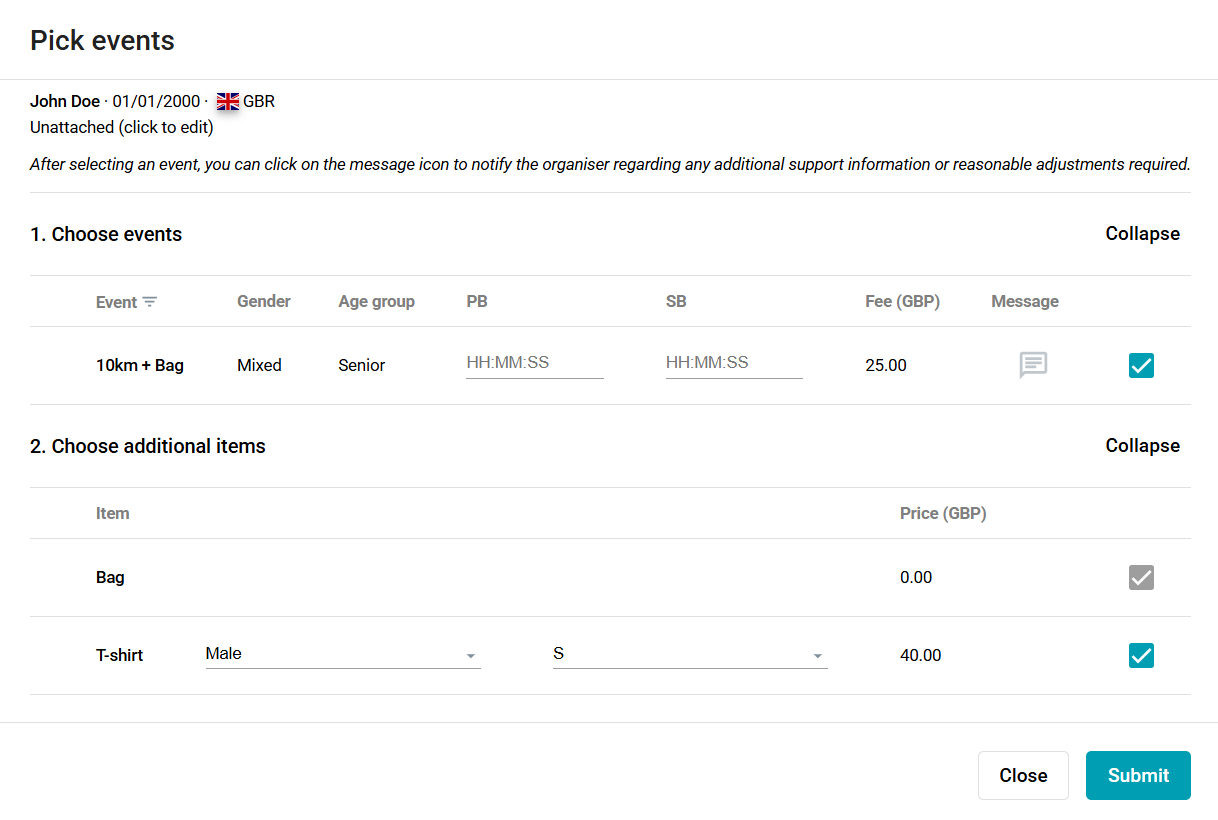
If the organiser has added any products for purchase to the registration, you can choose the items and options when picking the events. Depending on the organiser's settings, the item:
- can be manually selected by the registrant (not mandatory),
- will be selected automatically when selecting any event (mandatory with any event)
- will be automatically selected when selecting a specific event (mandatory for that event).
In the last case, the product name will be visible next to the event, and its price will be included in the event fee.
Competition entry fee
If the organiser has set a competition entry fee, you will see it at the top of the event list. The entry fee will be selected automatically after selecting the first event.

The entry fee is an additional charge collected by the organiser for the first event you sign up for. Any subsequent event for the same athlete will not include this fee.
Please note: The sum of fees for the participation if there is a competition entry fee will be competition fee + event price. If you want to register an athlete for two or more events, the sum will be competition fee + event no. 1 price + event no. 2 price, and so on.
Status
After registering, you will need to take the next step, depending on your registration status. The athlete/relay status may be as follows:
- Pending approval - athlete/relay has been registered and is awaiting approval by the organiser (the process may take a few seconds if the organiser has enabled auto-approval, and the status will be updated shortly if waiting on this page).
- Checking licence validity - athlete has been registered and is awaiting the result if their licence is valid for the day of the competition (this option is visible if the licence verification setting for the competition is enabled by the organiser).
- Approved - athlete/relay has been approved by the organiser and payment is required (if participation is not free).
- Rejected - athlete/relay has been rejected by the organiser and will not be allowed to pay or register for the same event once again.
- Wait-list - athlete/relay has been moved to the wait list and needs to await the next change of status (this may have happened when the max athletes/relay teams number was reached).
- Start list - athlete/relay is on the start list, no more action is required unless wanting to resign.
- Resigned - athlete/relay has resigned from the event.
- Removed - athlete/relay has been removed from the start list by the organiser.

You will also be informed of each change in status by email.
Payment
When at least one of your managed athletes/relays has been approved, the payment status is Required, and the statuses of all athletes/relays are not pending, you can proceed to payment by clicking on the Payment button. The payment status may be as follows:
- No cost - there is no fee for this event.
- Required - you can pay for this event. Click the Payment button at the bottom of the page to go to the Stripe payment platform.
- Payment started - once you click the Payment button, the payment status changes to Payment started. If you go back from Stripe to the Roster platform without paying, you can click on the Cancel payment button and resign from the event.
- Payment failed - unsuccessful payment, please try again or contact the organiser.
- Payment complete - payment was successful, and an athlete/relay is or will be moved to the start list shortly.
- Refund requested - a participant resigned and requested a refund.
- Refund started - the organiser has accepted the refund.
- Refund rejected - the organiser has rejected the refund.
- Refund complete - the refund was successful.
By clicking on the Payment button, you will see the Payment summary window. Check the list and if everything is OK, click on the Pay button.
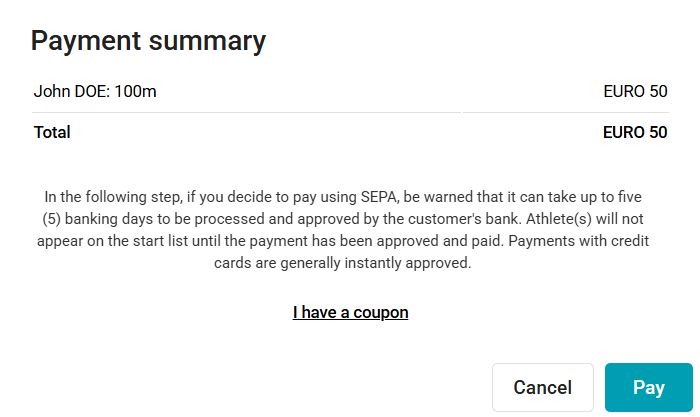
If you have a valid discount coupon for the competition, click I have a coupon, enter your code, and then click Apply to redeem it.
Please note: Coupons can be used even if a club discount has already been applied.
Roster Athletics partners with Stripe for secure payments and financial services. Clicking the Pay button takes you to the Stripe payment view.

The available payment options will vary slightly depending on who is organising the competition, the currency being used, and the browser you are using. The most popular payment options are:
- Card (e.g. Visa, Mastercard, American Express),
- Google Pay (not available in Safari),
- Apple Pay (only available in Safari),
- Przelewy24 (relevant only for the Polish currency).
Choose the payment option that is convenient for you, fill in the appropriate fields and click the Pay button. Do not close the window. If the payment is successful, you will go back to the Roster platform. The athlete/relay status should change to Start list, and the payment status should be Payment complete. It may take up to 10 minutes for these changes to appear, but is typically much shorter.
Payment with credits
If you have credits in your account, you will see the Pay using credits window after clicking on the Payment button. For entry fees where you don't have enough credits to cover the entire amount, you can apply the credits to make a partial payment. If you do, however, combine credits and payments for an event, and further want a refund, you will only be able to receive it as credits.

Credits can be used if the credit amount covers all or part of the fee. In the latter case, credits will be included on the payment provider page as a discount.
Credits can only be used to pay for participation in competitions organised by the same organiser who refunded your starting fee in the form of credits in the same currency. Go to the Account → Registration credits to check your current credit balance.
Resigning and refunding
You can resign from the event before or after the payment. If you resign before the payment (or if there is no cost), you can do so by clicking the three dots in the far-right column and selecting Resign.

In the above case, you cannot resign from an event if it is less than 2 hours before its start.
Please note: You will not be able to re-register to the event you have resigned from, if your status was other than Pending approval.
If you want to resign after the payment, click the three dots in the far-right column and select Resign & request refund.

In the new Resign & request refund window, you can decide what kind of refund you want to receive.

By selecting the Payment method refund, you will receive the full amount for the event, less any applicable transaction fees (e.g., credit card fee, Roster service fee).
By selecting Organiser credits, the full amount will be credited to your account. You can use the credits in the same competition for a different event, or any future competition organised by the same organiser.
Please note: Once you have resigned from this event, you cannot sign up for it again in this competition. To do so, you will need to contact the organiser.
If the competition entry fee is refundable, you can request a refund if you resign from all your events, and the organiser resolves all event refund requests. The same rule applies to refundable items linked to any or specific events.