
This user guide explains how to use the seamless integration between the Roster Athletics platform and the RACE RESULT timing system without using the RACE RESULT software.
The guide is divided into the following sections:
- What do you need to get started?
- Enabling integration
- Ubidium setup
- Set up in Roster Athletics
- Starting a race
- Splits scoreboard
What do you need to get started?
- A competition that you created on the Roster Athletics platform, from which start lists will be generated and athlete results displayed.
- RACE RESULT hardware, including a decoder box and an antenna (for passive or active transponders).
- Passive transponders (BIB numbers) or active transponders.
Enabling integration
To integrate the Roster Athletics platform with the RACE RESULT timing system, in Roster Athletics, go to the competition Details → Timing system integration section and select Direct (Ubidium) in the RACE RESULT integration field.
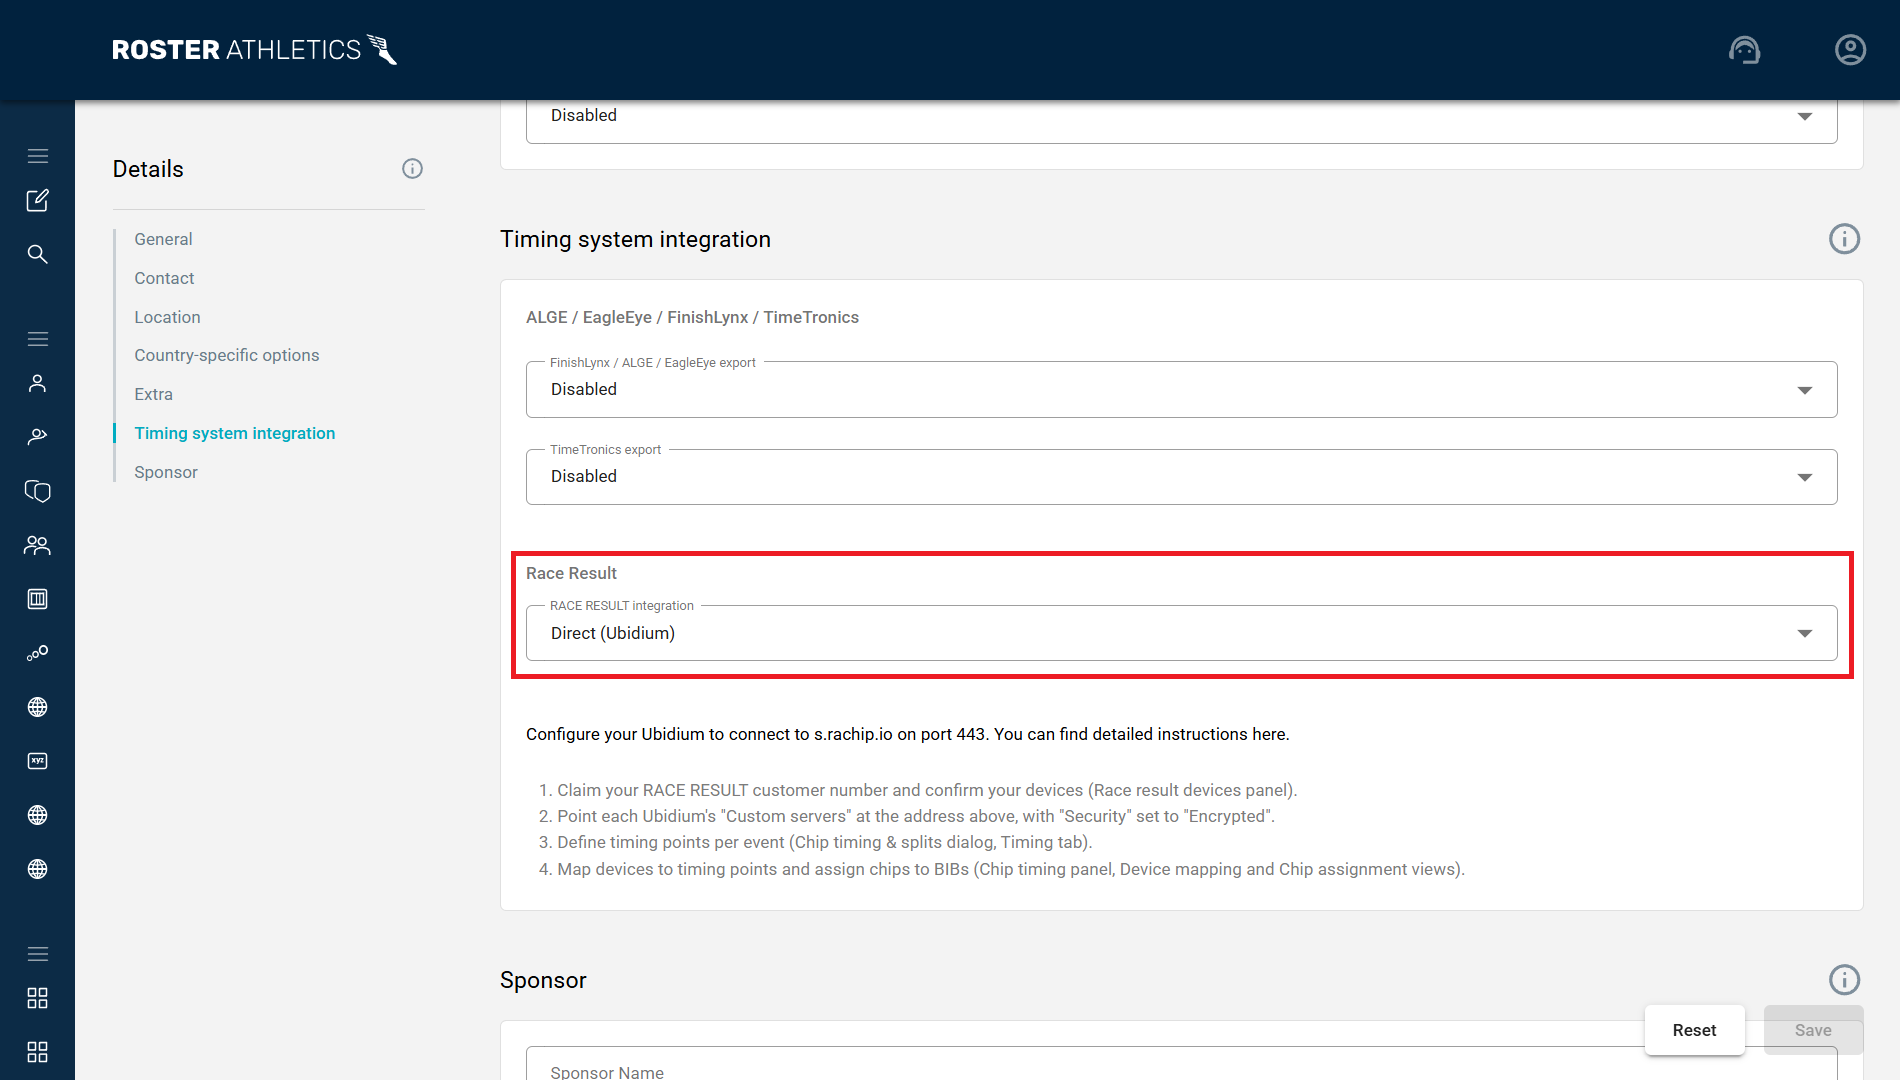
Here you will find the host and port information to enter on all your Ubidium devices.
Ubidium setup
To start, you need to know your RACE RESULT customer number. You can find it by logging in to https://www.raceresult.com/. The number is displayed in the top right corner.
If your competition is ready and you have your RACE RESULT account, follow these steps:
- Go to network settings on your RACE RESULT Ubidium.
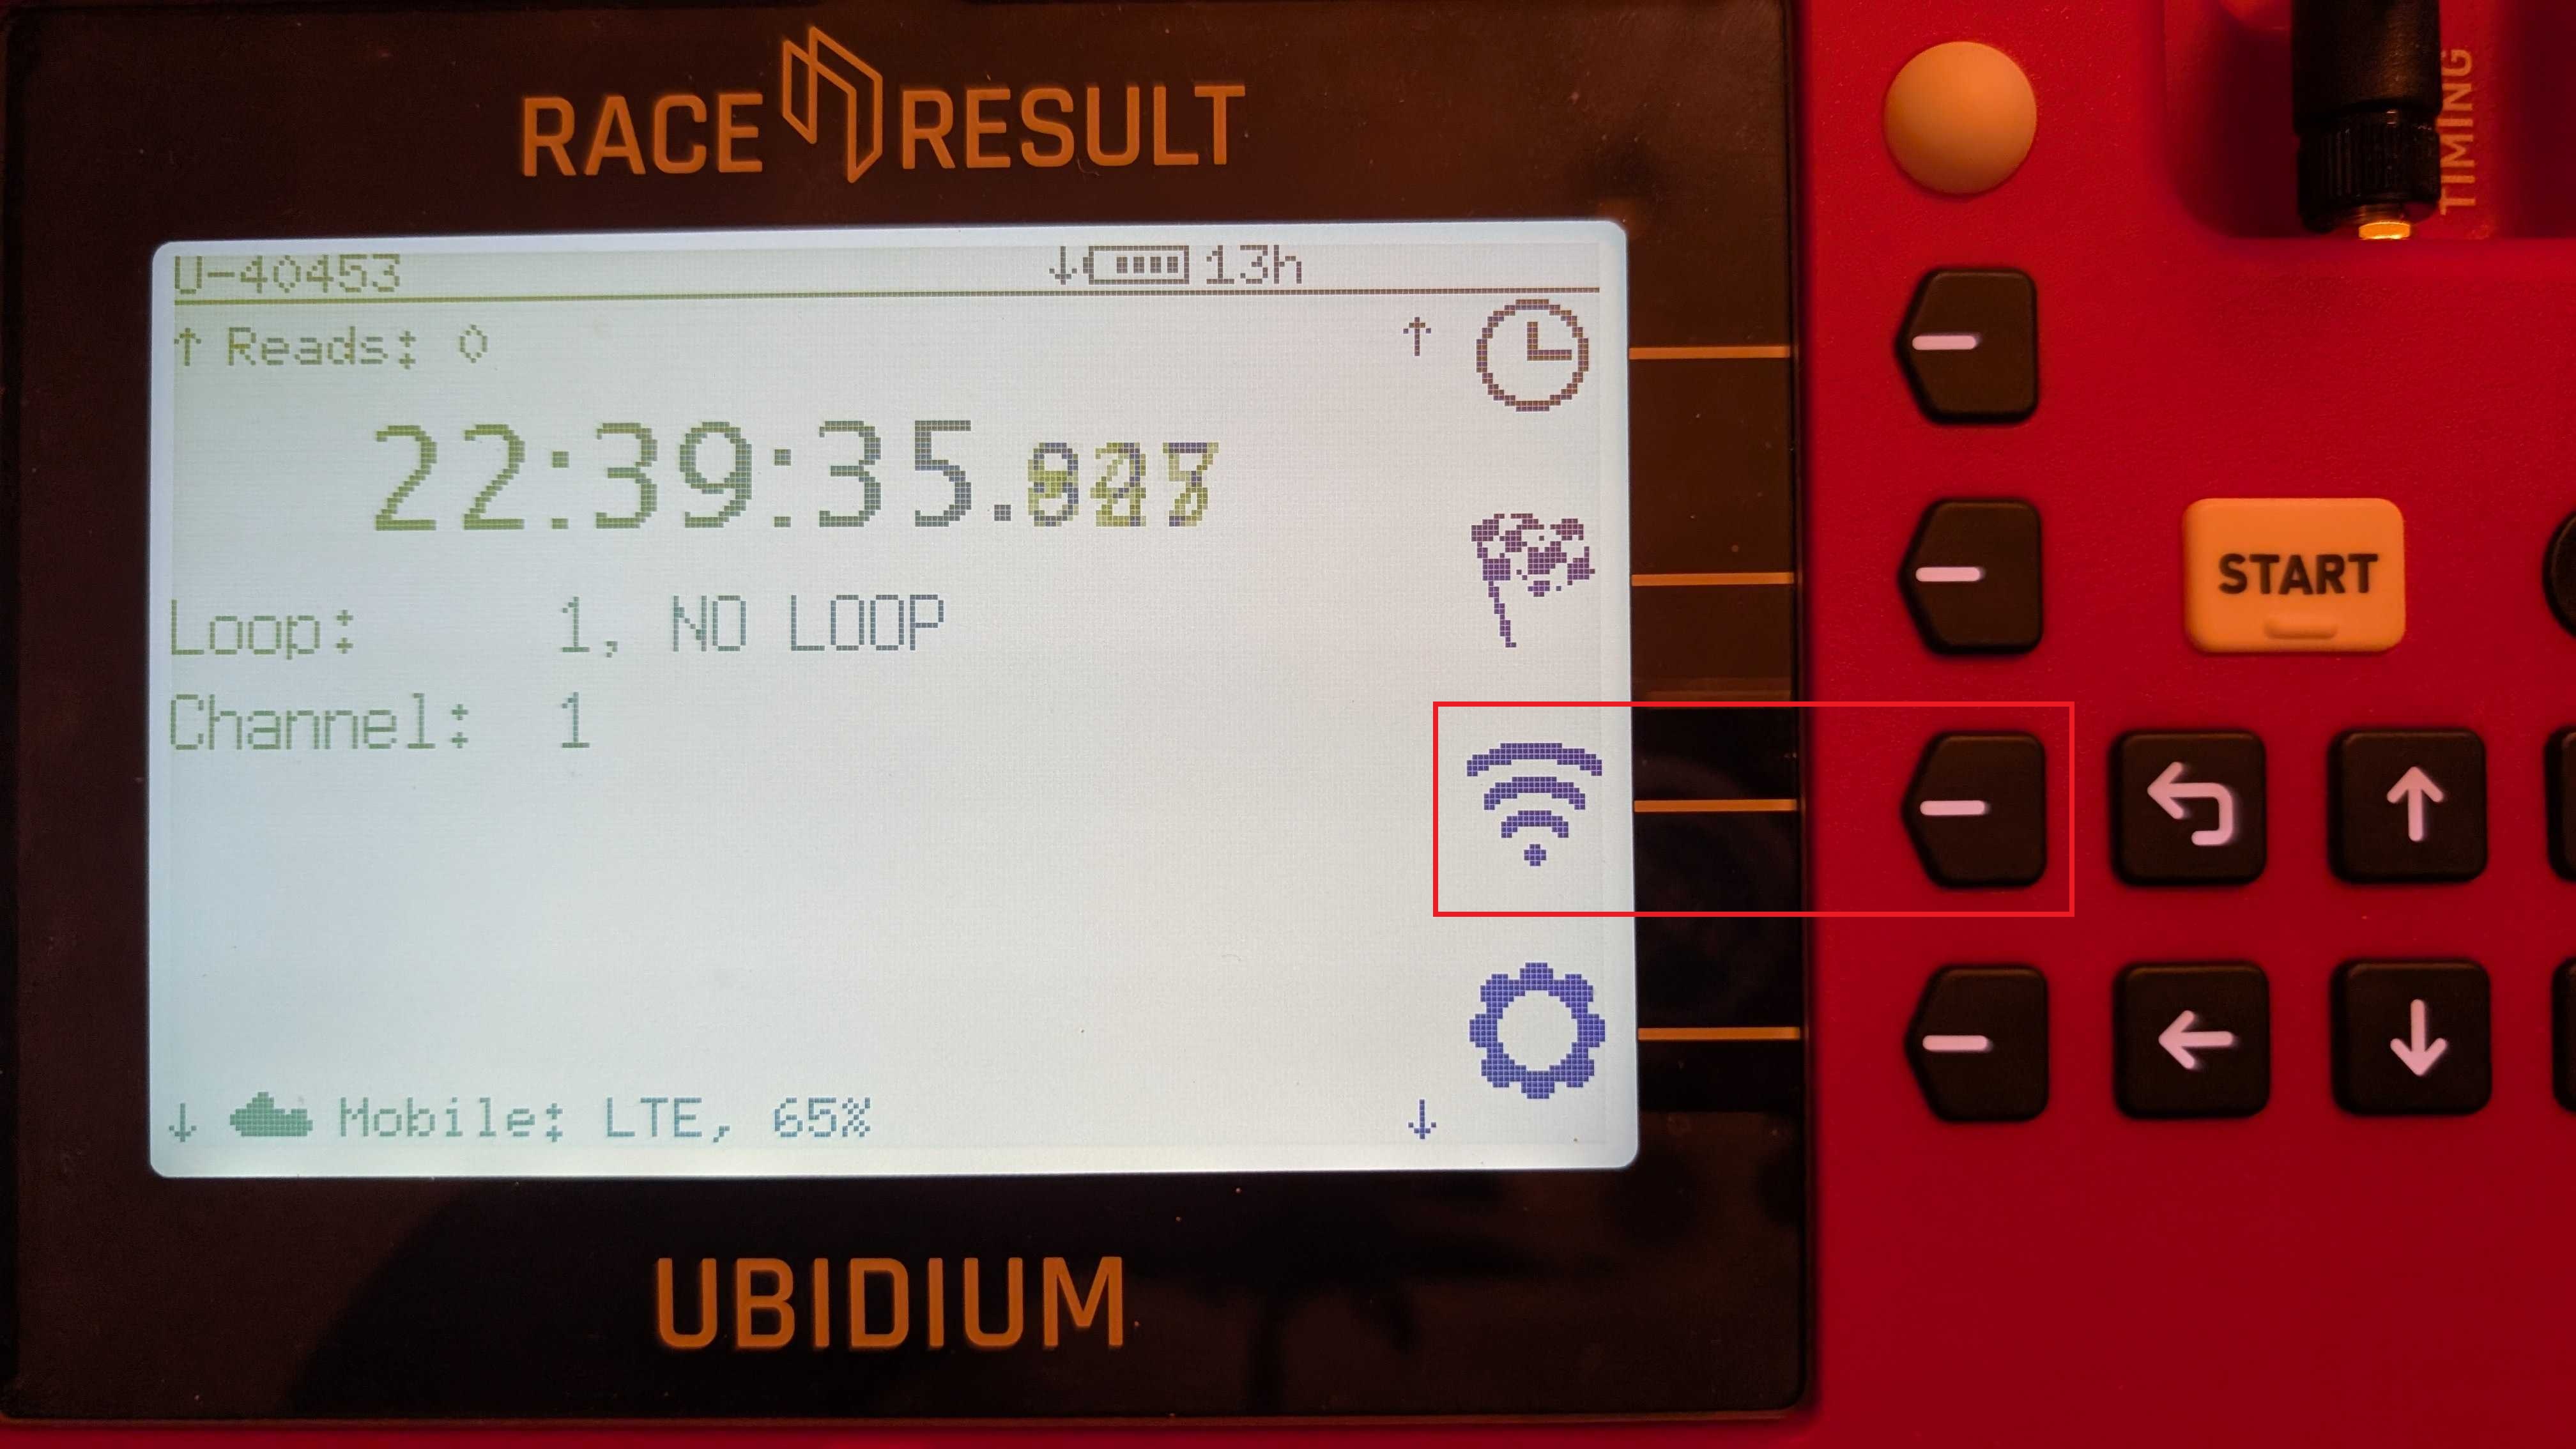
- Set up Wi-Fi under the WiFi menu item.
- Select Cloud.
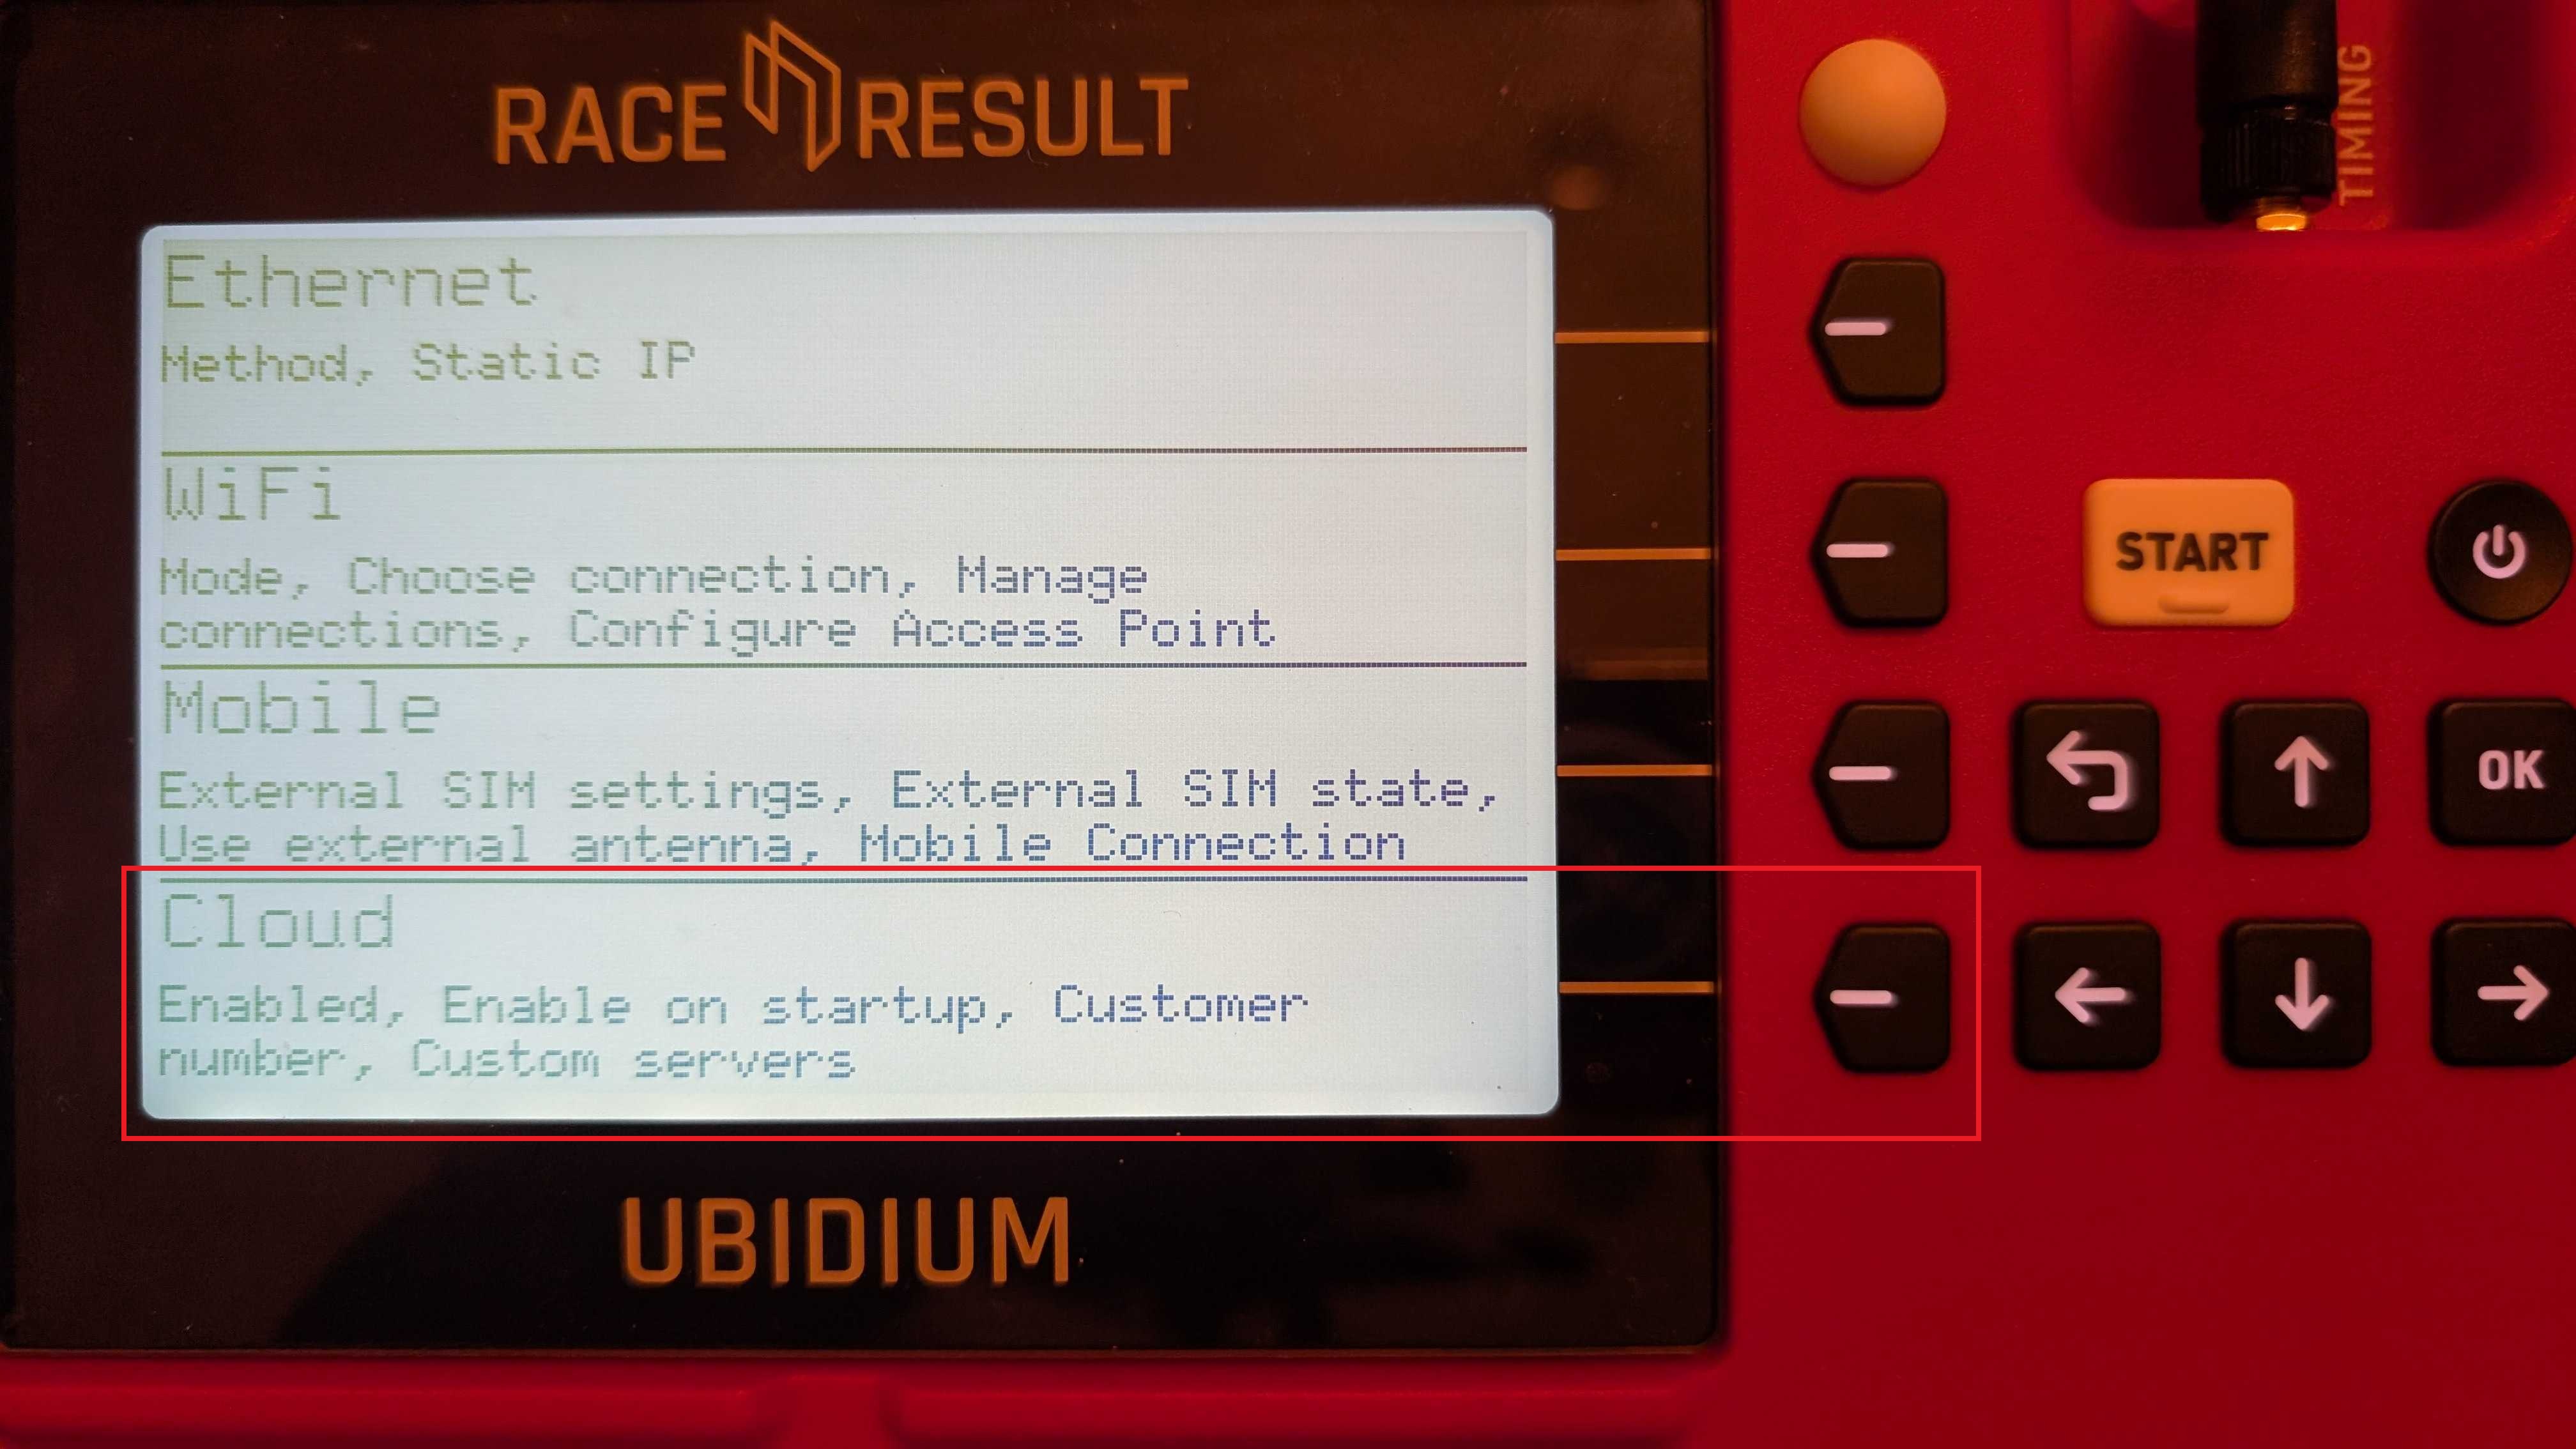
- Enable cloud — note you can also choose to enable this on startup, so you don’t have to change it every time.
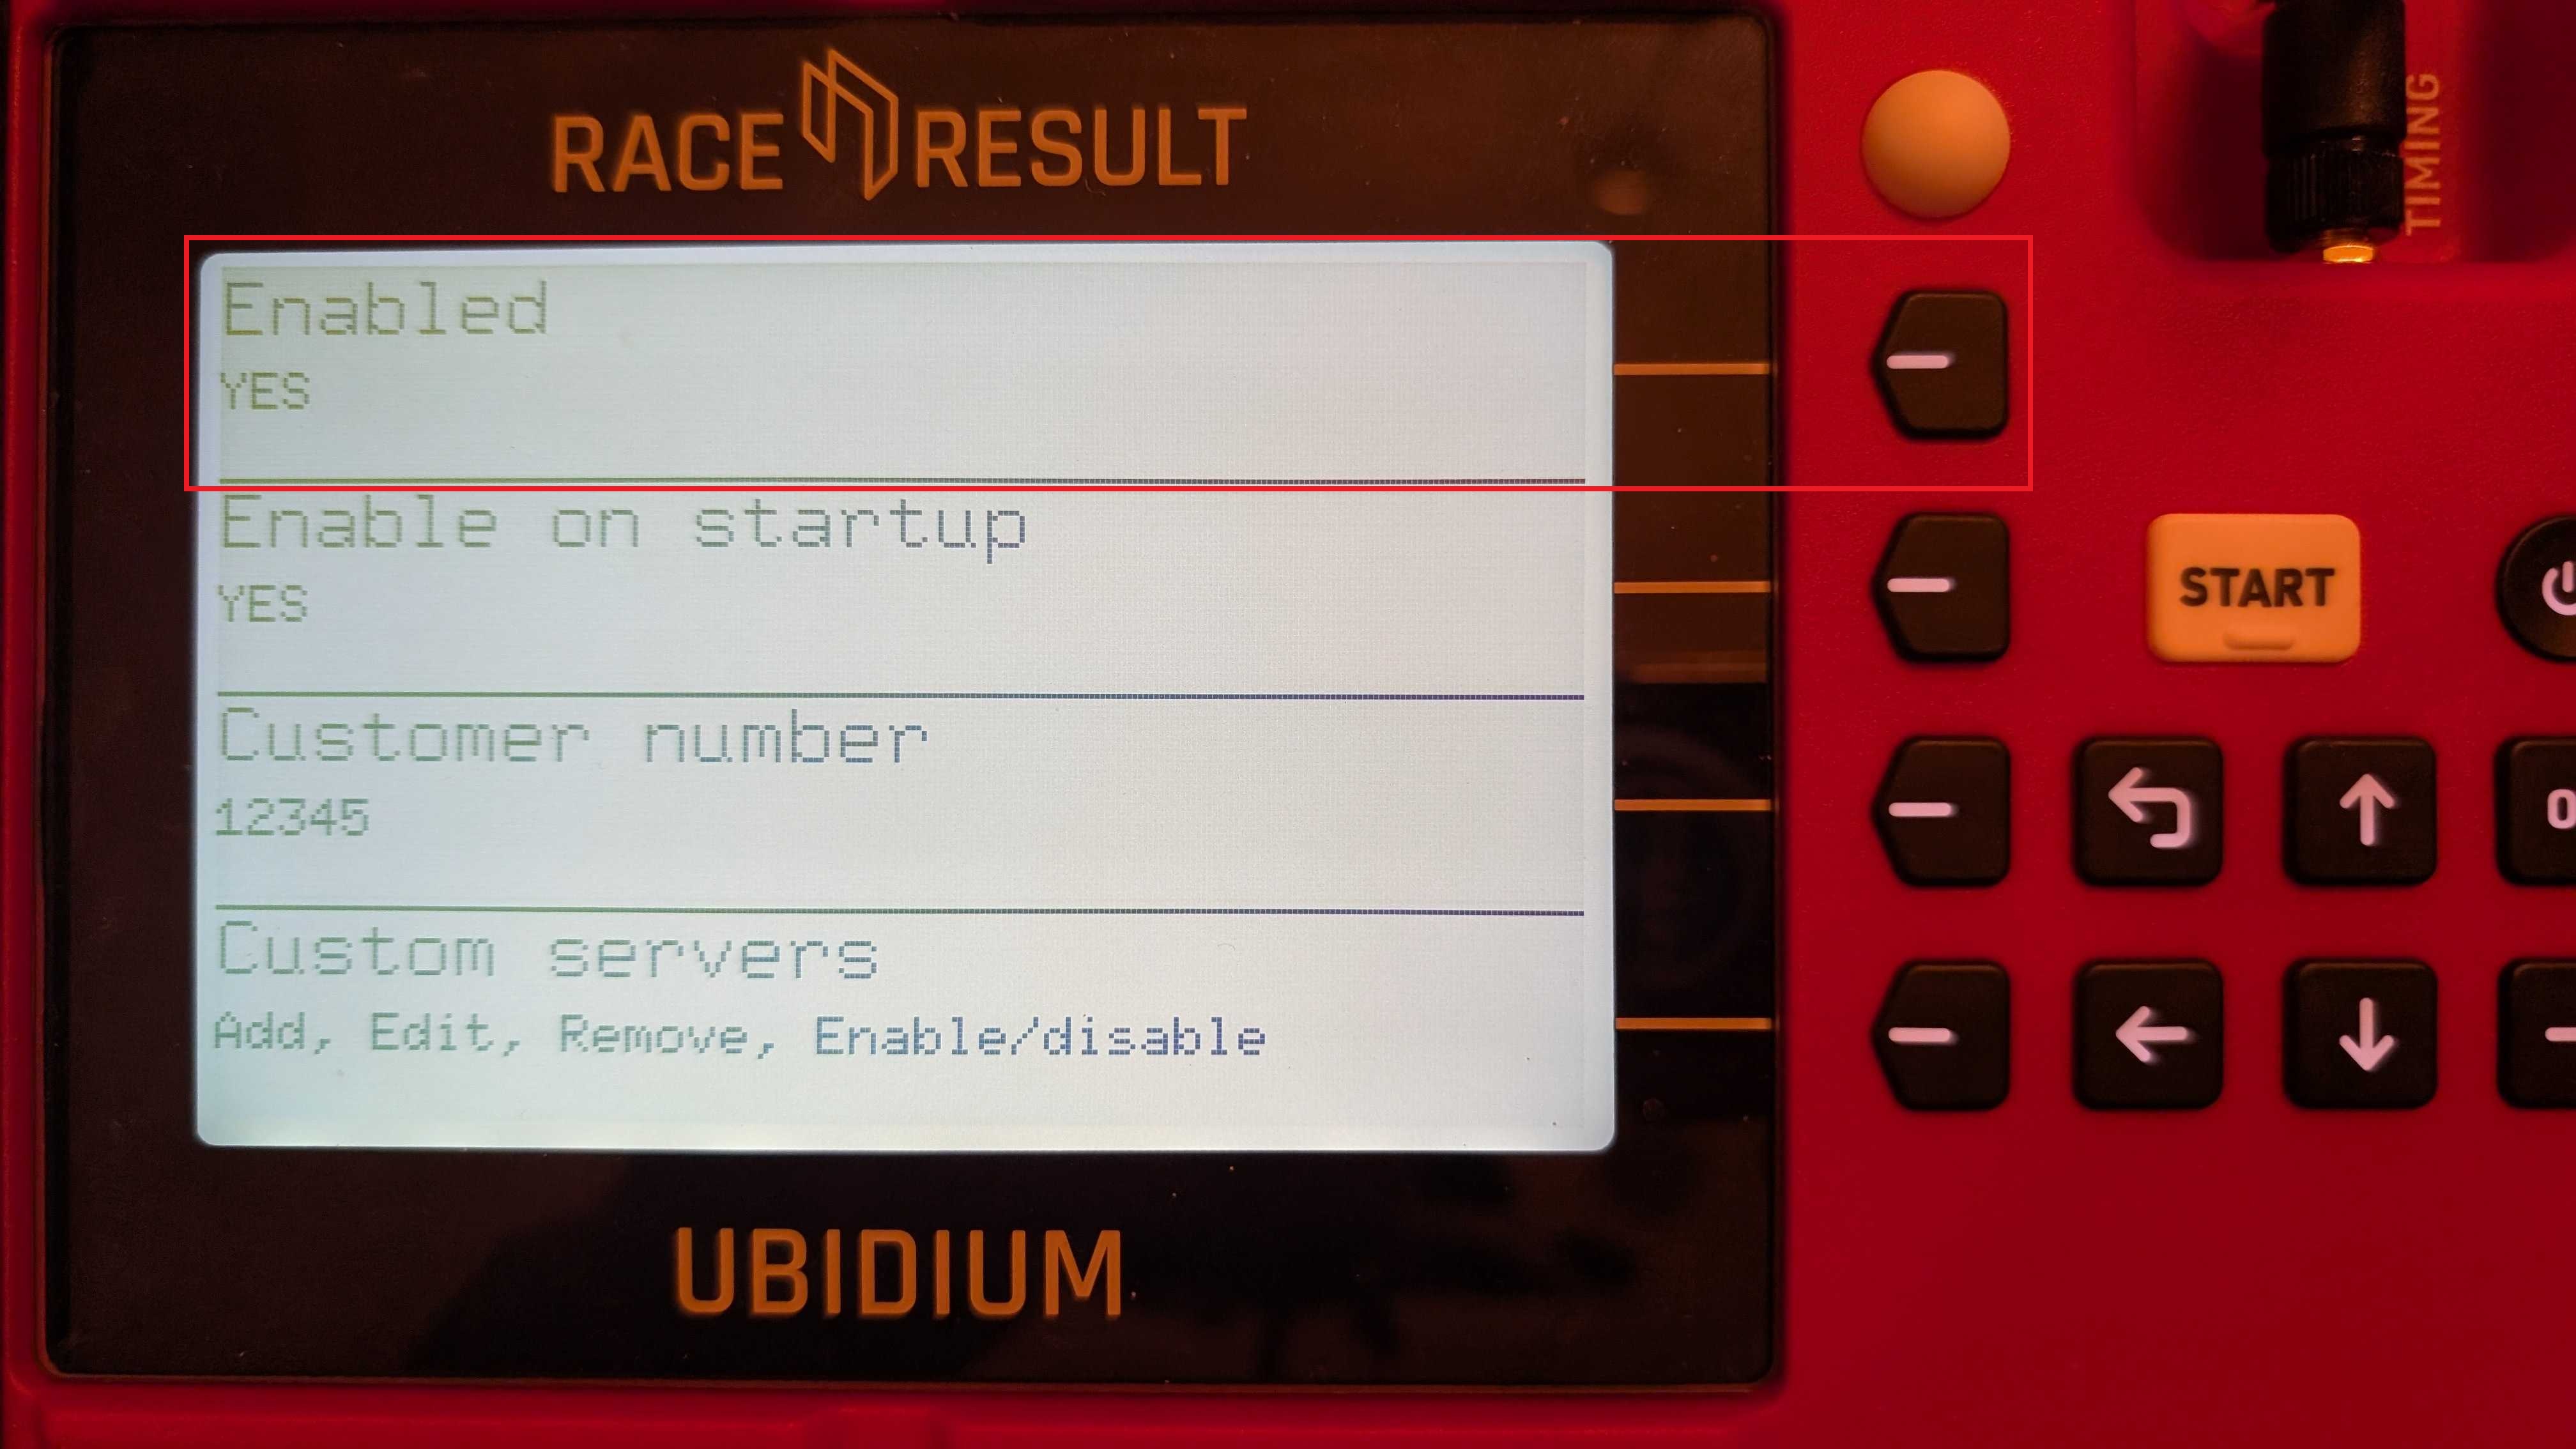
- Type in your RACE RESULT customer number.
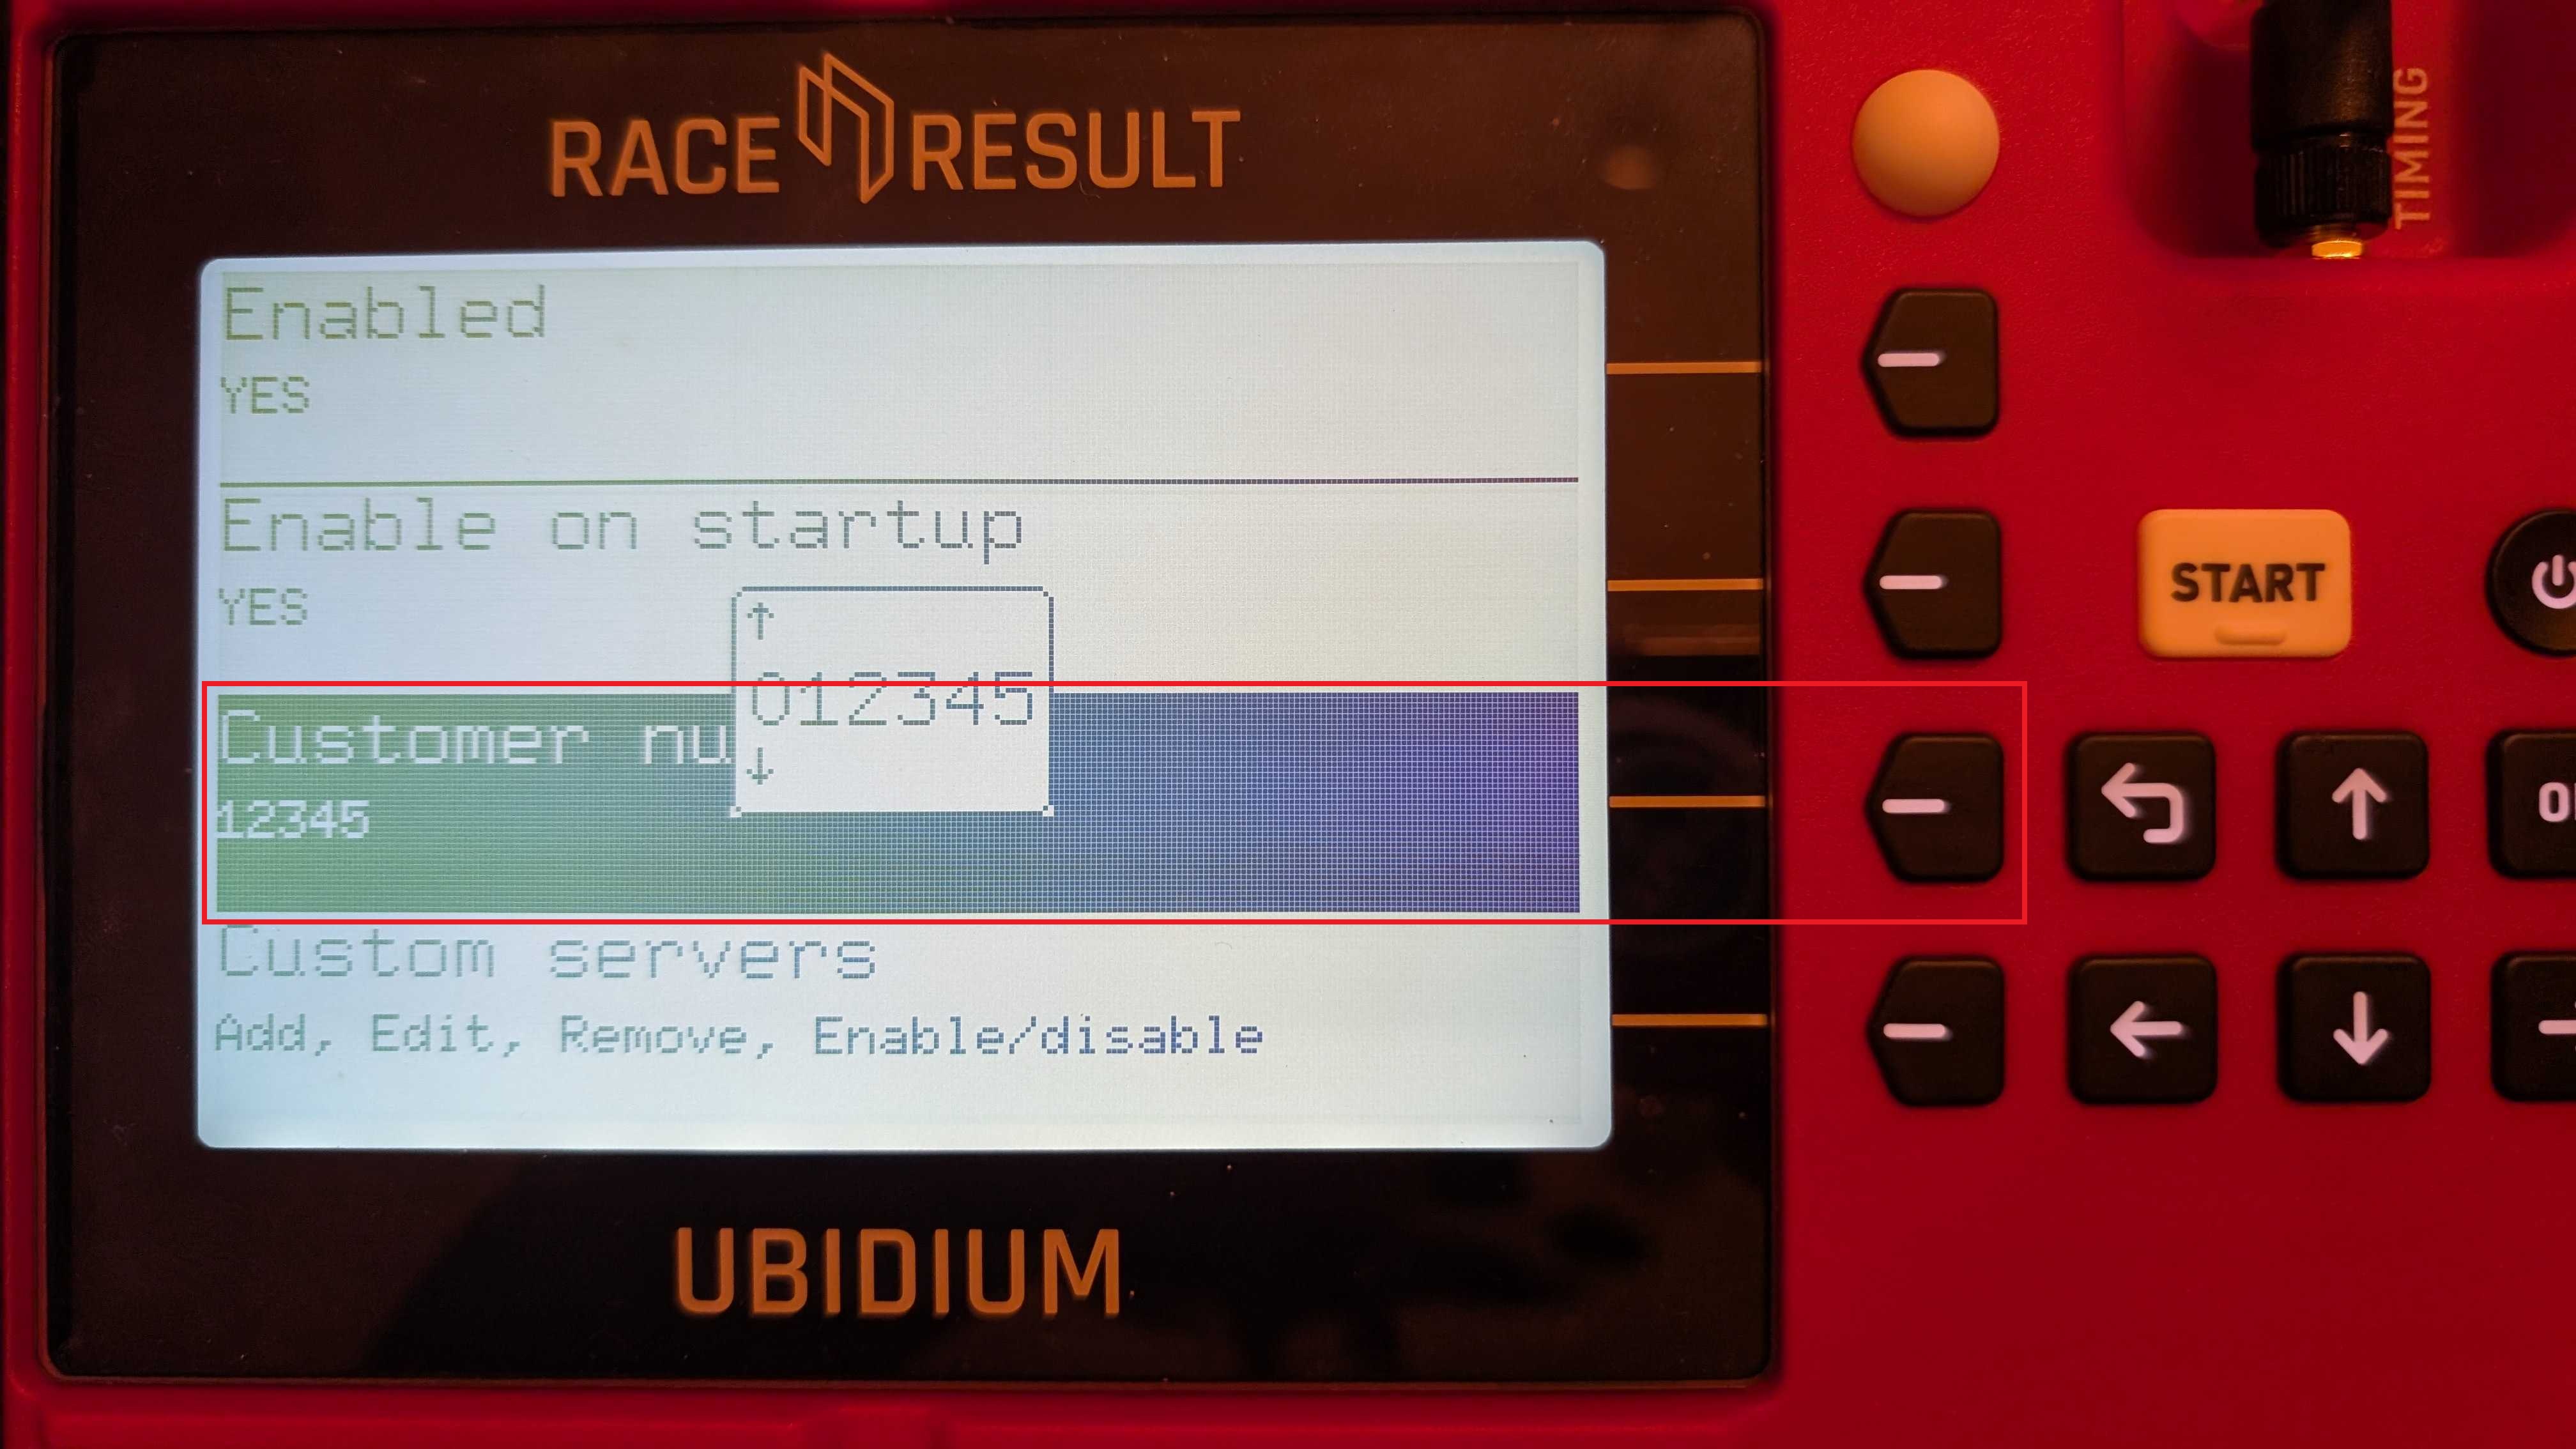
- Click Custom servers.
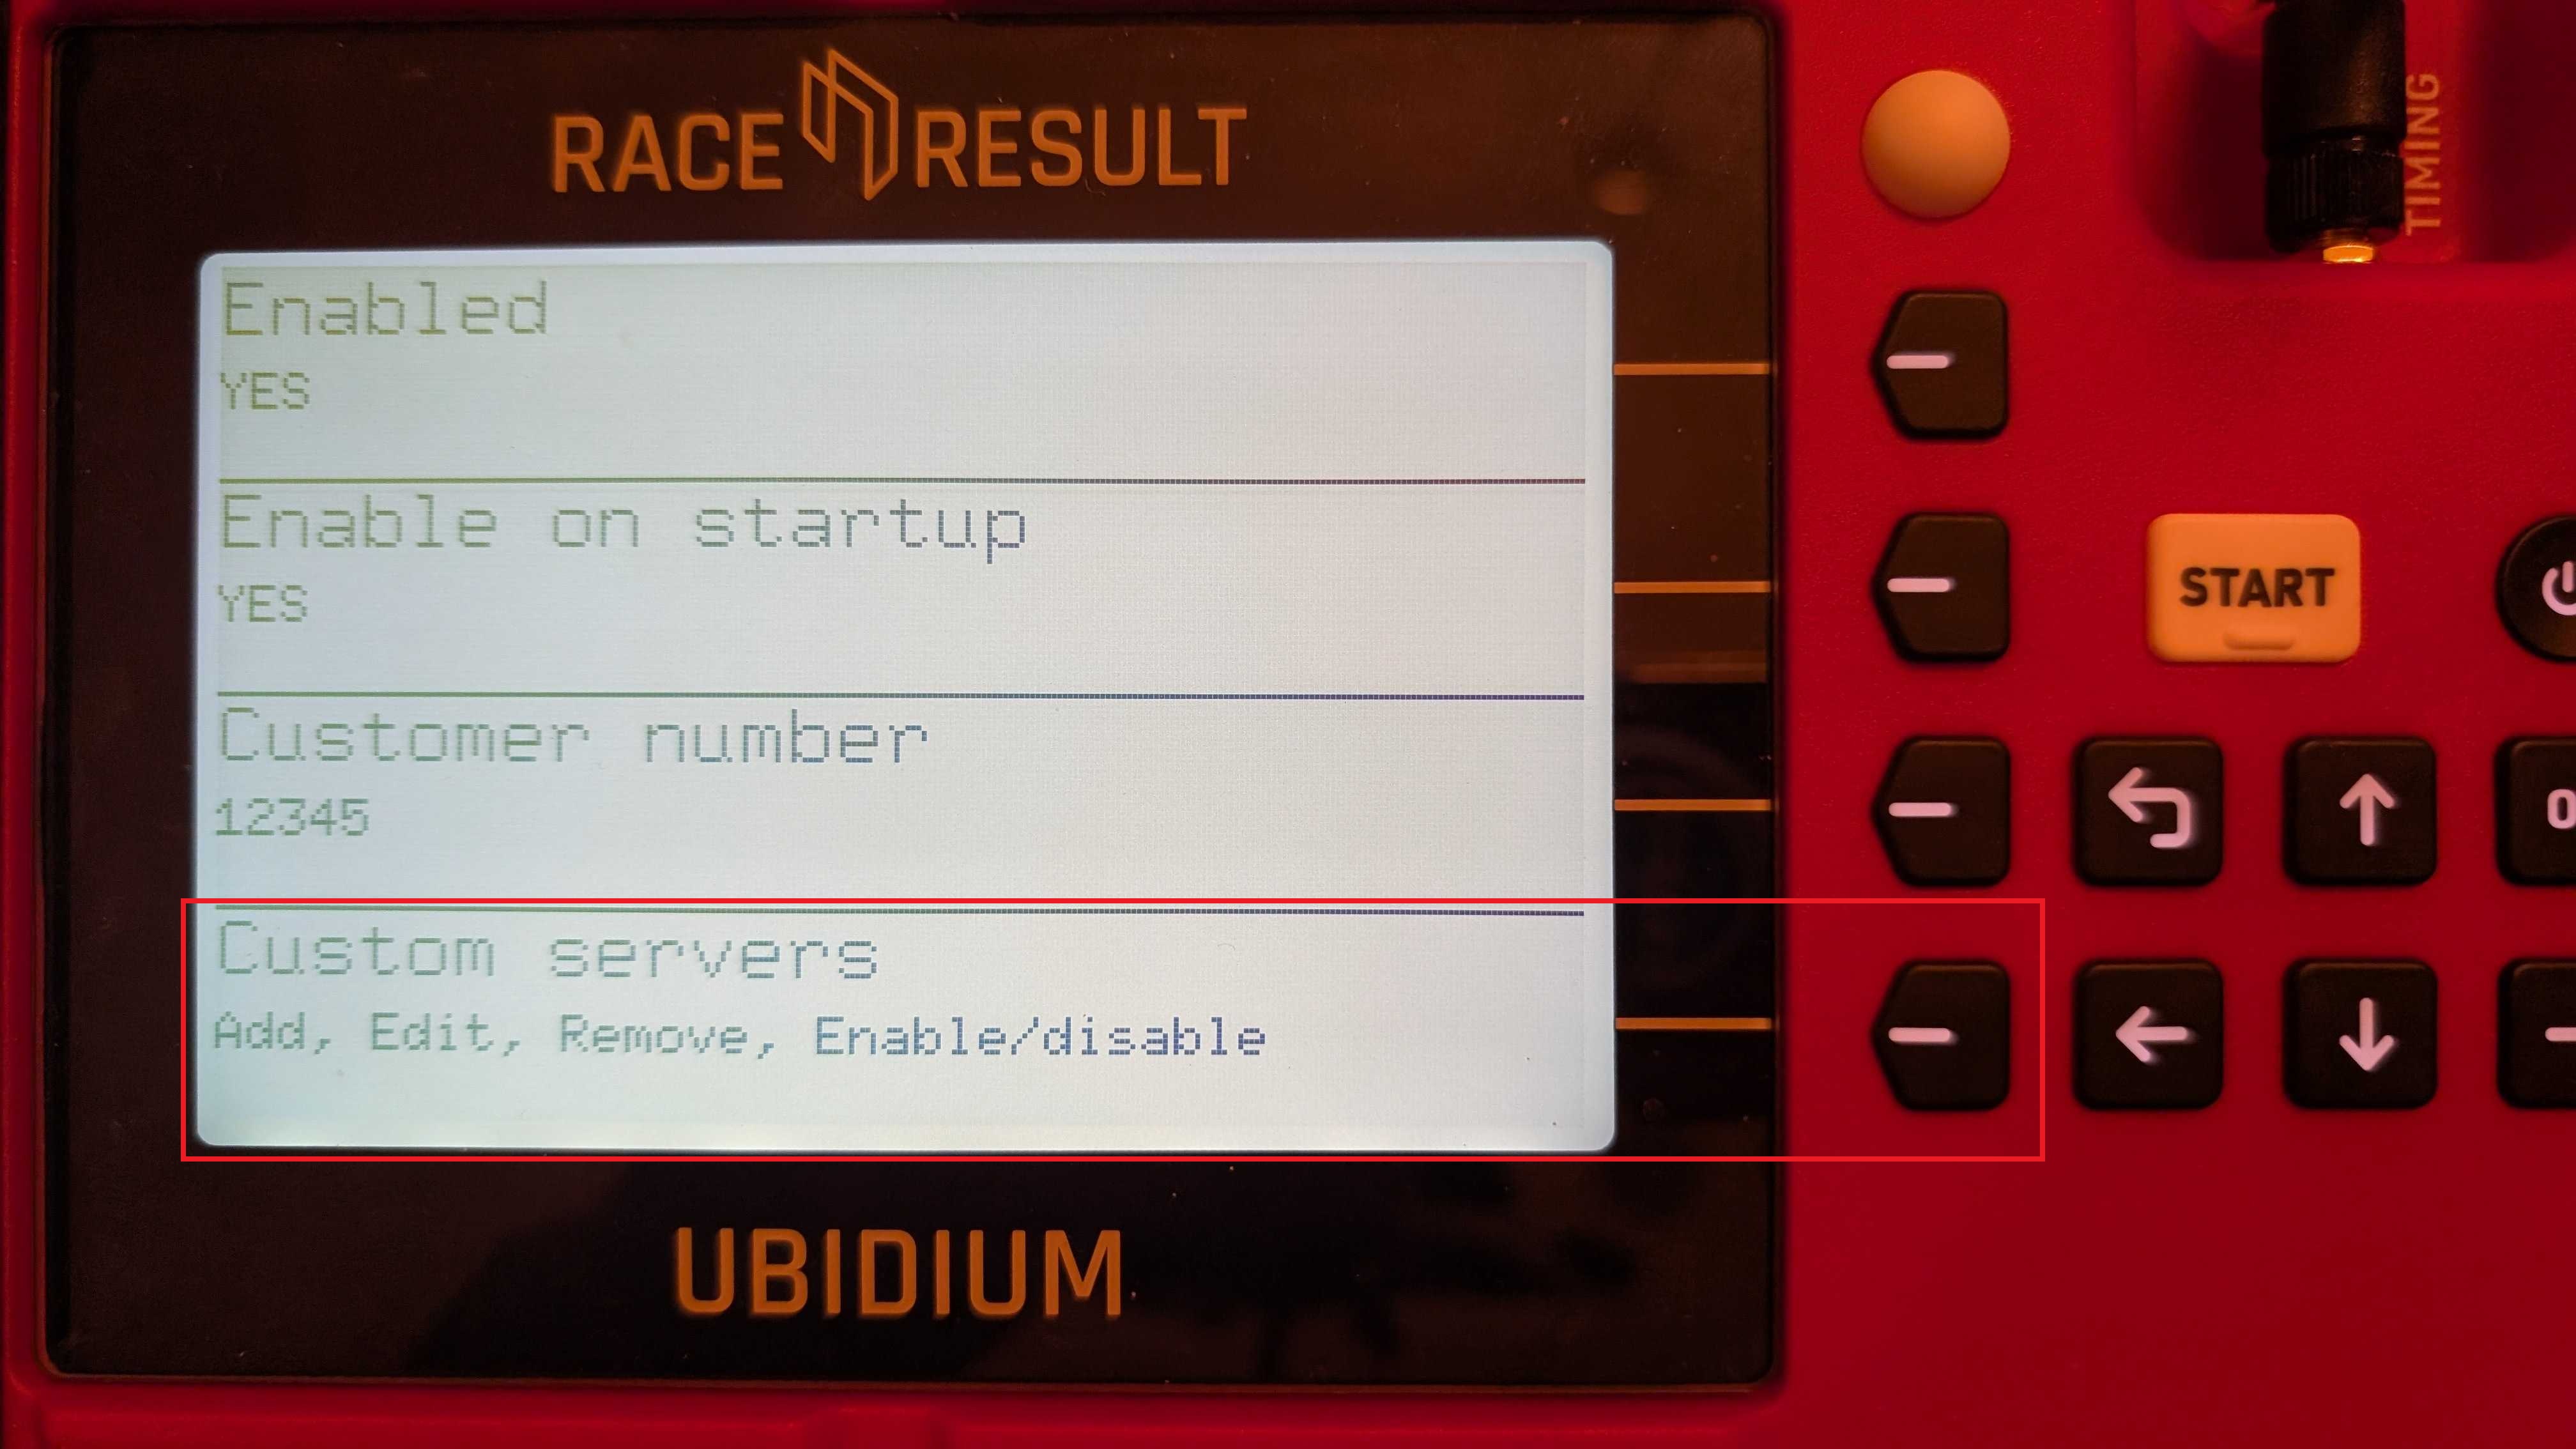
- Click Add.
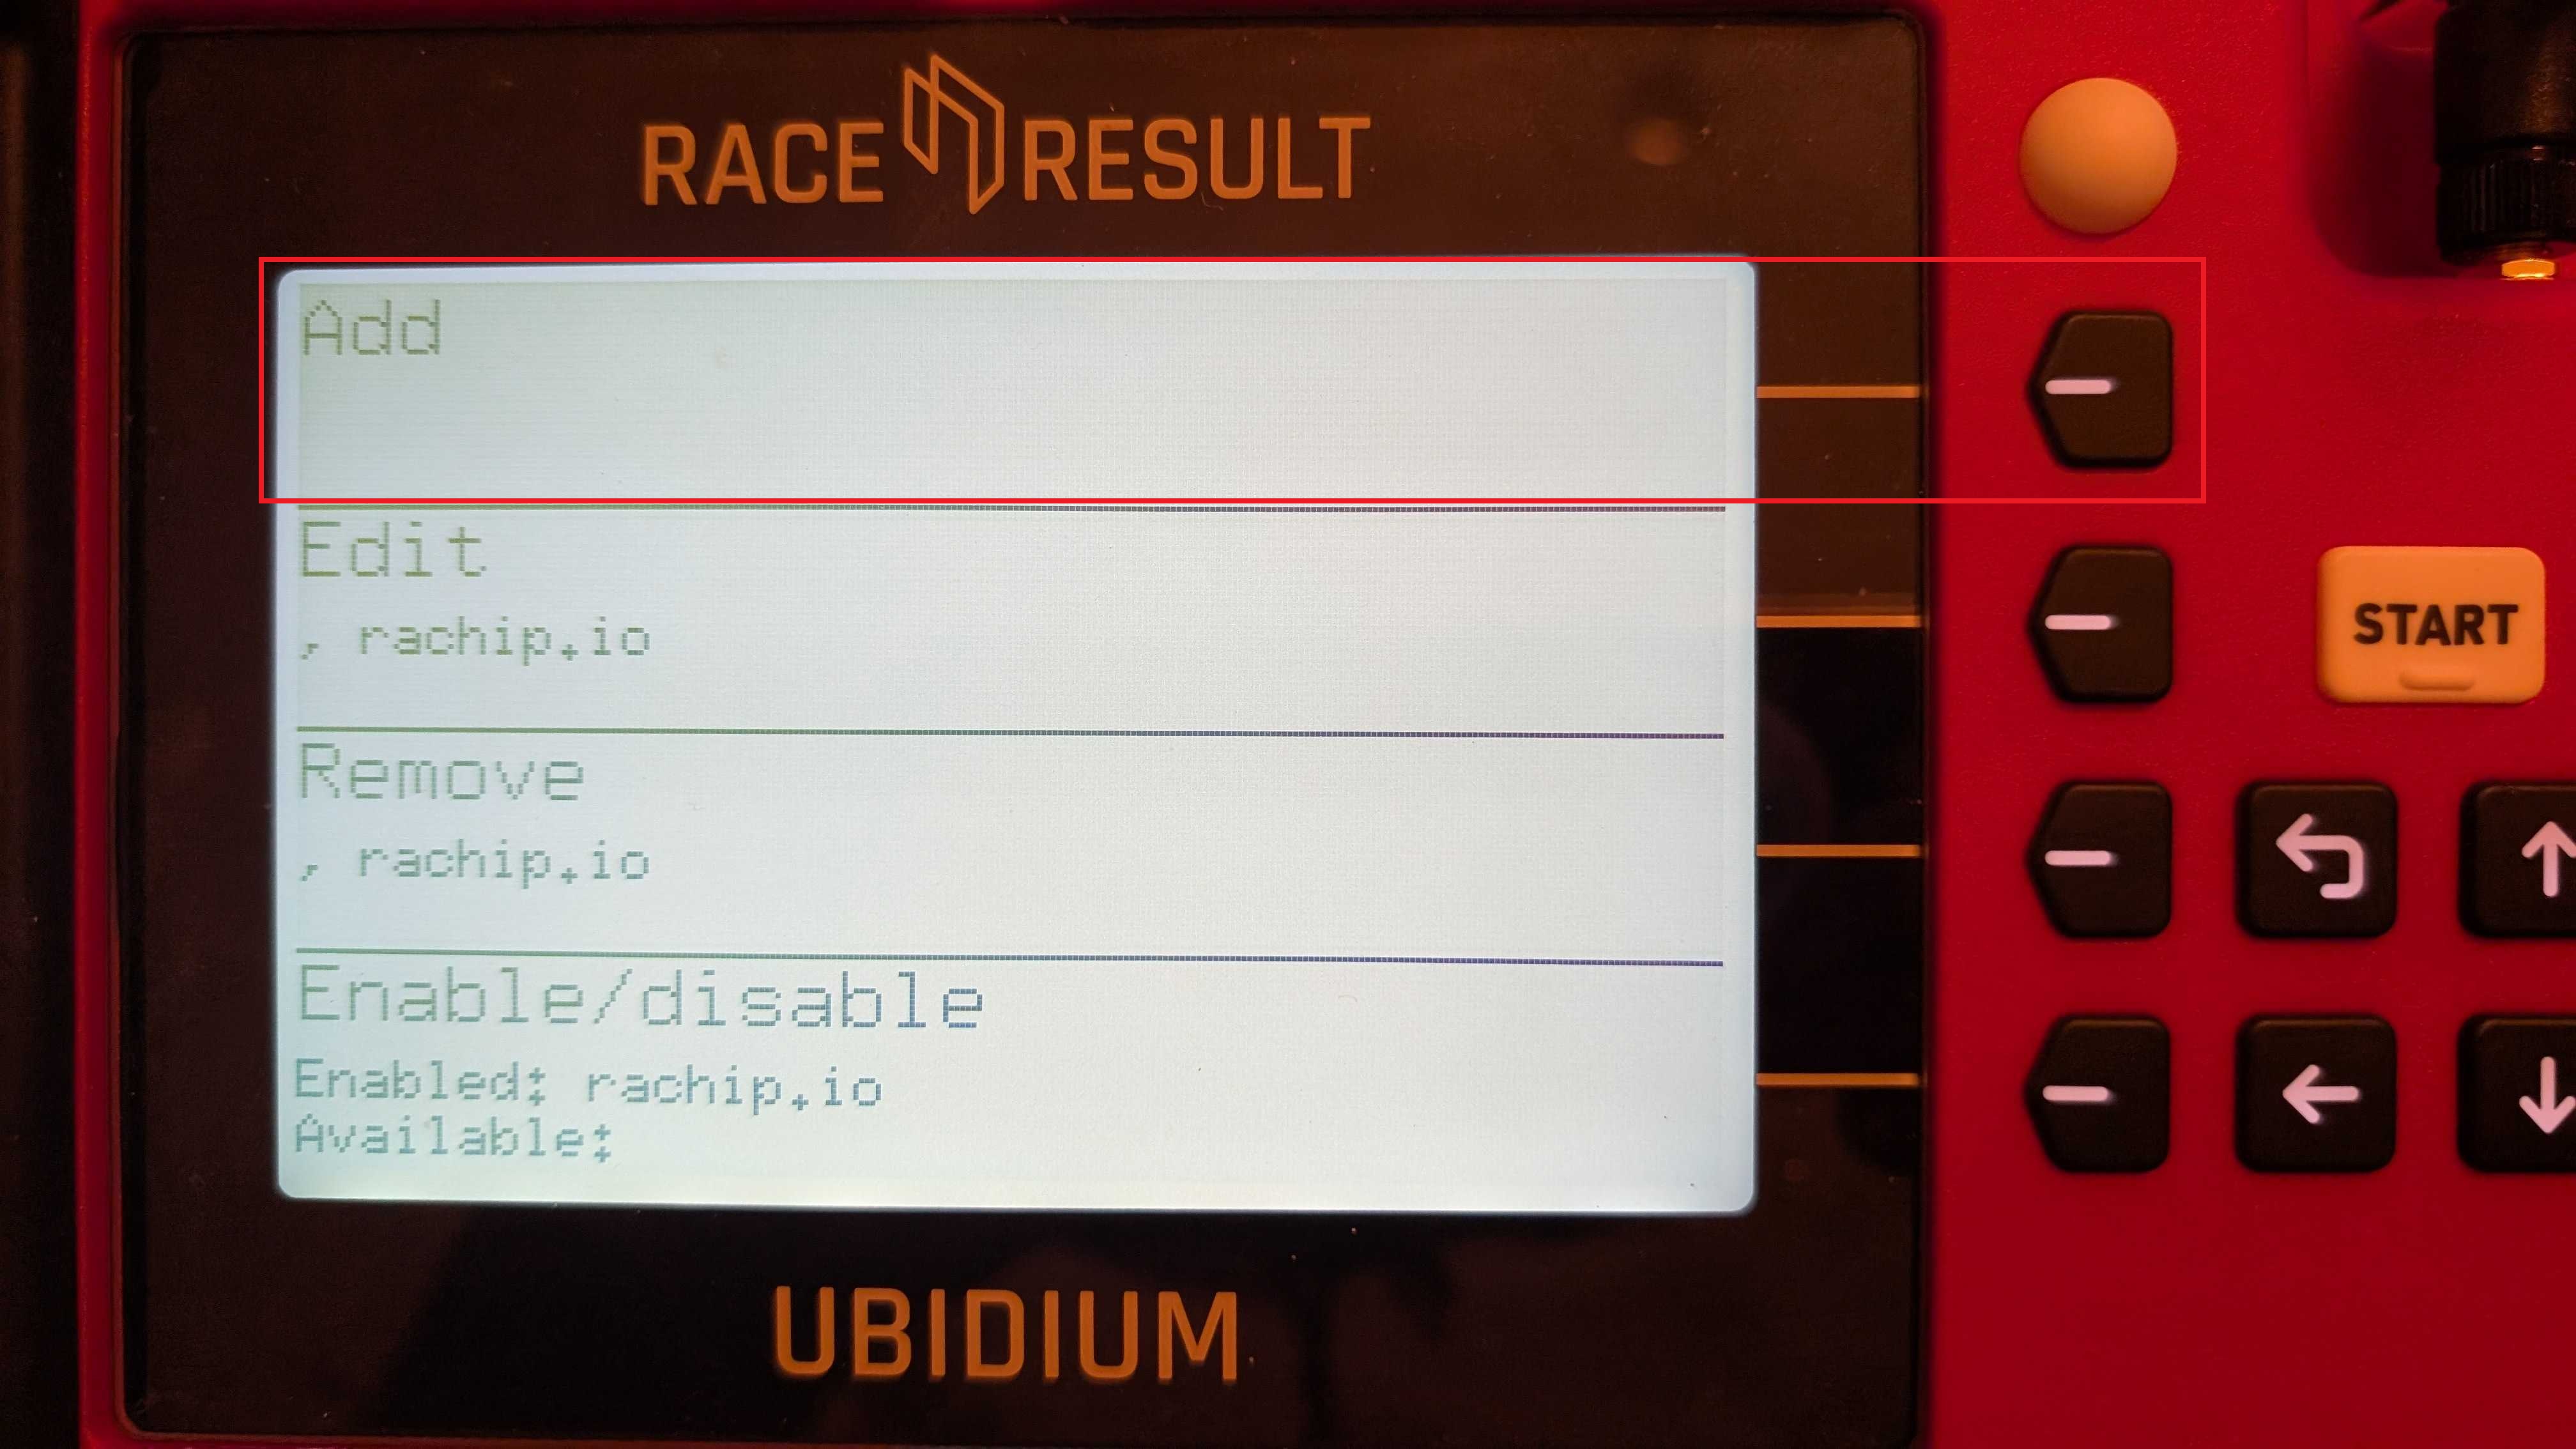
- Click Host.
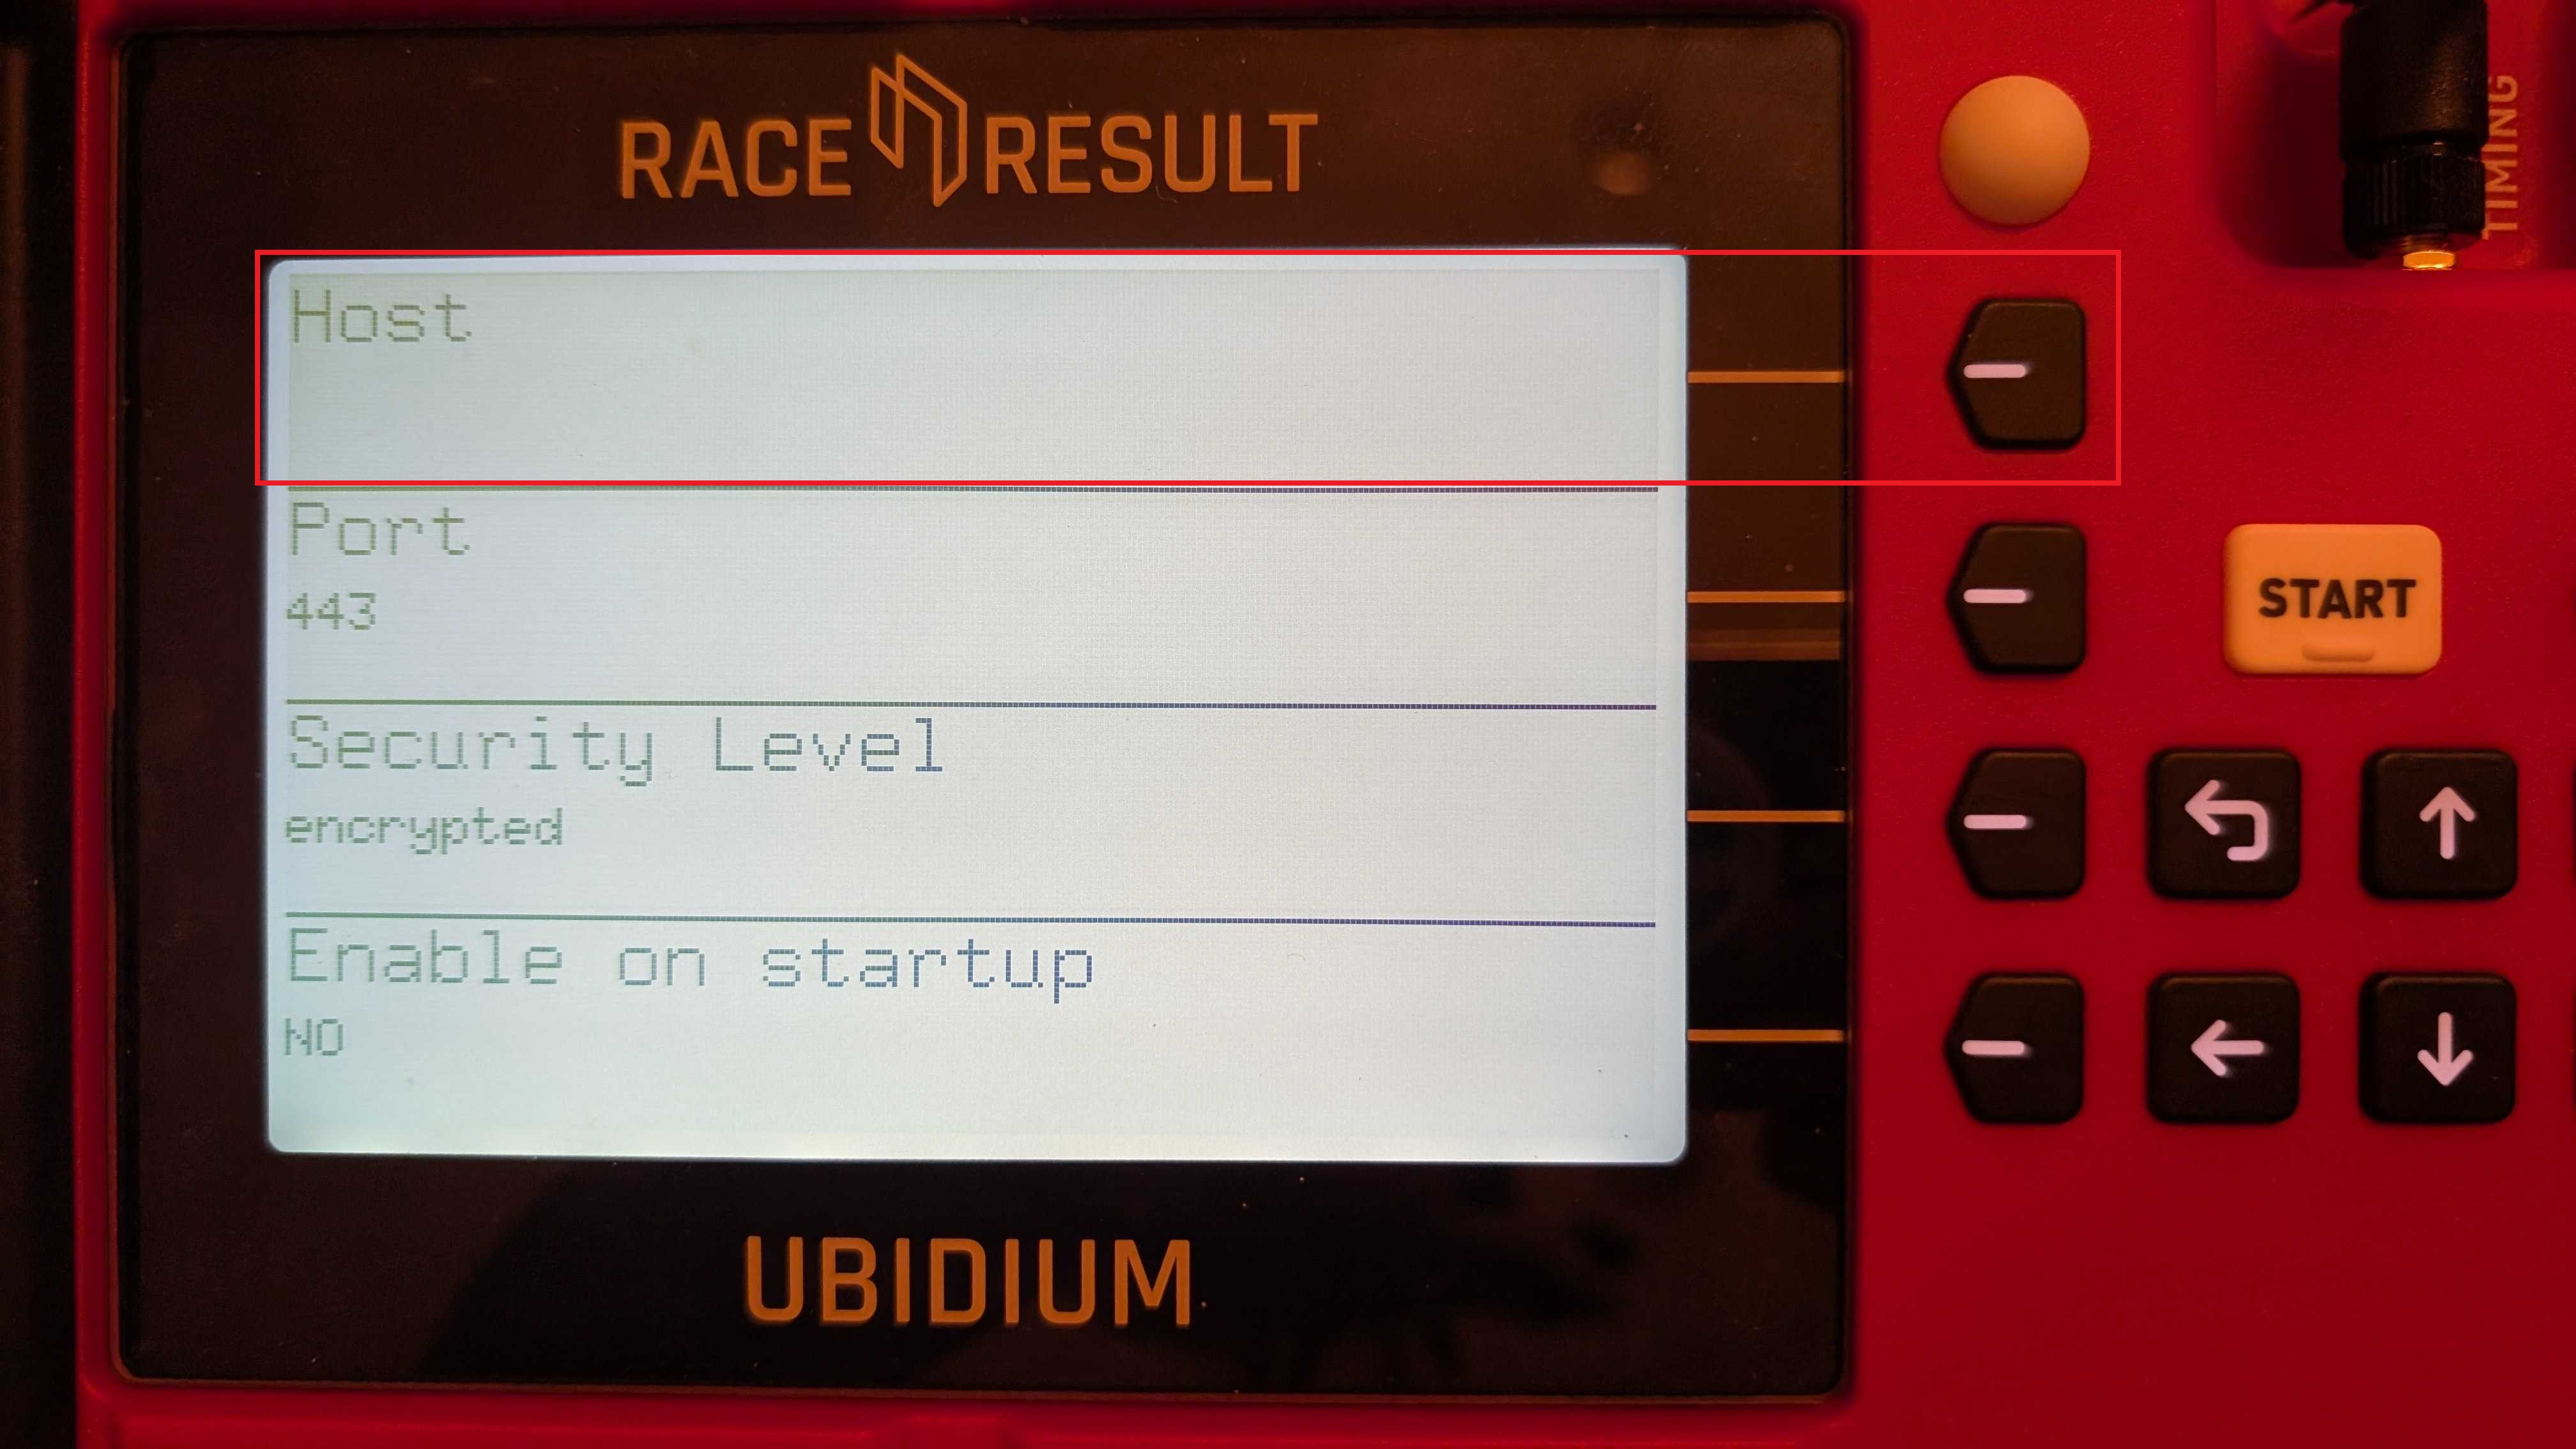
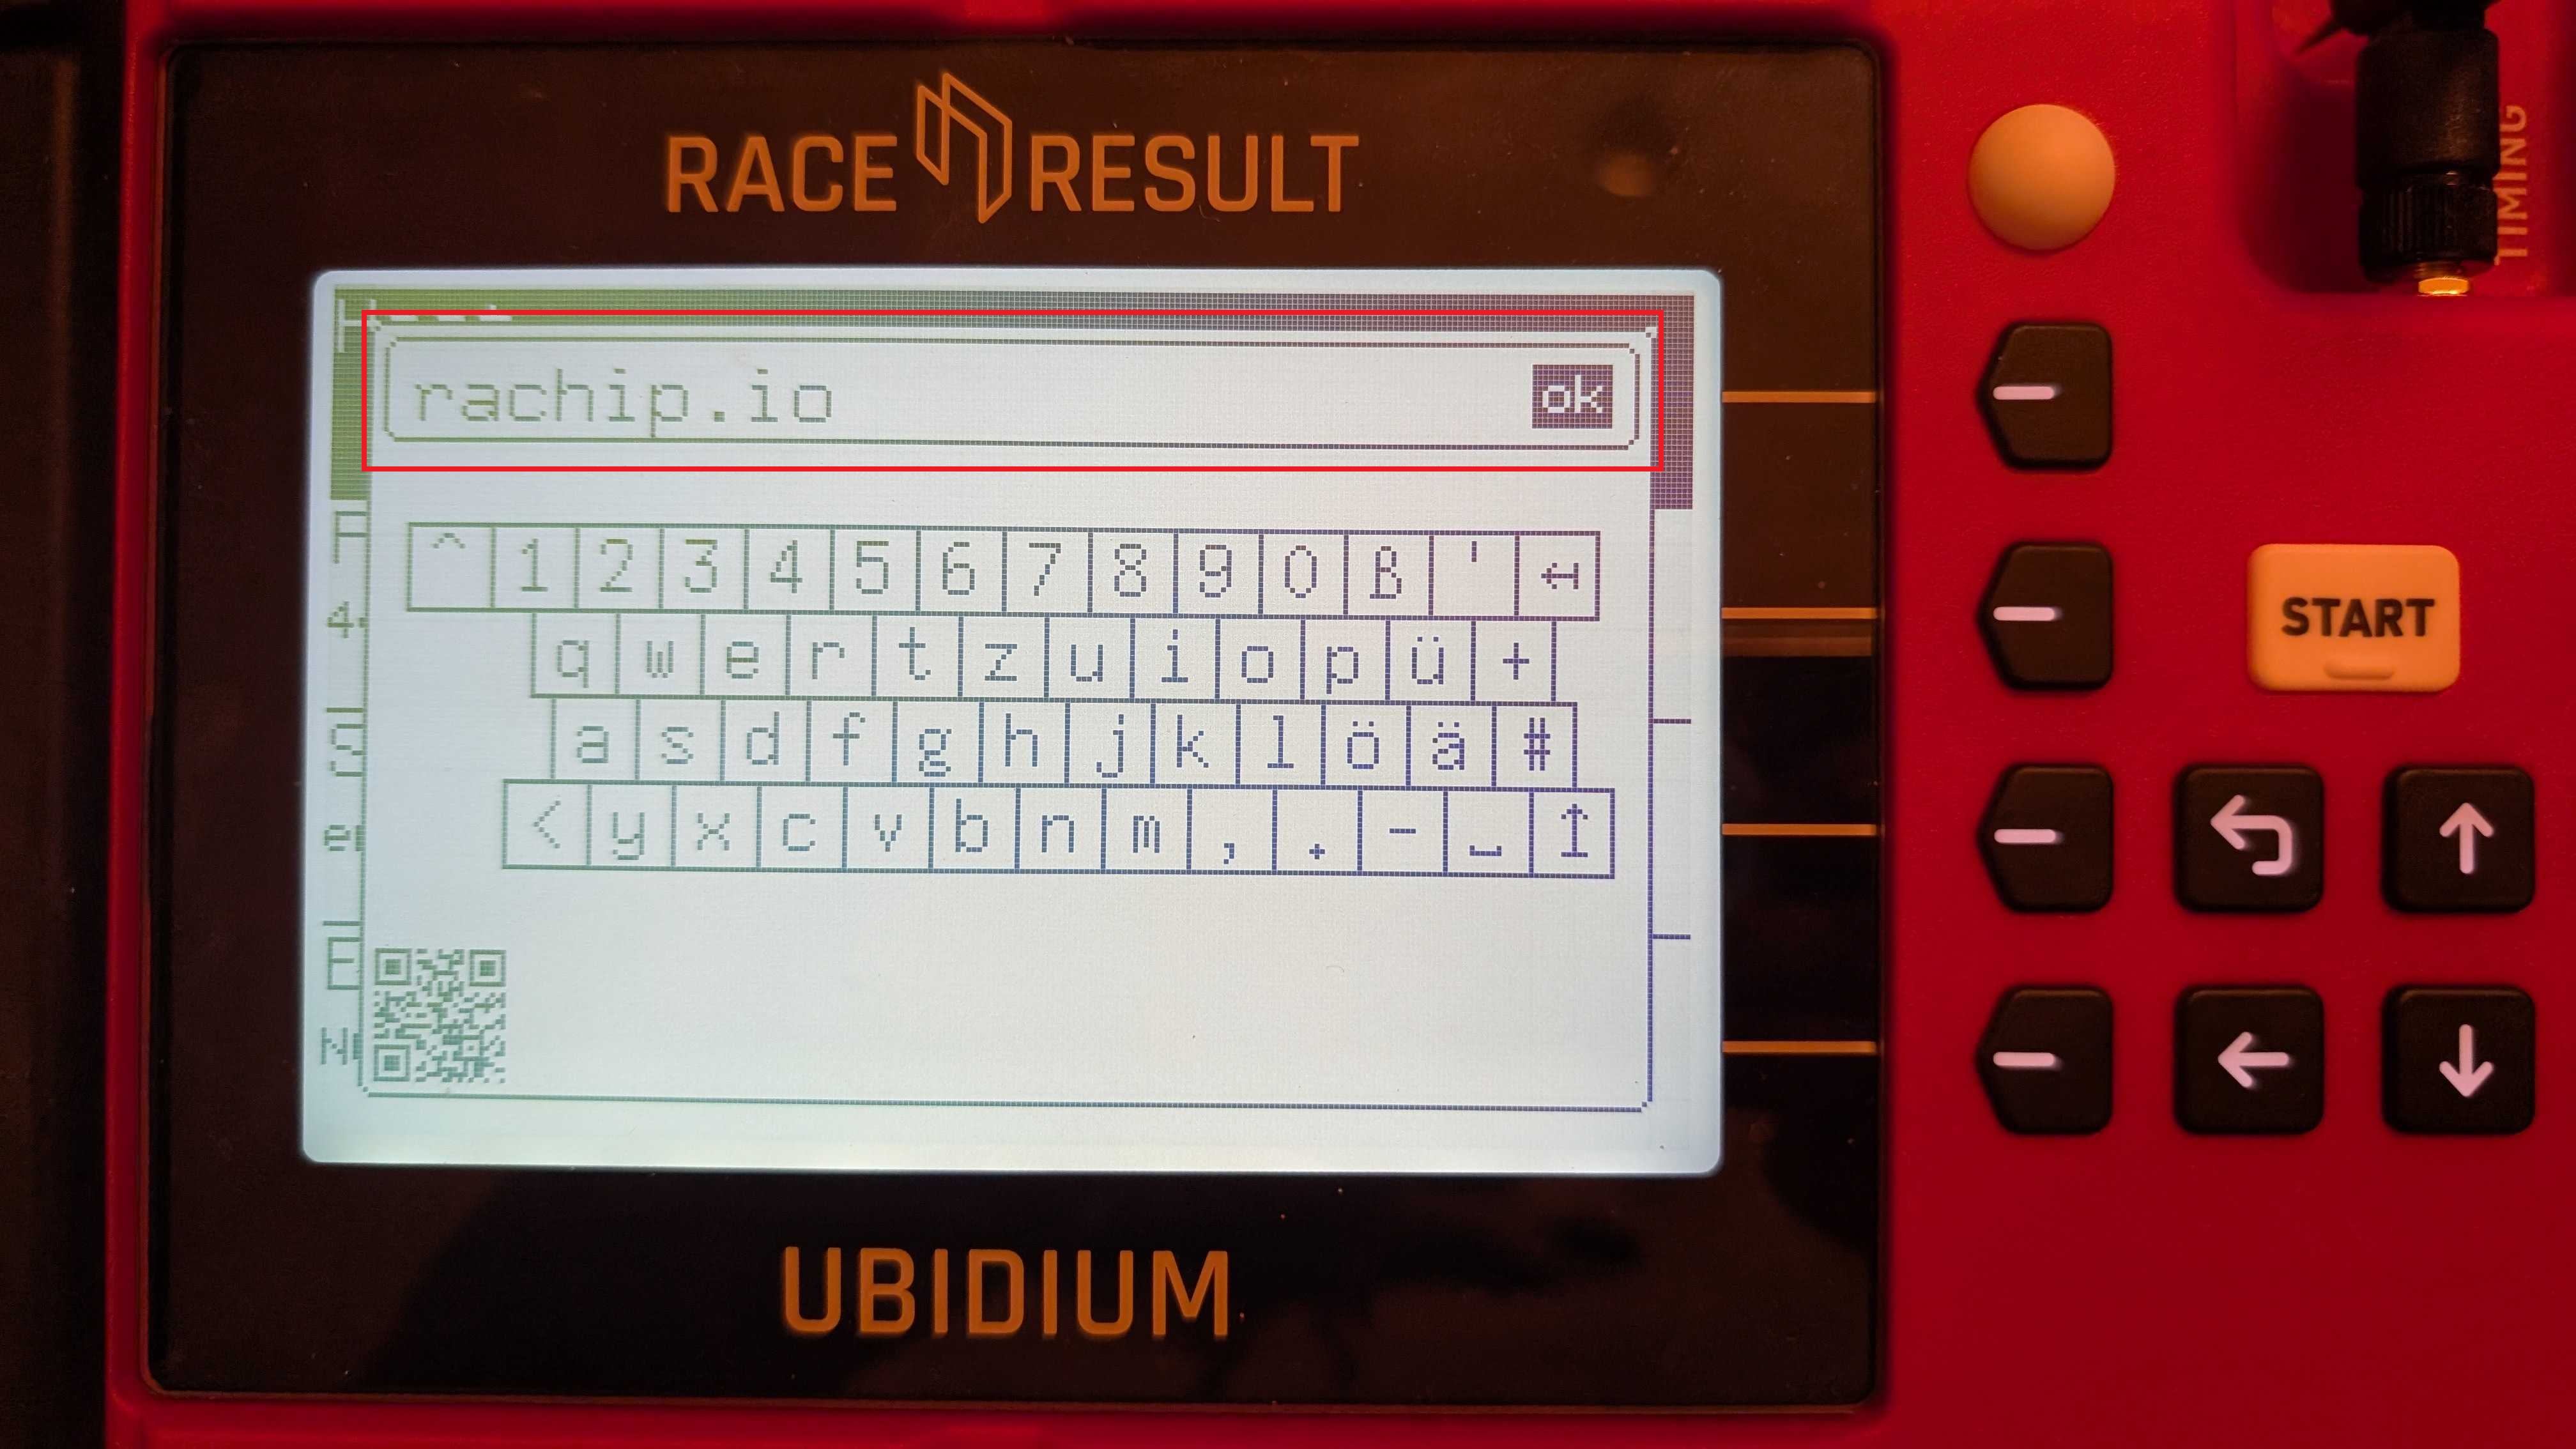
- Type in rachip.io and click OK.
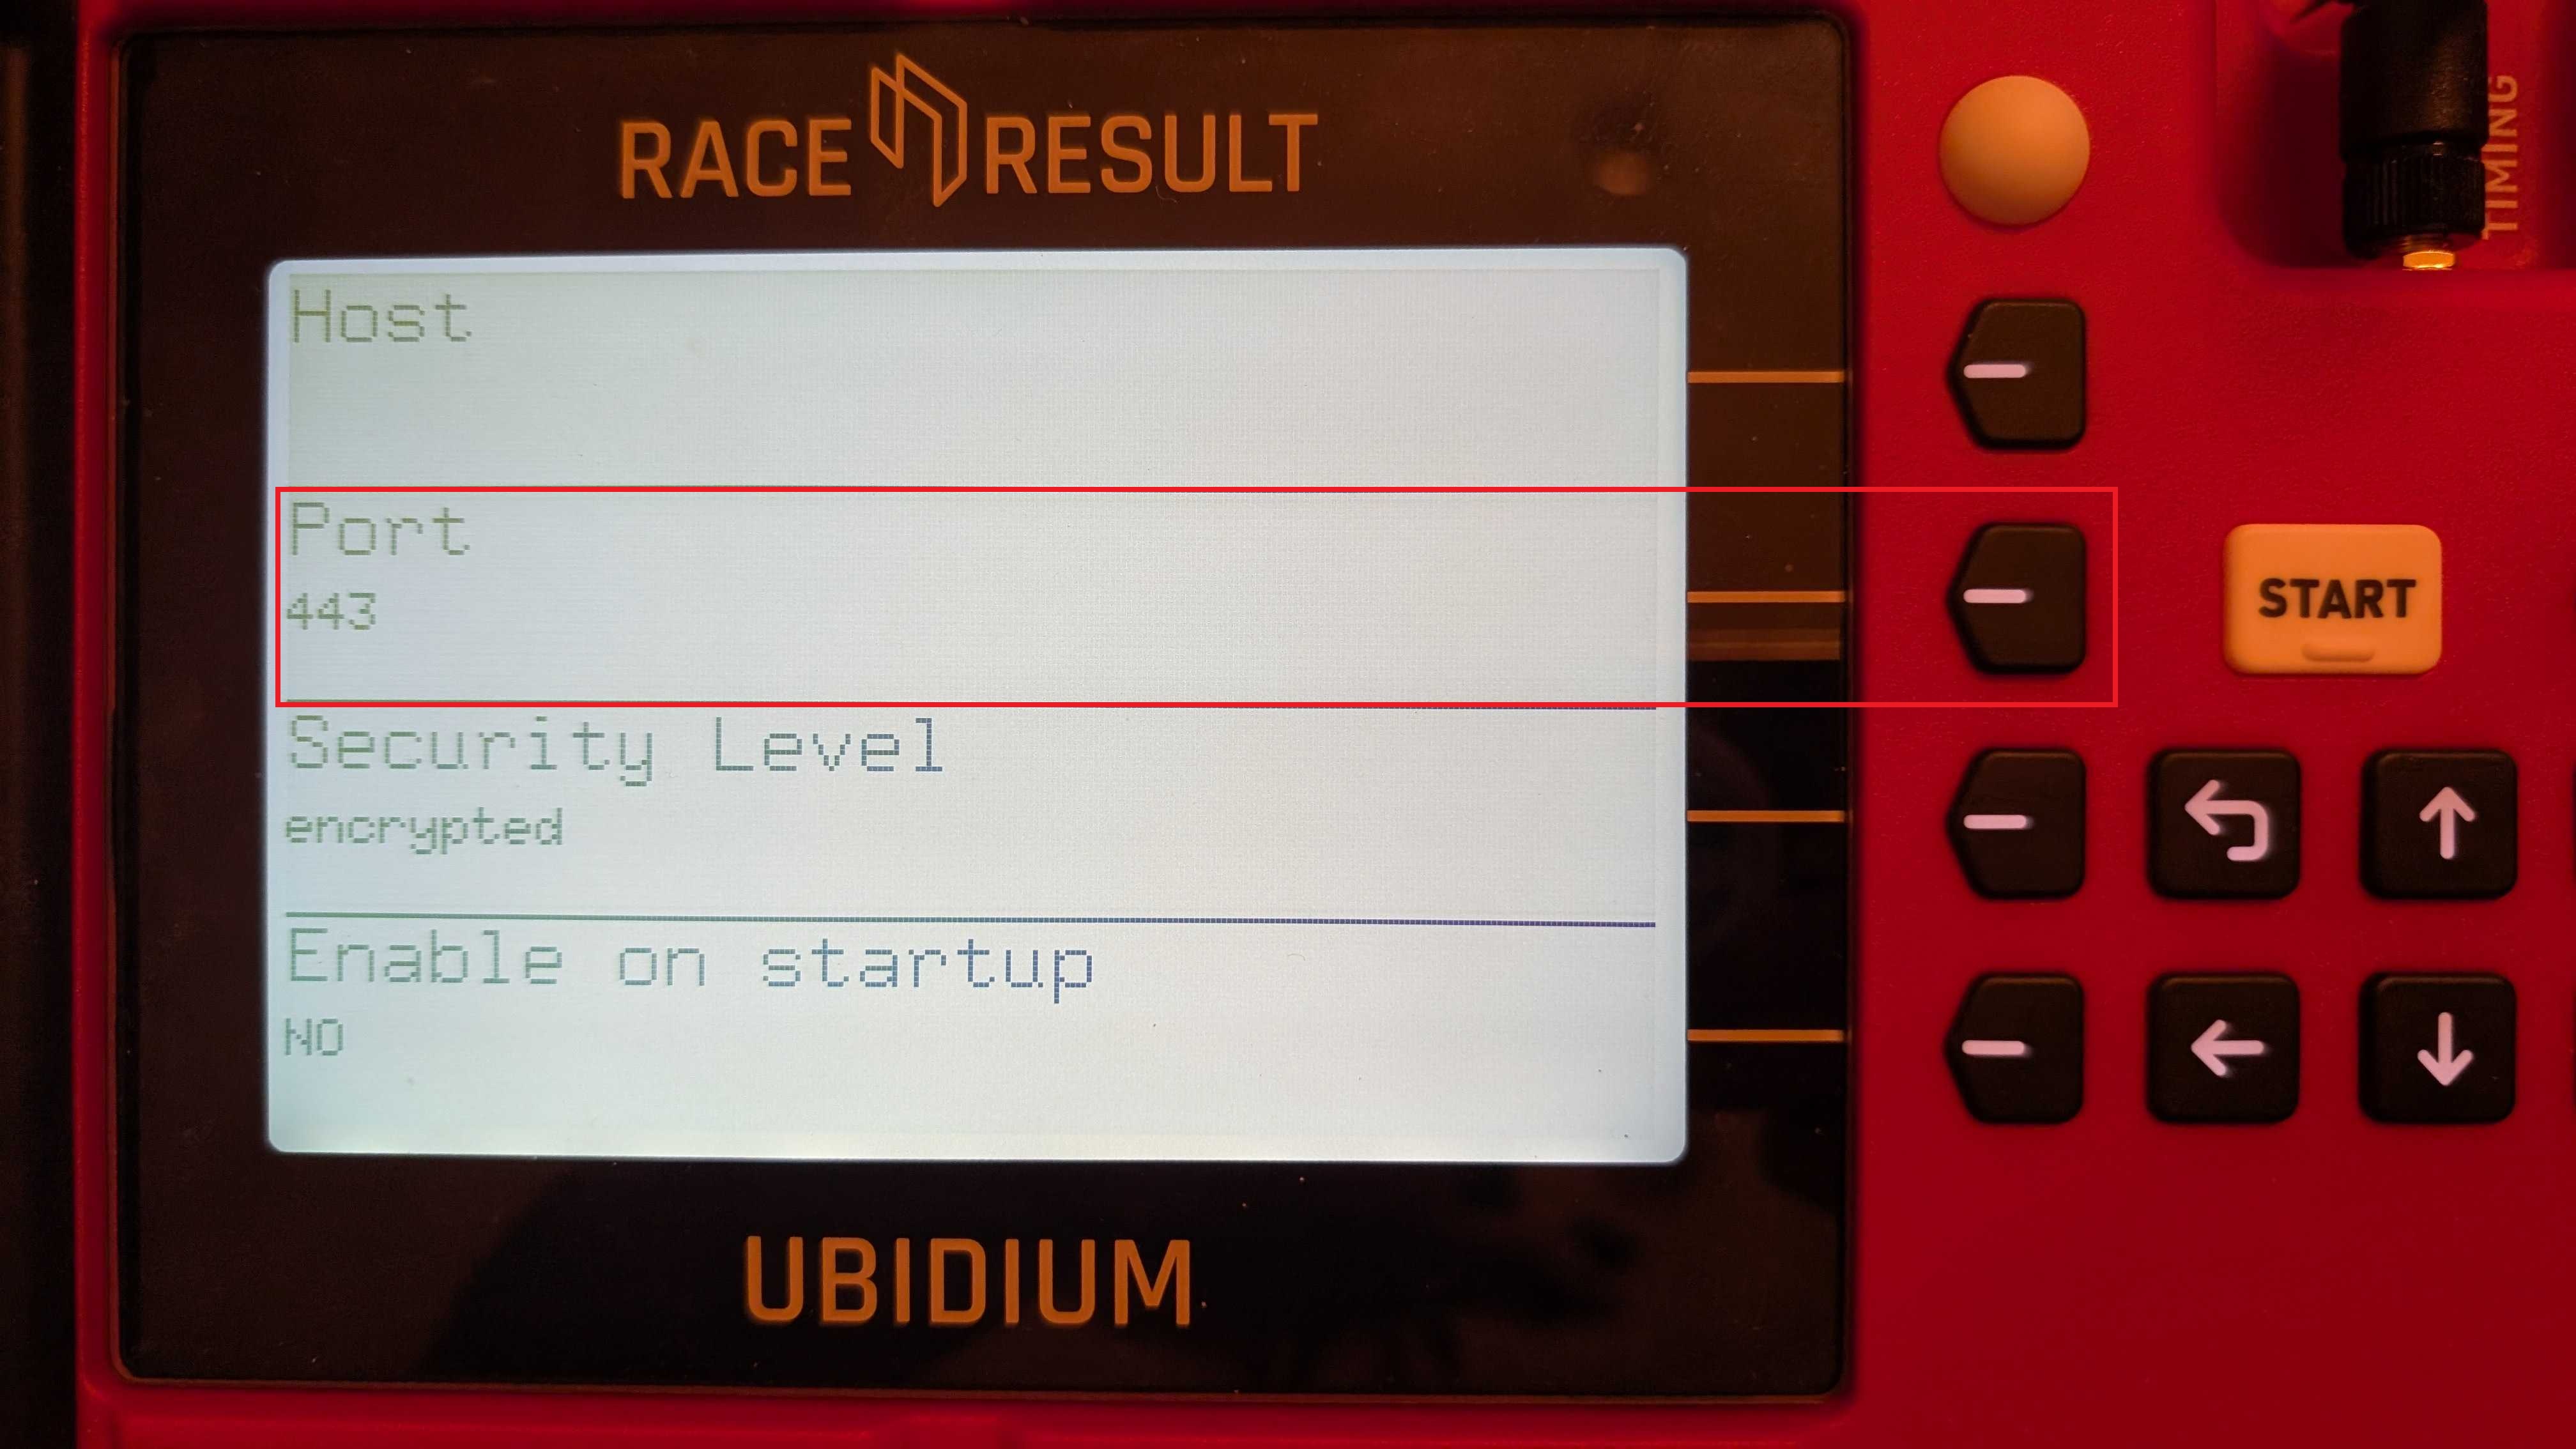
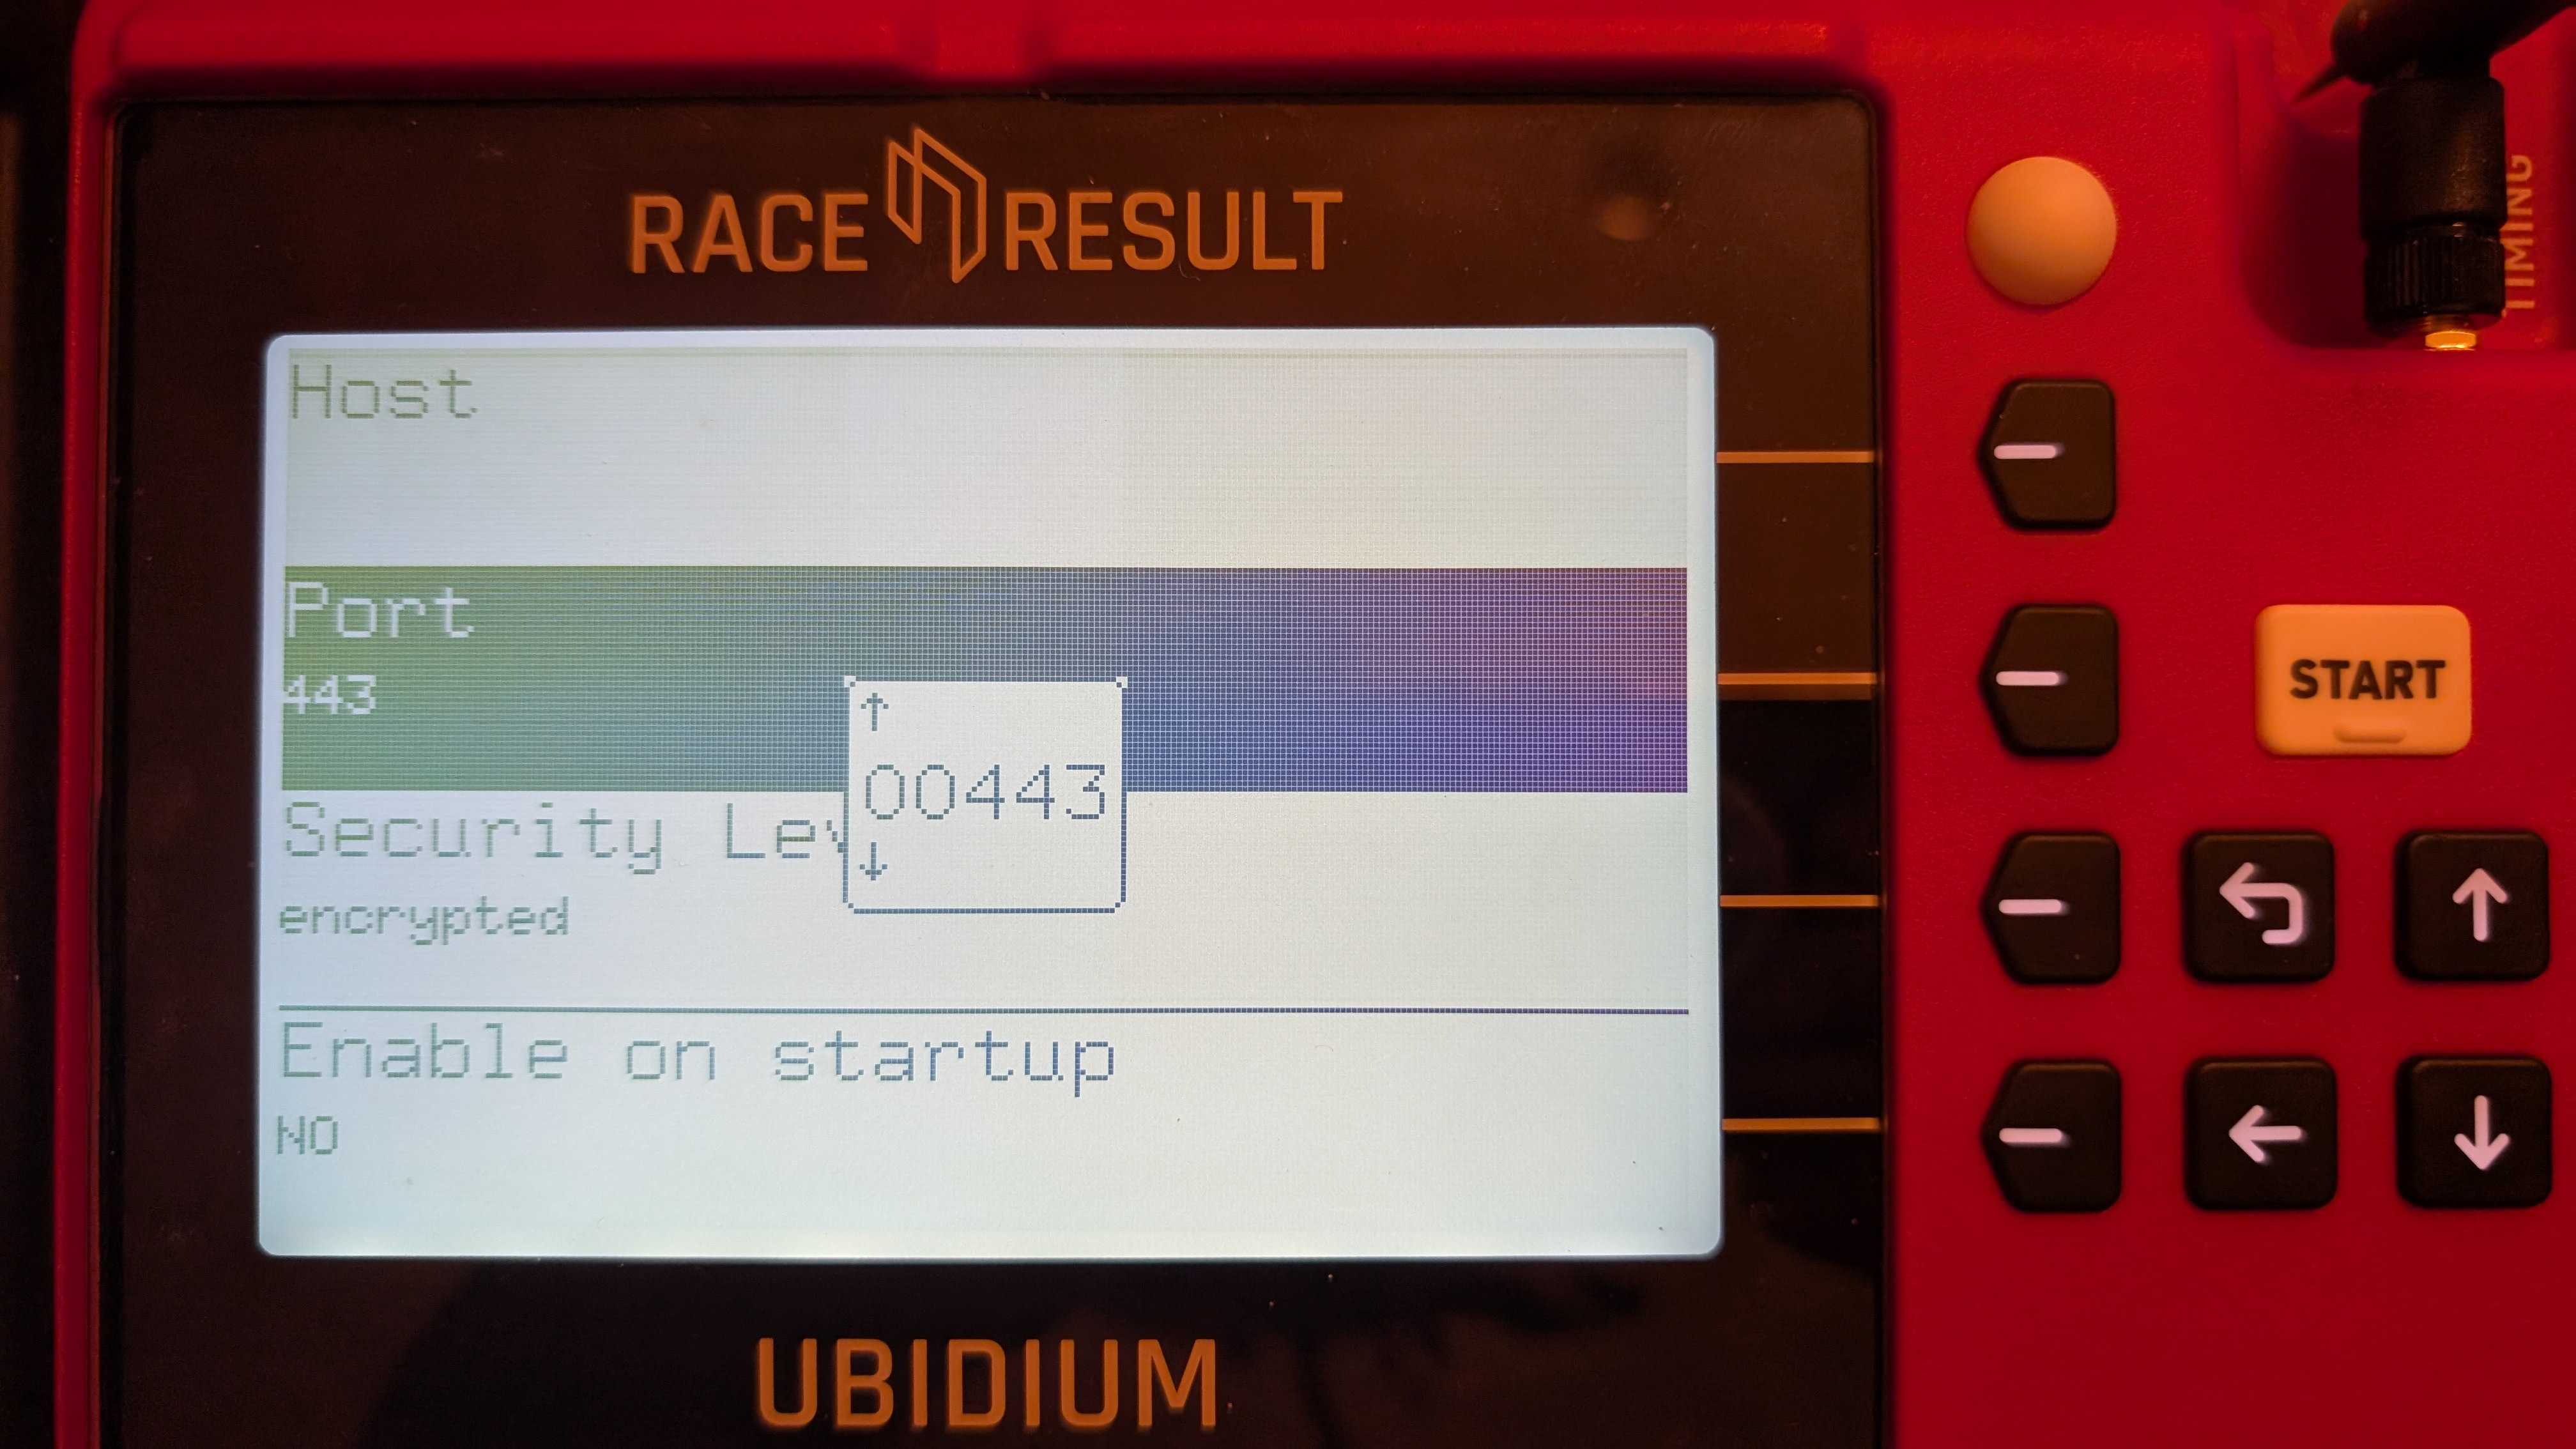
- Click Port, type in 443, and click OK.
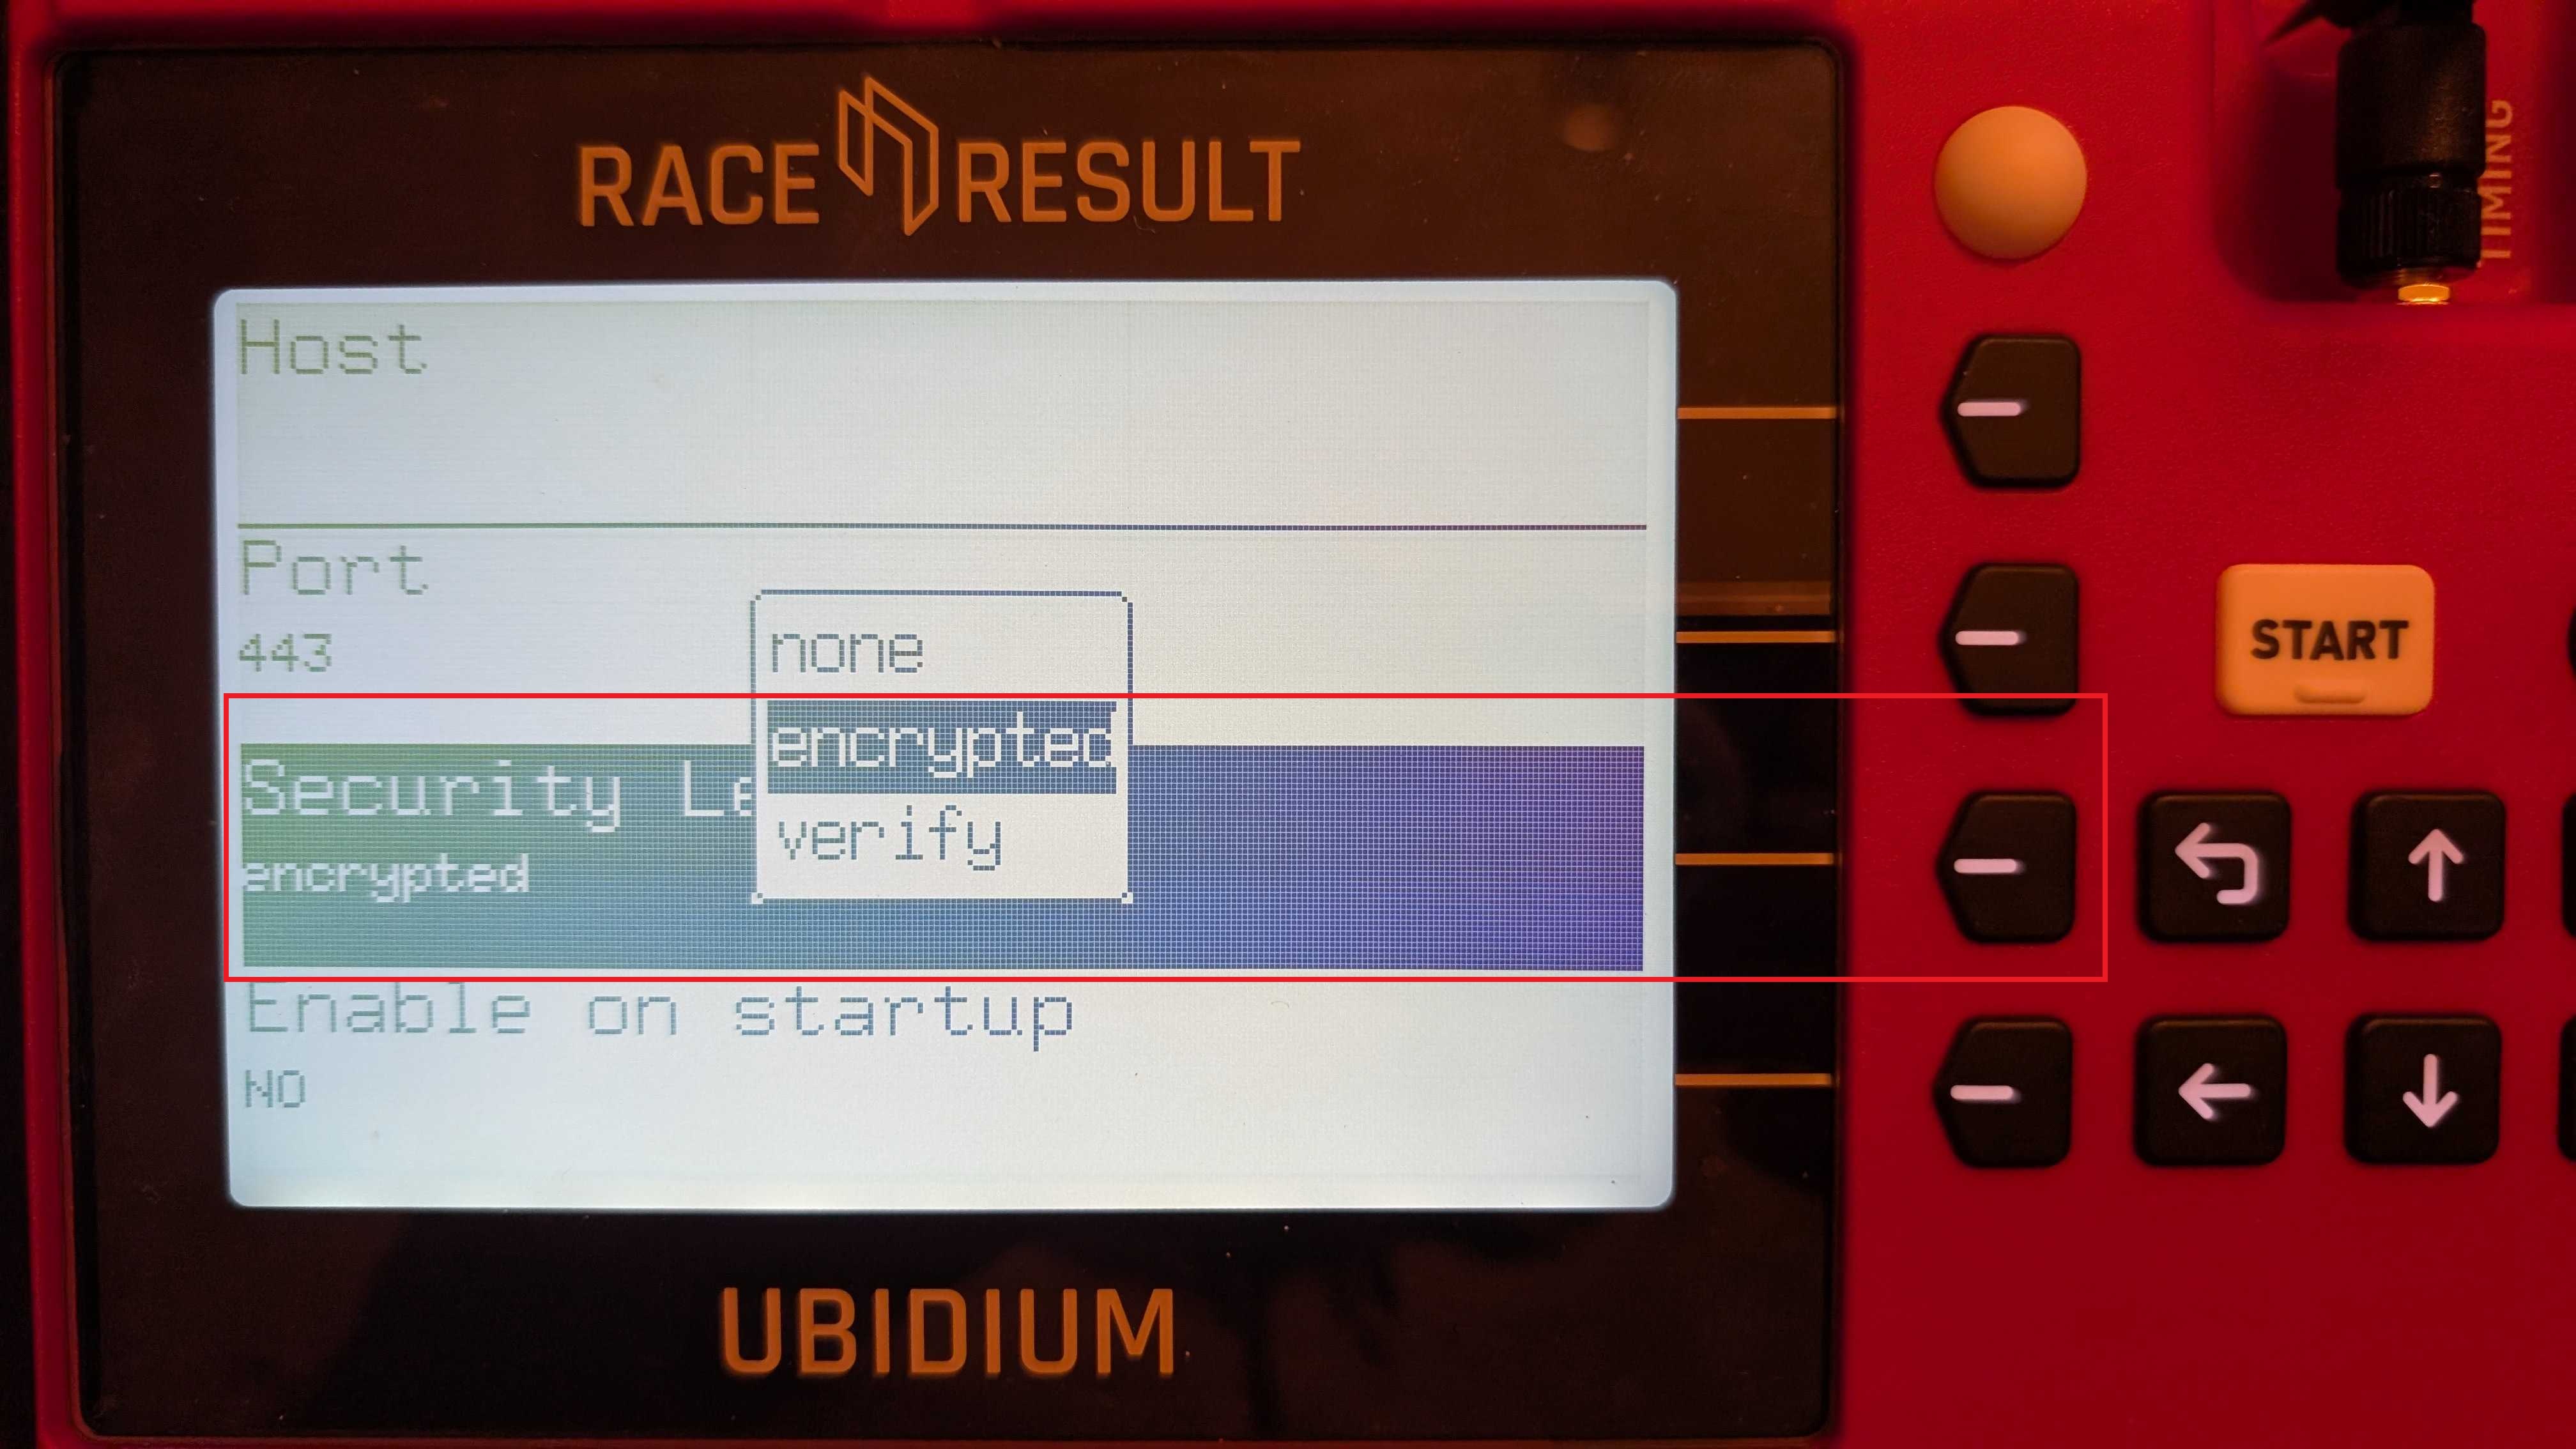
- Click Security Level and select Encrypted, then click OK.
- Finally, set Enable on startup to Yes and click OK.
- Click the back button.
- Ensure enable/disable is set to Enabled.
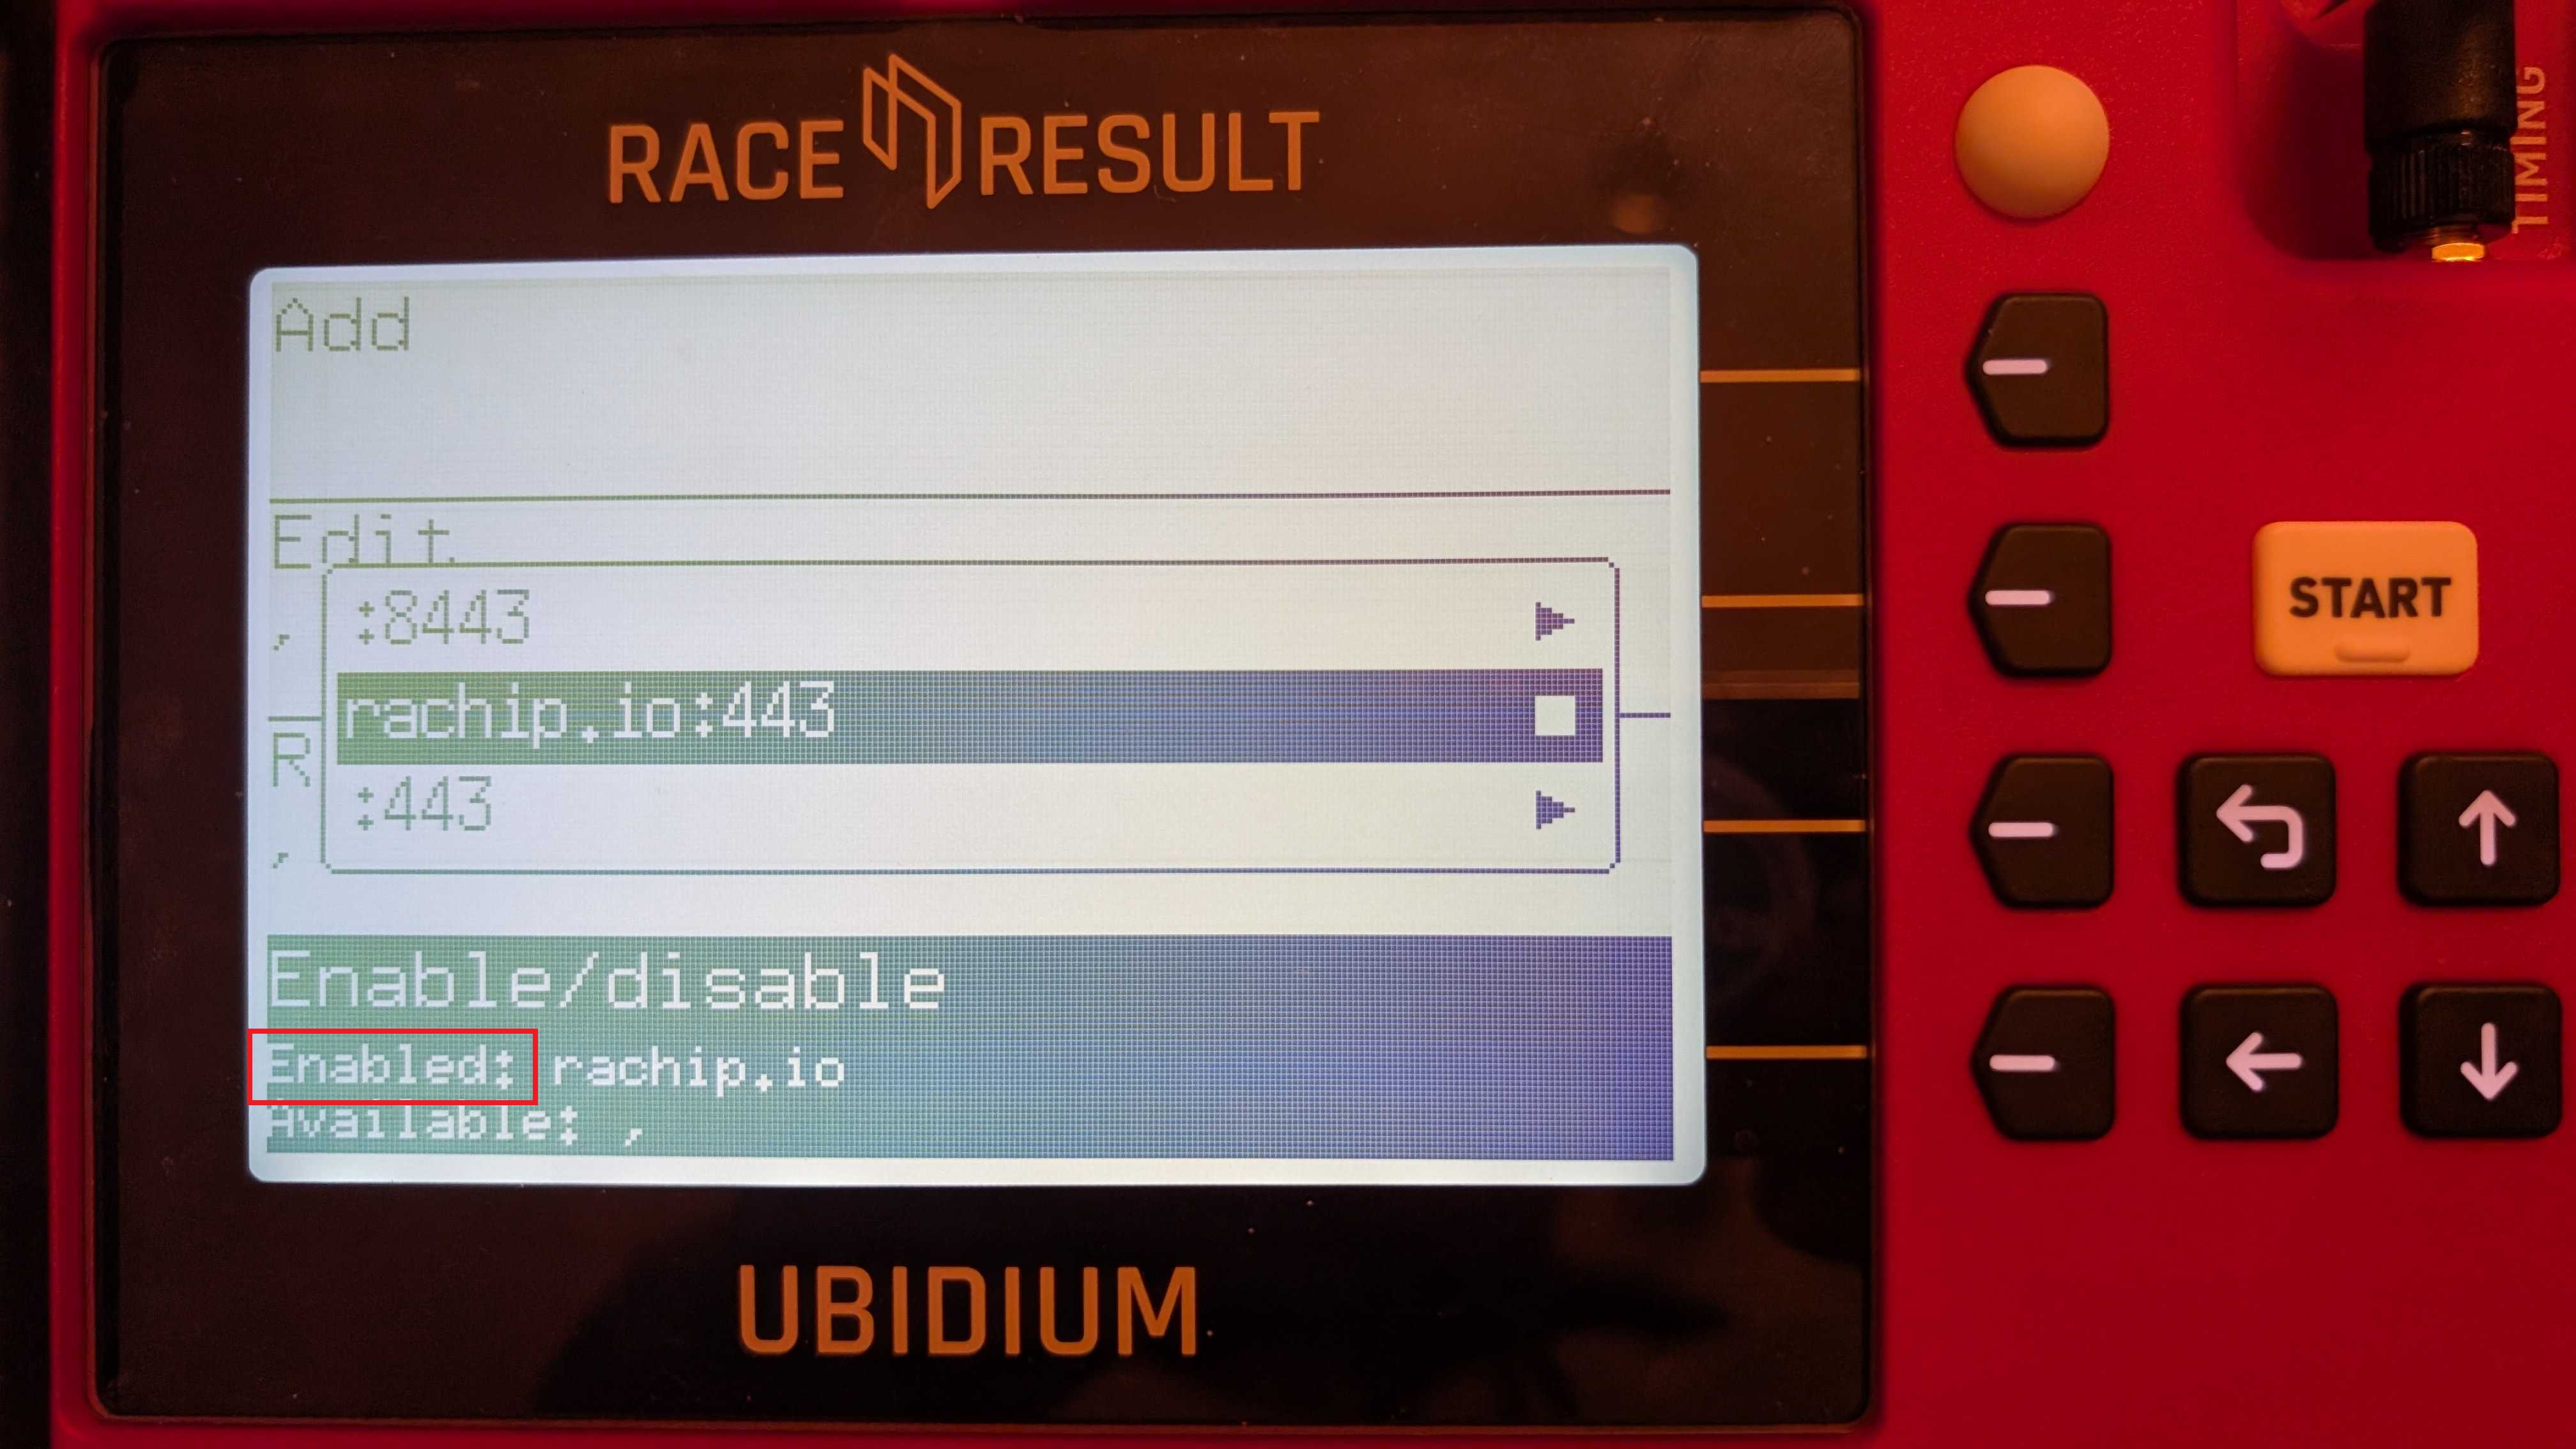
- Click the back button three times until you’re back at the main menu.
- You can now continue configuring in Roster Athletics.
Set up in Roster Athletics
Organiser devices
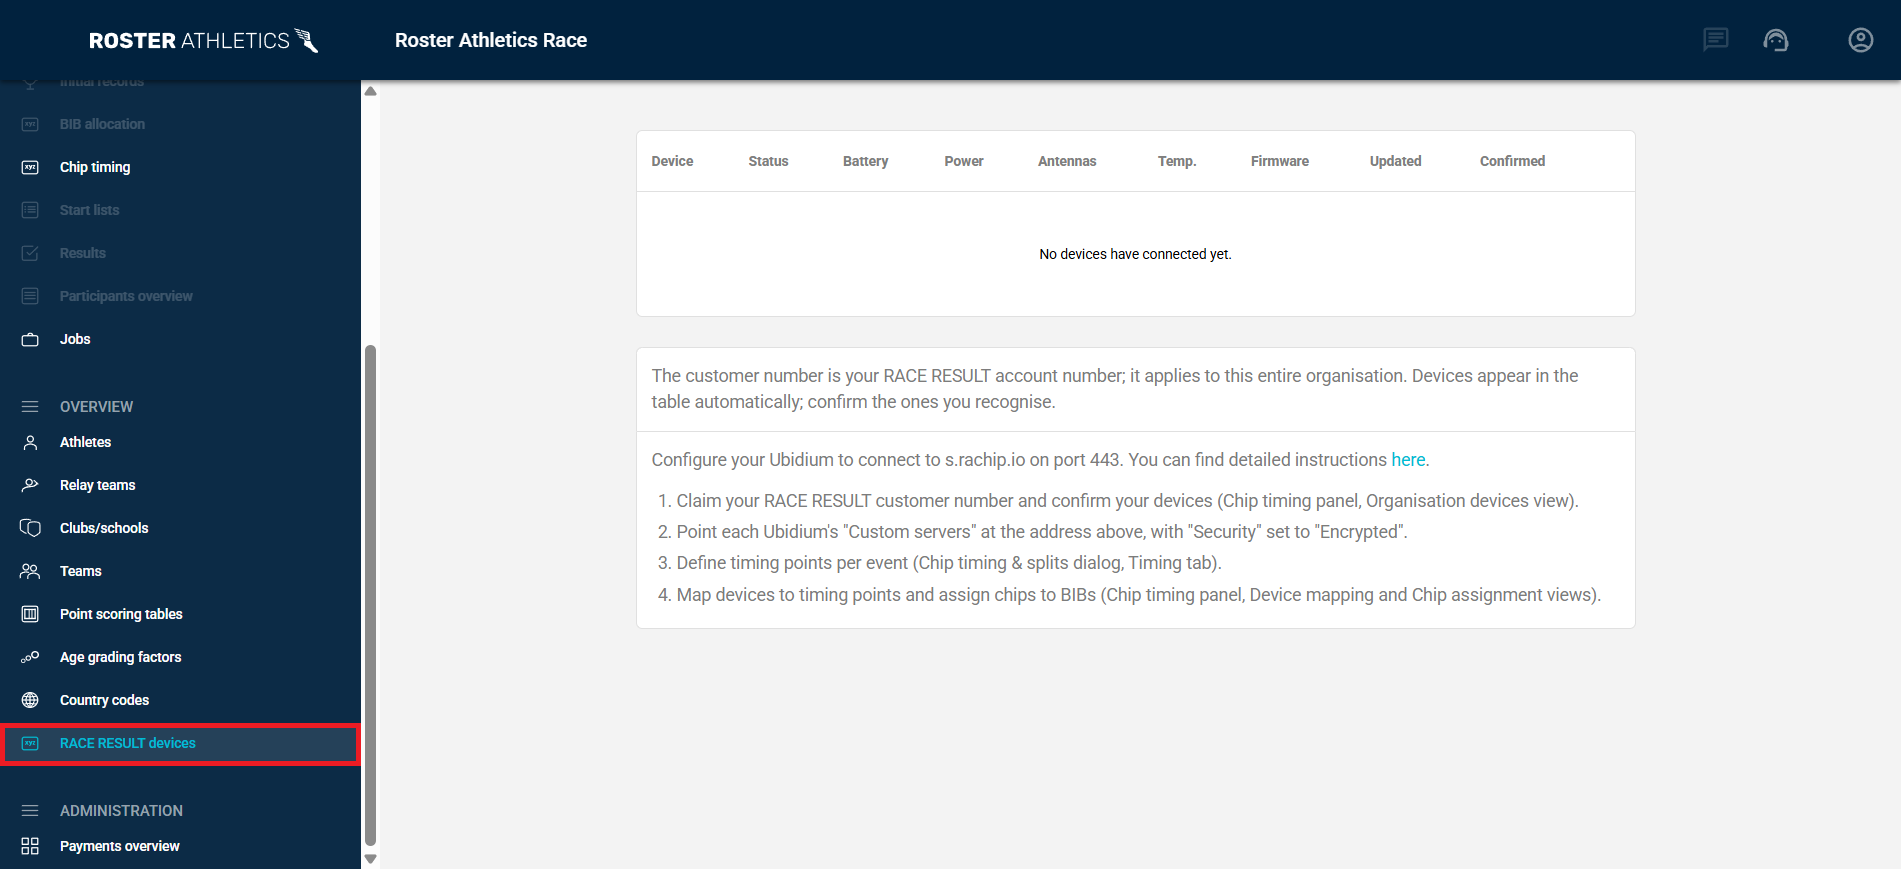
If the Ubidium setup was successful, you will see your devices in your organisation's device list on Roster Athletics. Select OVERVIEW → RACE RESULT devices from the left-hand menu, enter the RACE RESULT customer number in the Customer number field and save.
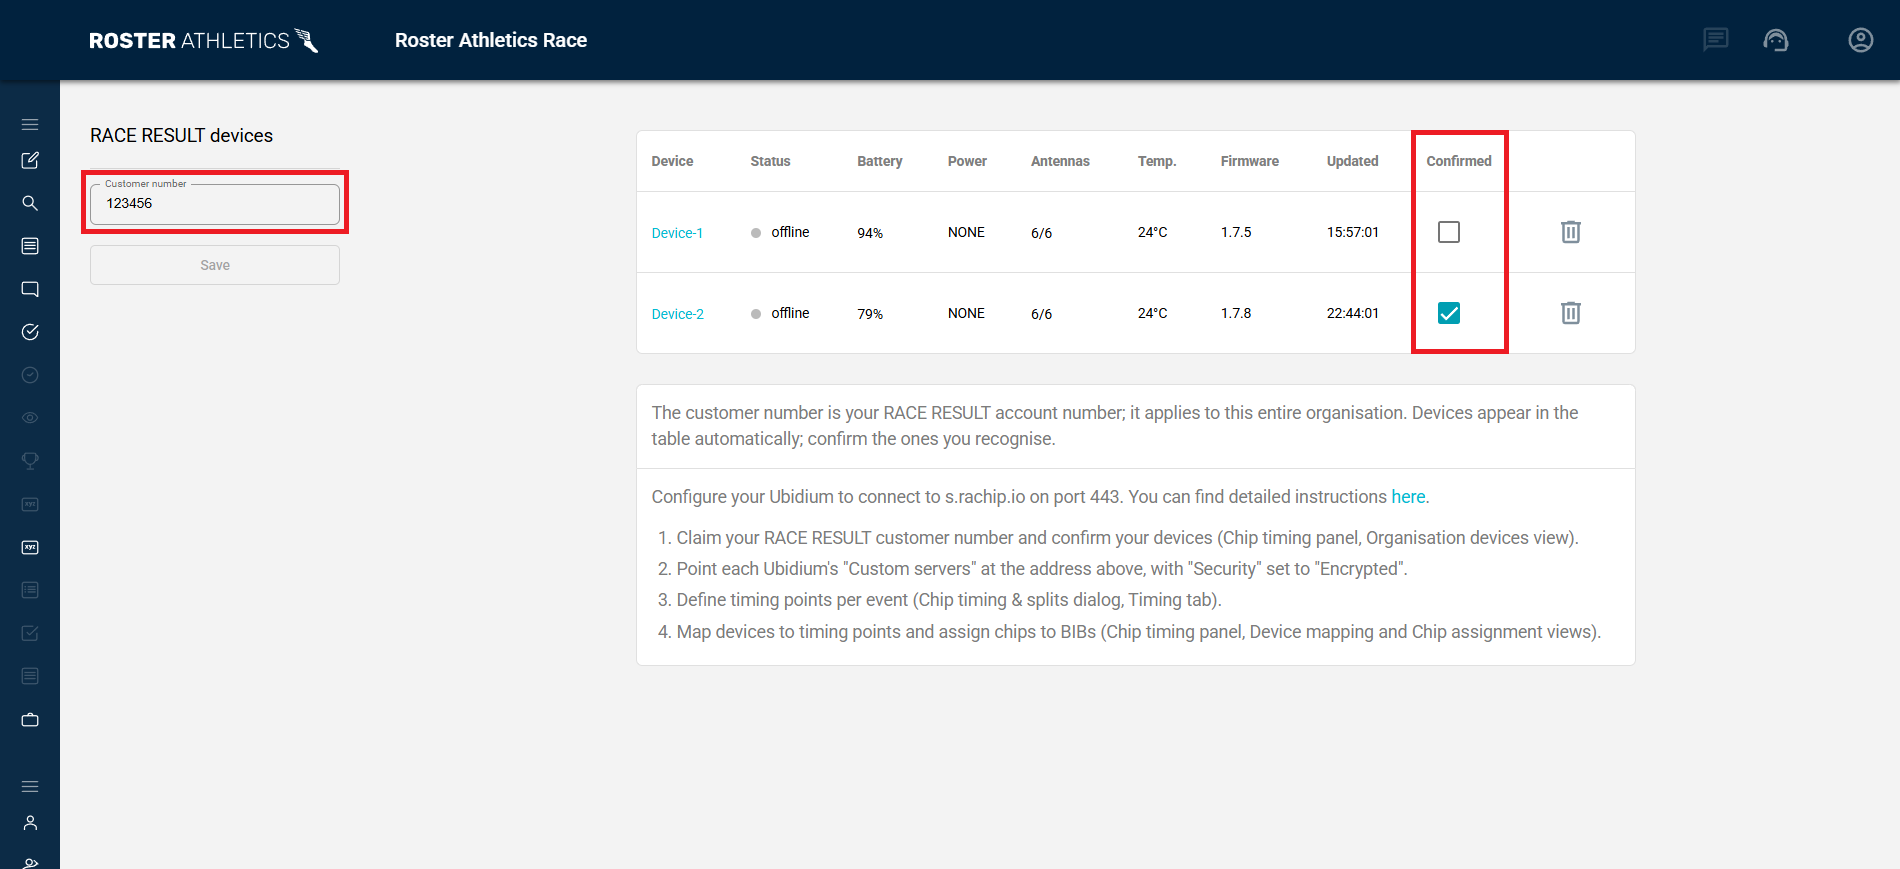
The customer number applies to the whole organisation and cannot be reused by another organisation. Devices appear in the table automatically; confirm the ones you recognise by clicking the checkbox in the Confirmed column.
Timing points
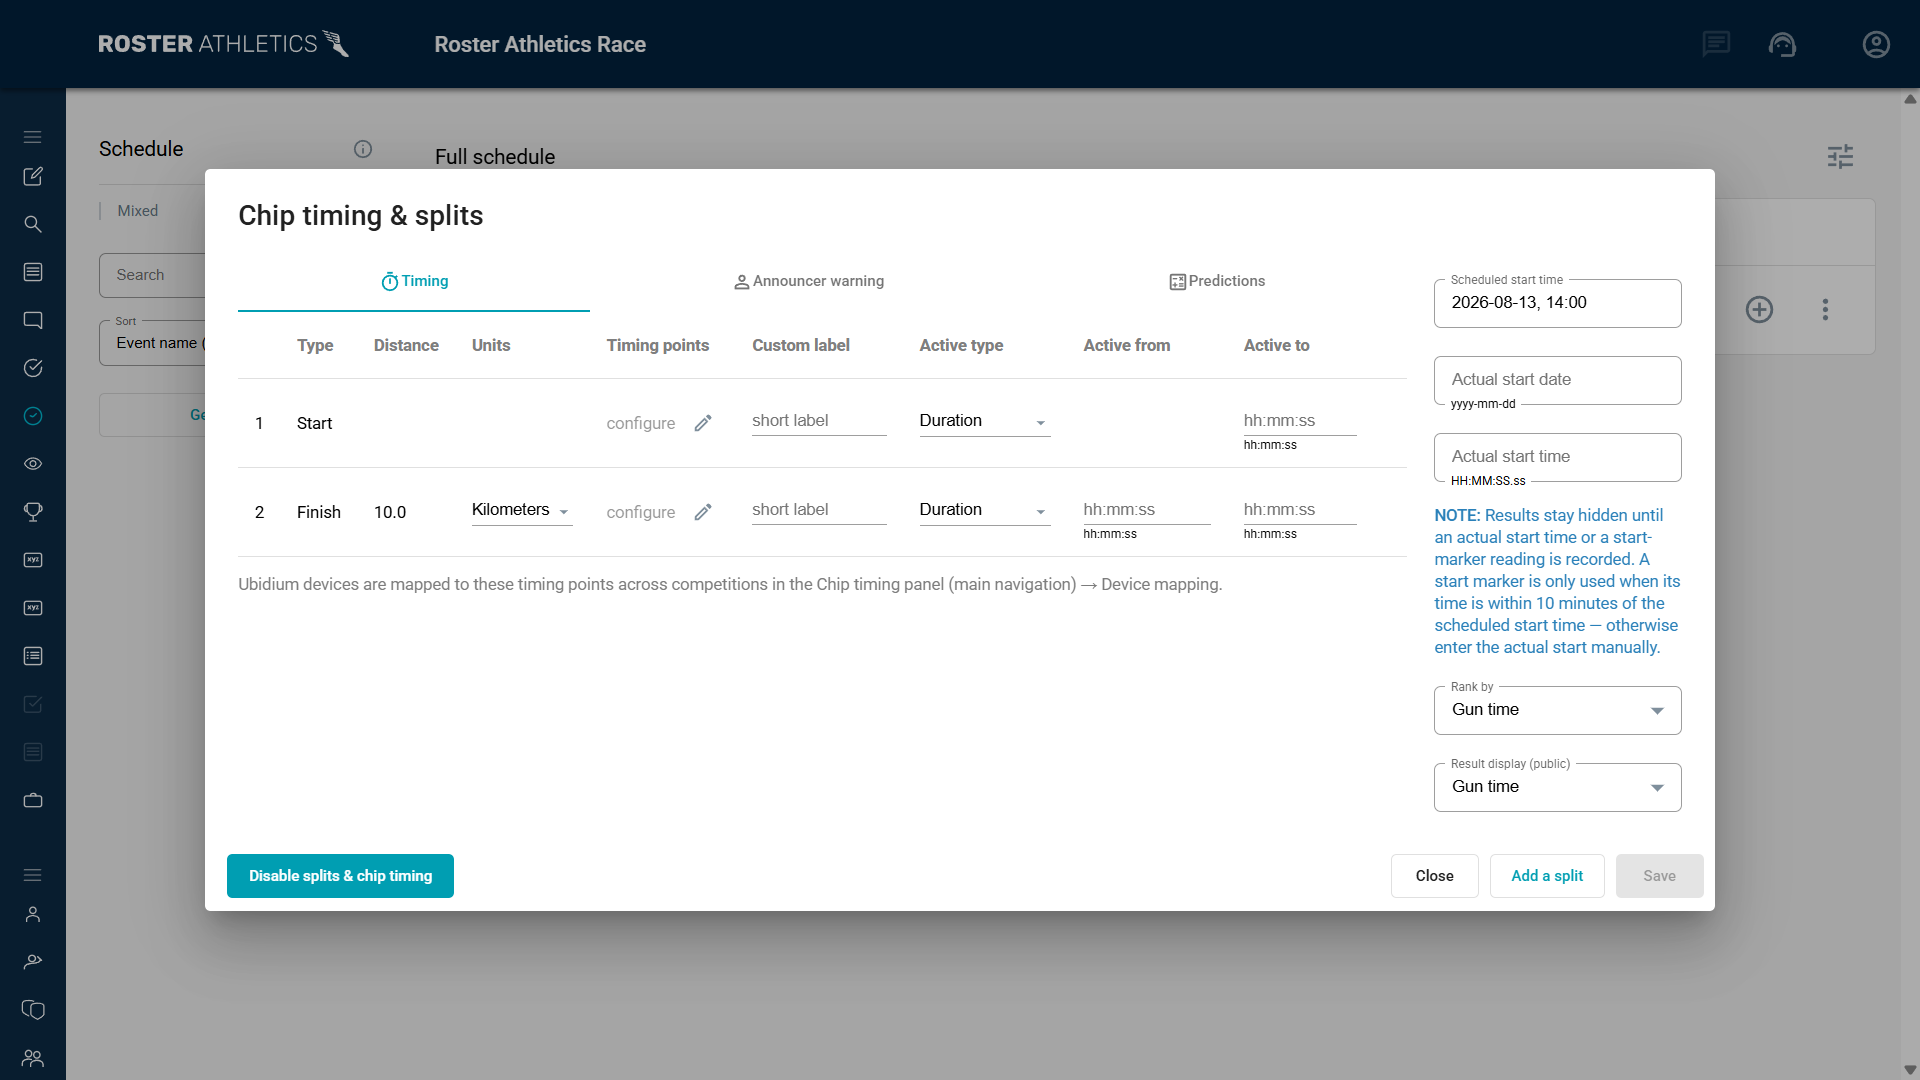
In Roster Athletics, go to the Schedule page. Click the three-dot icon next to the event, select Chip timing and Enable splits & chip timing (you can also access this from the event options in the start list and results views). Here, you can define all the timing points you want to use for the event (Timing tab; read more below), configure the announcer overview (Announcer warning tab; read more in the RACE RESULT integration: race announcer overview guide), and see the predicted times for each split (Predictions tab; read more below).
Please note: The Chip timing option is available only for events from the Distance category within Roster and when the RACE RESULT integration is enabled in the competition details (Details → Timing system integration → RACE RESULT integration → Direct/Legacy).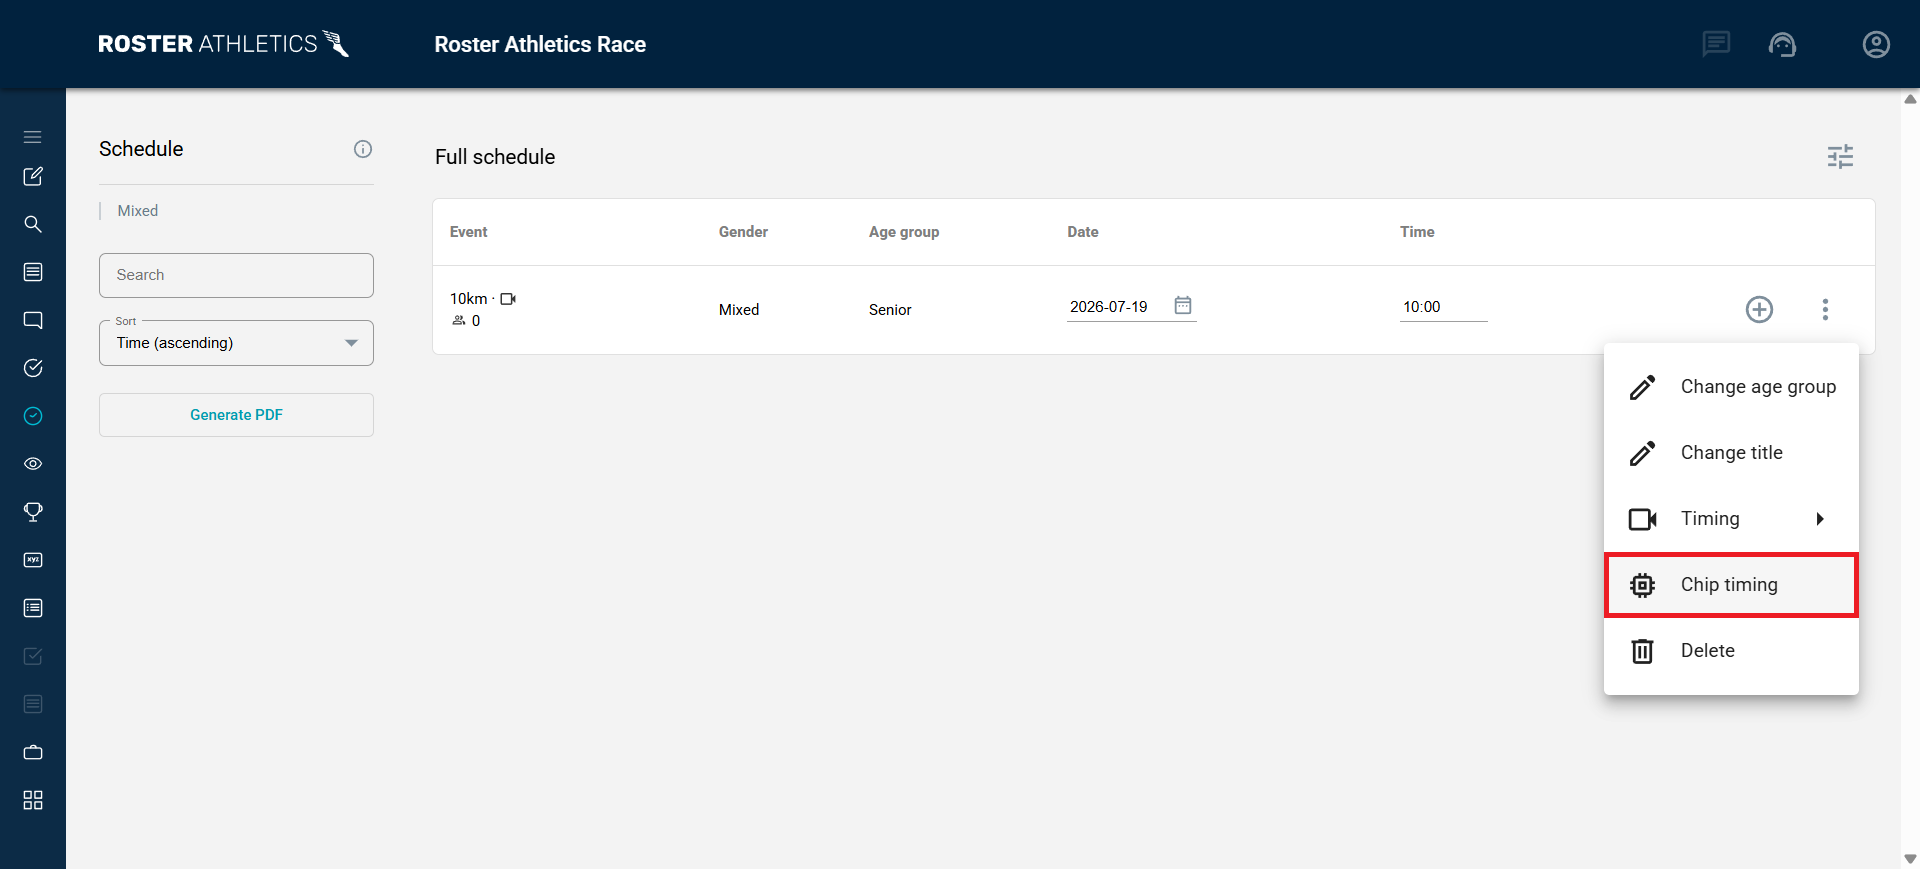
You must add at least one timing point for Finish by adding the timing point name in the Timing Points field.
If you wish to register net times, add the timing point name for the start. Note that this can be the same timing point as the finish if the race uses it that way.
Splits
If your race has splits, add them to the Chip timing & splits view. Click the Add a split button and add all of the following information:
- Type - select if it is Start, Finish or Split point
- Distance - split distance
- Units - distance unit. Available options:
- Kilometres
- Metres
- Miles
- Feet
- Timing Points - any name
- Custom label (optional) - add a short label that will be visible in public results instead of the split distance (e.g., Lap 1)
- Active type- choose the type of the range when the point is active. Available options:
- Duration
- Pace (min/km)
- Speed (km/h)
- Active from (optional) - the start value (HH:MM:SS) for the selected type
- Active to (optional) - the end value (HH:MM:SS) for the selected type
Please note that you can set multiple timing points per split. This may be desired in cases such as a double-wide finish line (2 mats used for an extended finish line) or when a backup timing point is needed for a particular split (e.g., the finish line) in case the primary timing point doesn't register a time.
To add more splits, click the Add a split button once again.
Start time
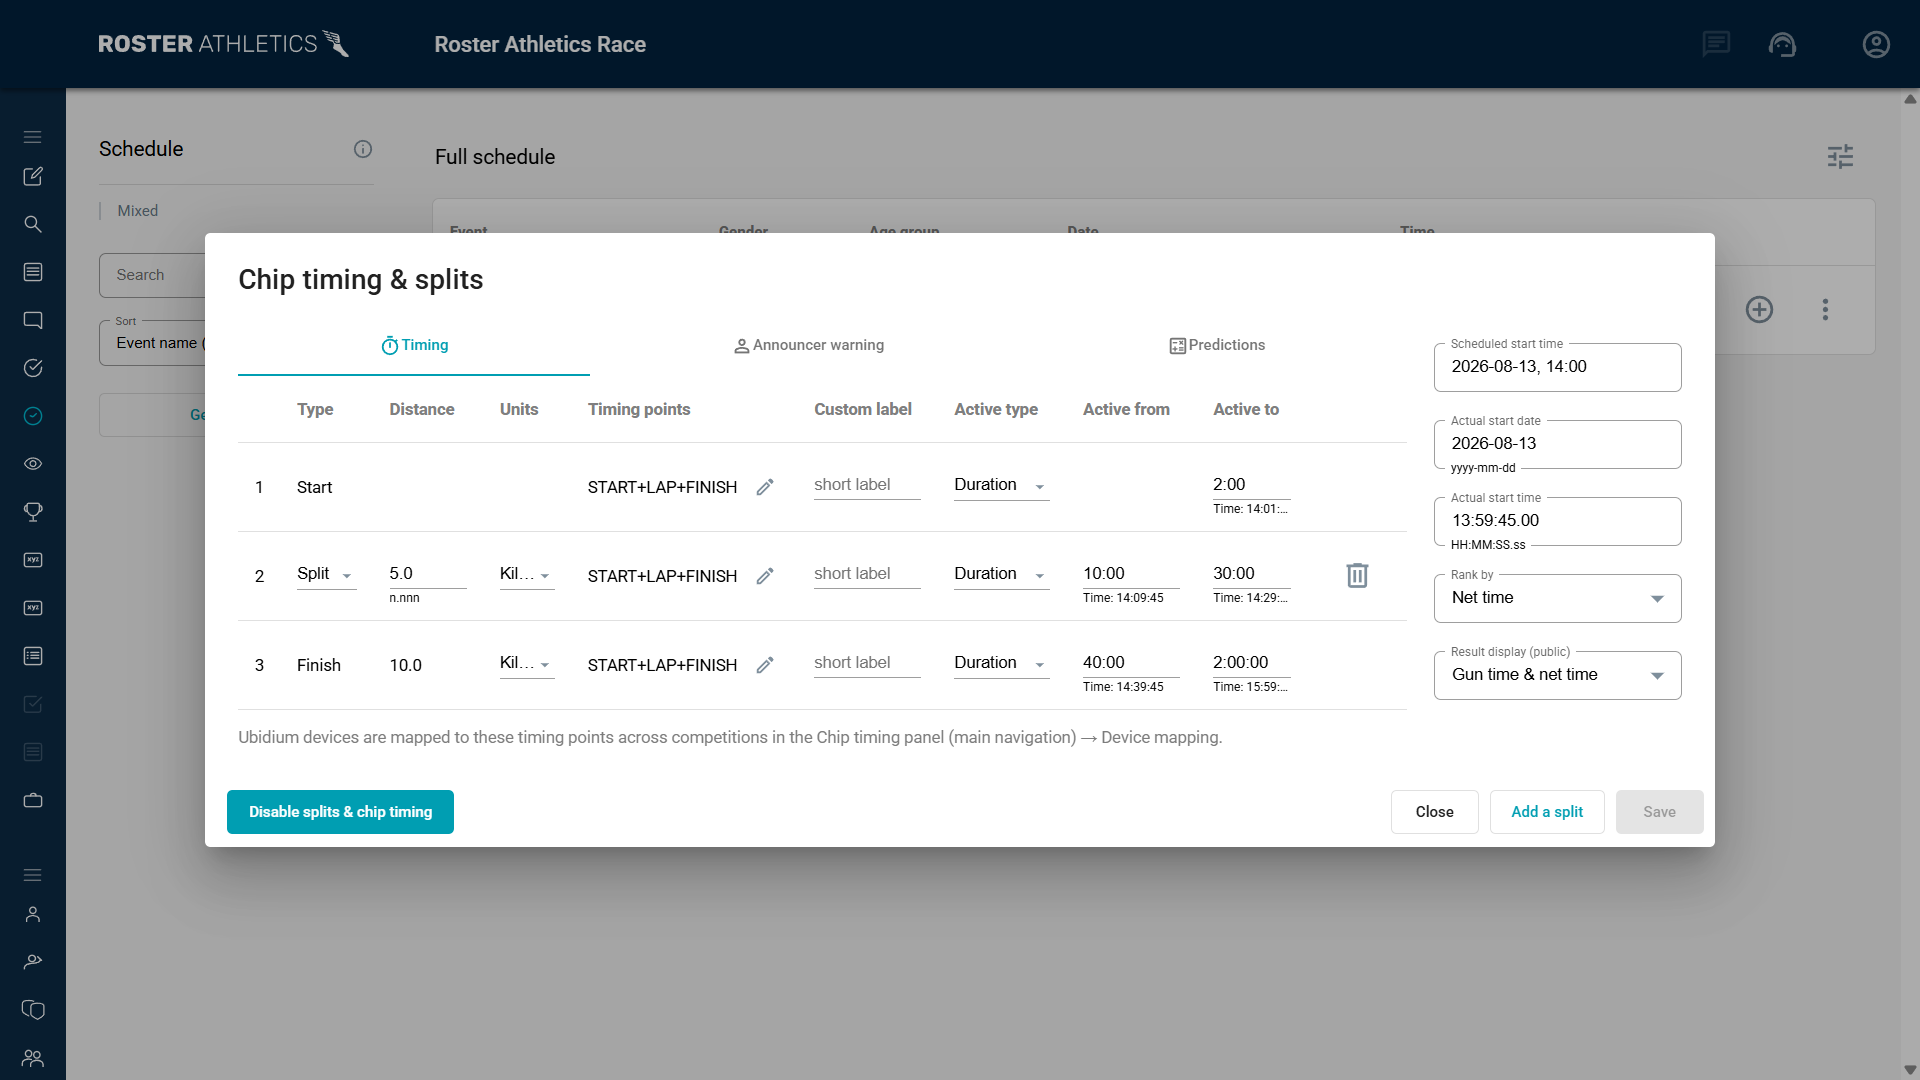
In the upper right corner of the Chip timing & splits view, you will see the race's Scheduled start time. To trigger the calculation of splits and results, you need to manually enter the Actual start date and Actual start time or use a start marker. Manually entered start time takes priority; otherwise, it's populated from the marker, which automatically adds the actual start time if it is within 10 minutes of the scheduled start time.
The example below illustrates a 10km race with the same timing point (name = START+LAP+FINISH) for the start, split at 5km, and the finish line (i.e., a 5km loop that runners run twice). The start is open from 13:59:45 (actual start time, manually added) to 2:00 minutes after the start. The 5km split is open from 18:00 to 30:00, and the finish is open from 40:00 to 2:00:00 after the actual start time.
Ranking and displaying results
You can decide what parameter should be used to rank athletes:
- Gun time - sort by gun time,
- Net time - sort by net time,
- Mixed (X first by gun time) - sort X first athletes by gun time and the rest by net time.
You can also decide which results should be visible in public views (website with results, consumer app, scoreboards, and PDF files) on Roster Athletics:
- Gun time - available when Gun time or Mixed is selected to rank athletes,
- Net time - available when Net time or Mixed is selected to rank athletes,
- Gun time & net time - available for all options.
Please note: If net times exist, they will be used to calculate records. Additionally, all split times will be displayed as net times.
Predictions
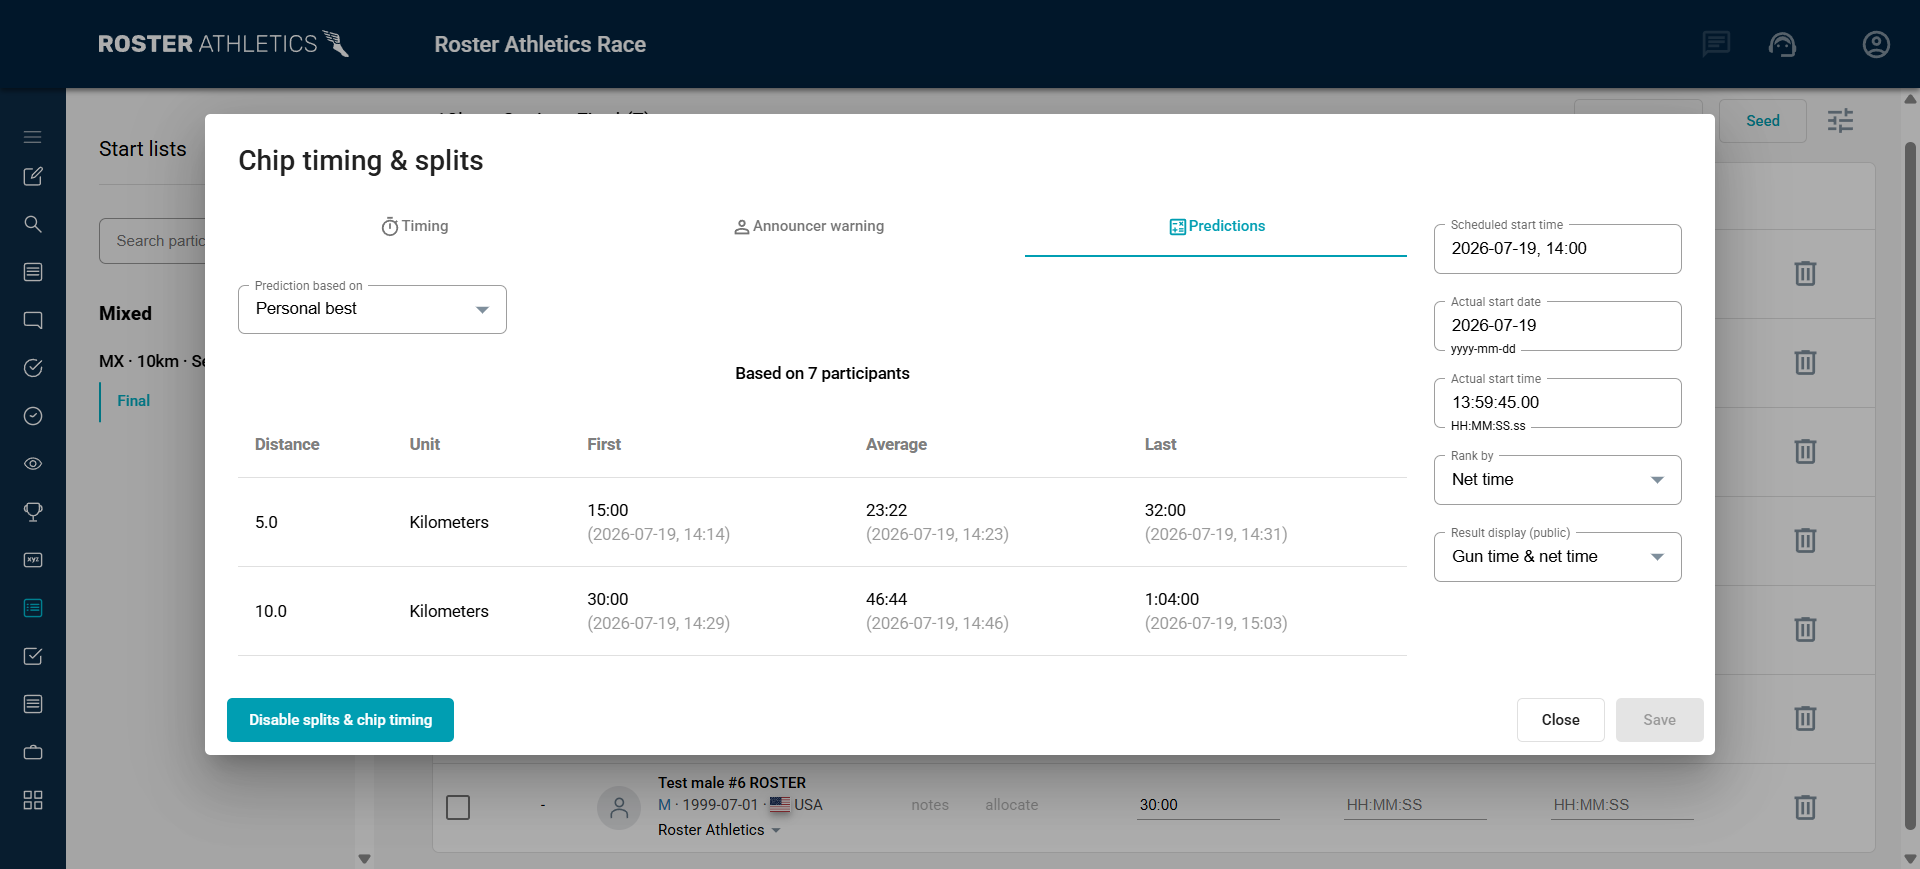
Open the Predictions tab in the Chip timing & splits view. Here you will see the predicted times for the first, average and last participant based on the selected record. For example, you can use this data to determine how long a given timing point should remain active or to decide how long a particular street should be closed for regular traffic.
Device mapping
Once your devices are set up and confirmed, and your timing points have been added, it's time to match them up.
Select COMPETITIONS → Chip timing from the left-hand menu and make sure you are in the Device mapping view.
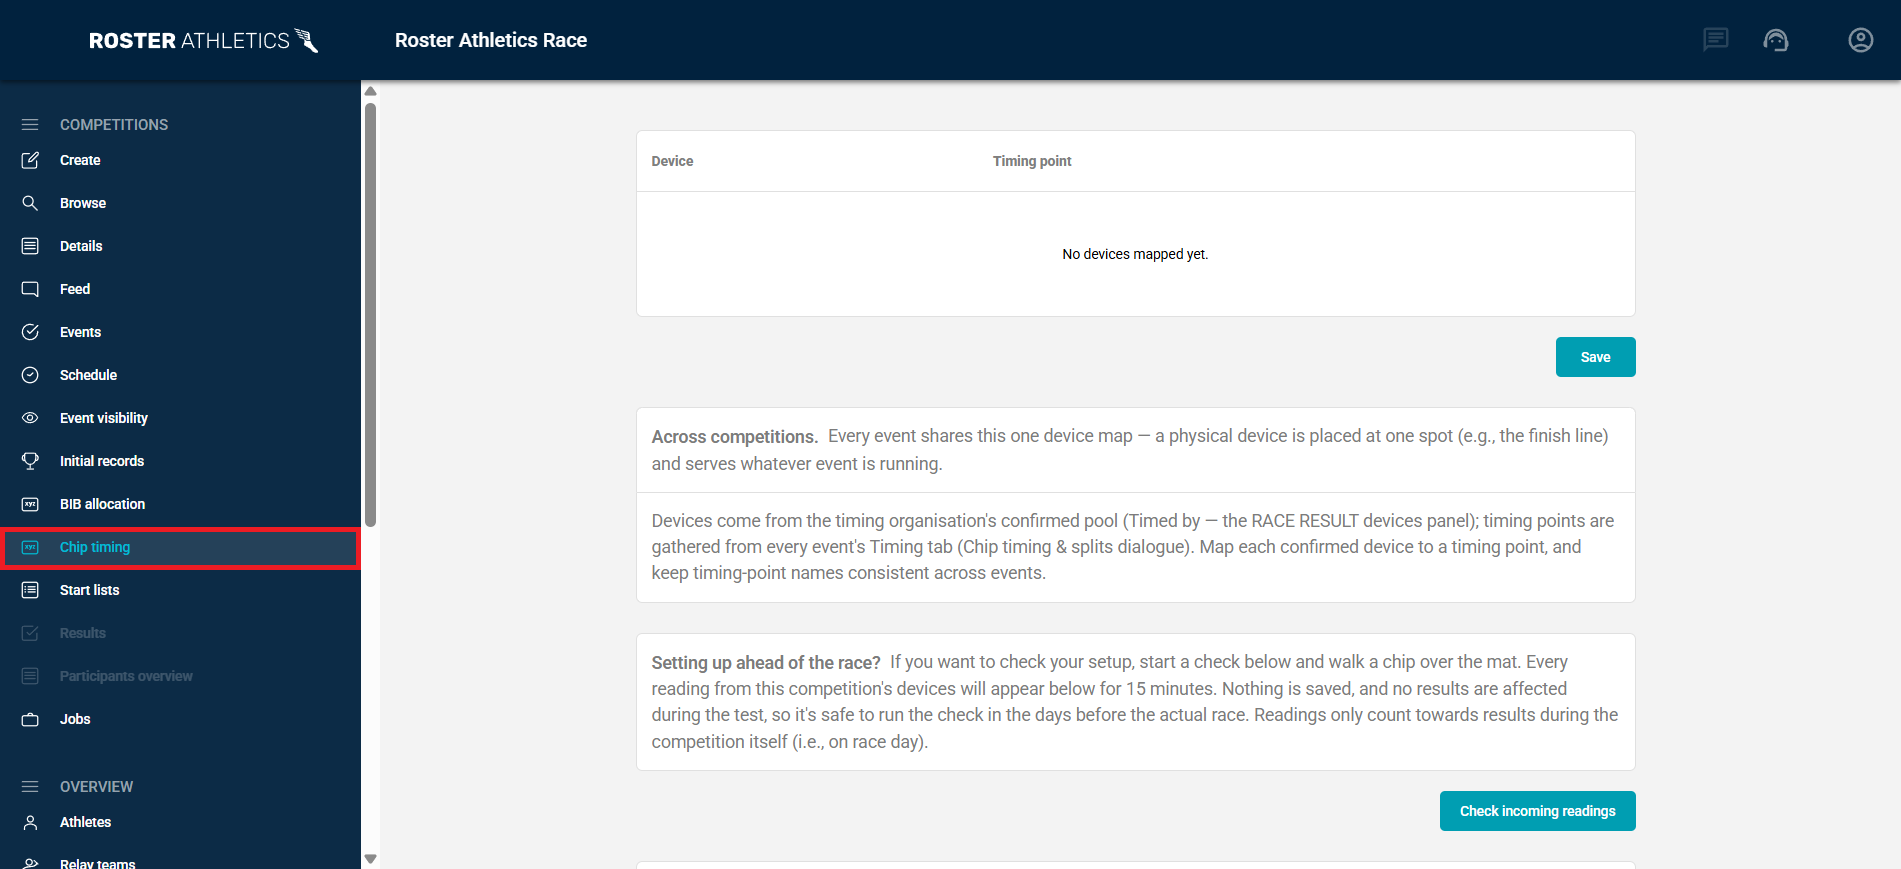
If you are going to use Ubidium devices assigned to your organisation, select Self in the Timed by field and make sure the RACE RESULT customer number is correct.
If you want to use devices assigned to another organisation, select the right organisation from the Timed by field. The list displays all organisations assigned to users linked to the competition (Details → Permissions).
Click the App mapping button, select the device from the Device column and the timing point name from the Timing point column. Repeat this step for all devices and timing points you want to configure and save.
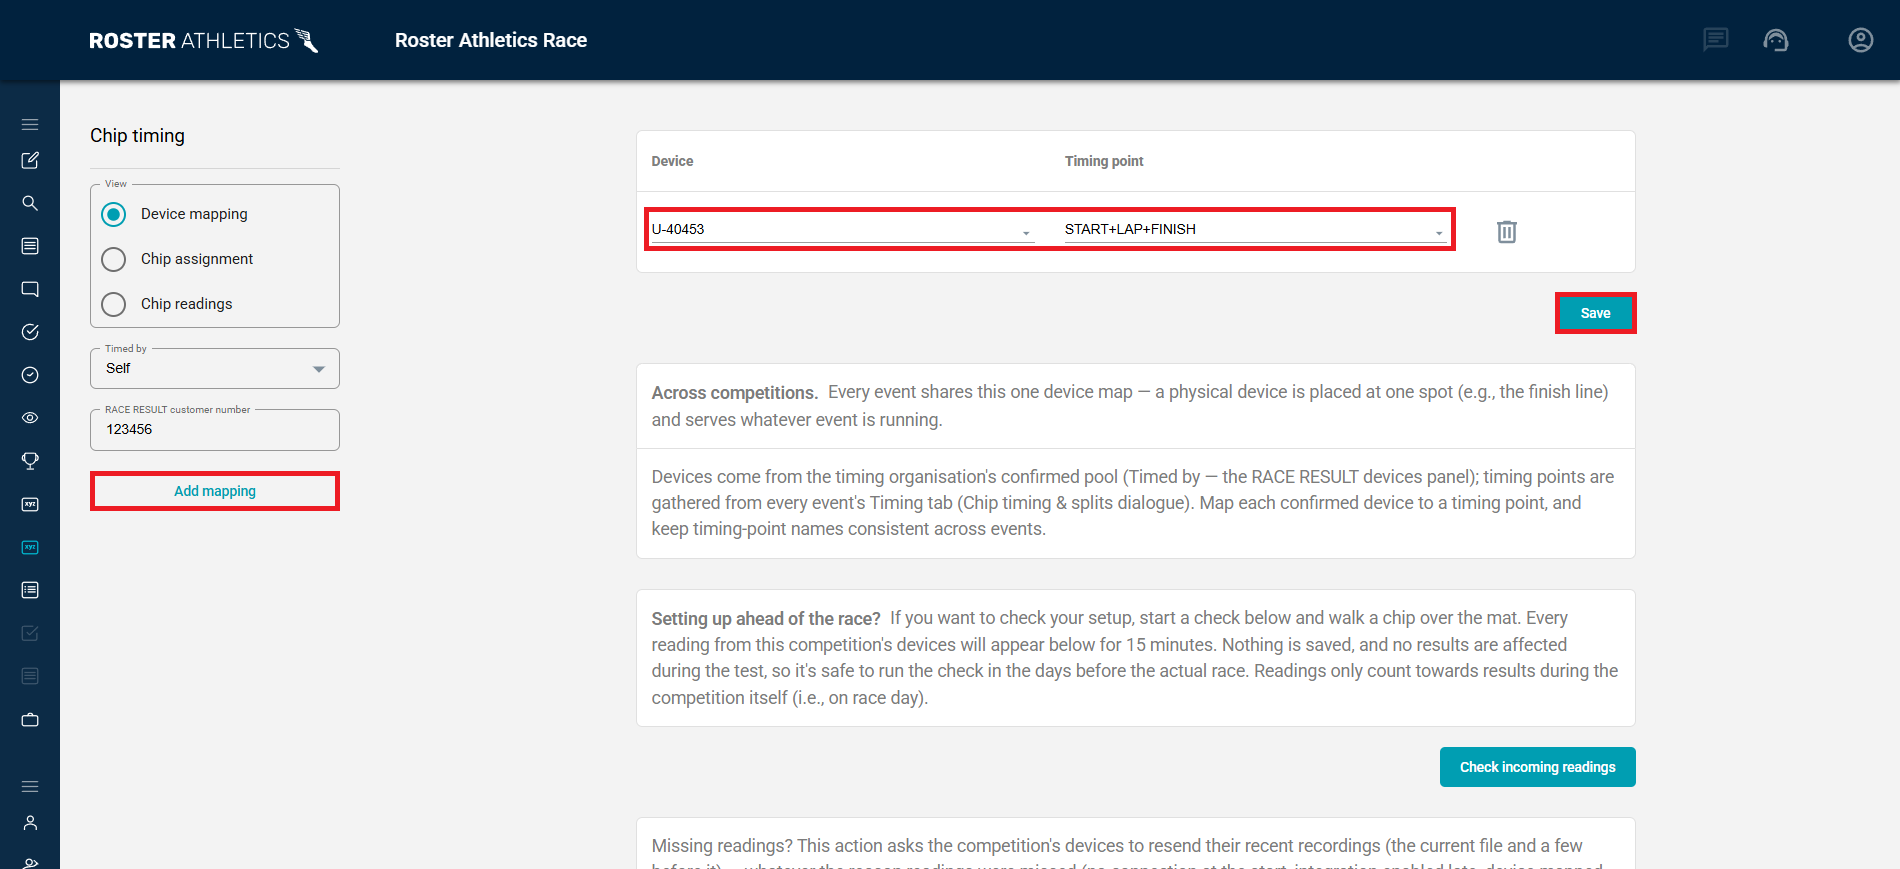
Every event shares this one device map — a physical device is placed at a single spot (e.g., the finish line) and serves whichever event is running.
Chip assignment
In many cases, the chip code matches the BIB number (e.g., BIB 10 has code 10). If this is the case, you can skip this step. Otherwise, you need to provide the chip code for all BIBs.
You can add the chip code manually by clicking the Add mapping button or entering it in the Chip Codes column field. To add more chip codes for the same BIB, separate them with commas. You can save the action by clicking the icon or Enter.
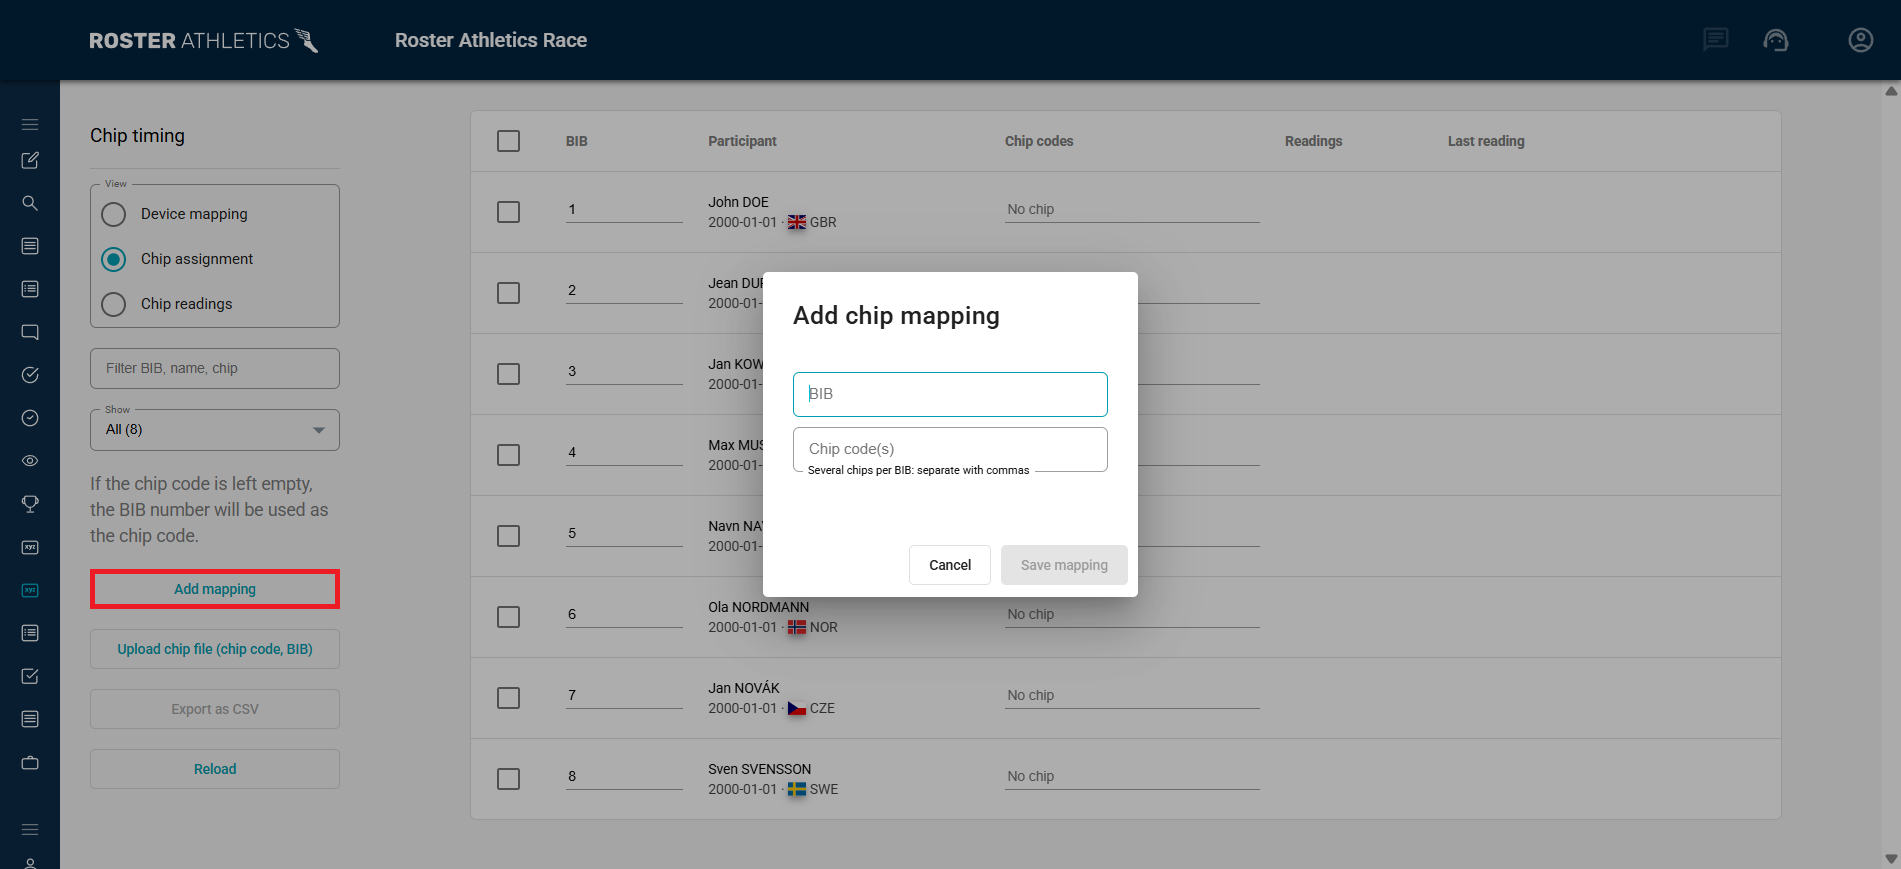
If you want to add more mappings in bulk, you can import a CSV file with the chip code in the first column and the BIB in the second. Example:
EMU000001,1
EMU000002,2
EMU000003,3
EMU000004,4
Testing the setup
If you want to check your setup, go to COMPETITIONS → Chip timing → Device mapping, click the Check incoming readings button and walk a chip over the mat.
Every reading from this competition's devices will appear on this screen for 15 minutes. Nothing is saved, and no results are affected during the test, so it's safe to run the check in the days leading up to the actual race. Readings only count towards results during the competition itself (i.e., on race day).
Starting a race
Starting a race
Click the START button on your RACE RESULT Ubidium to start recording data. Every time you press the button, it creates a marker that is used to determine the actual start date and time if it is within 10 minutes of the scheduled start time.
Chip readings
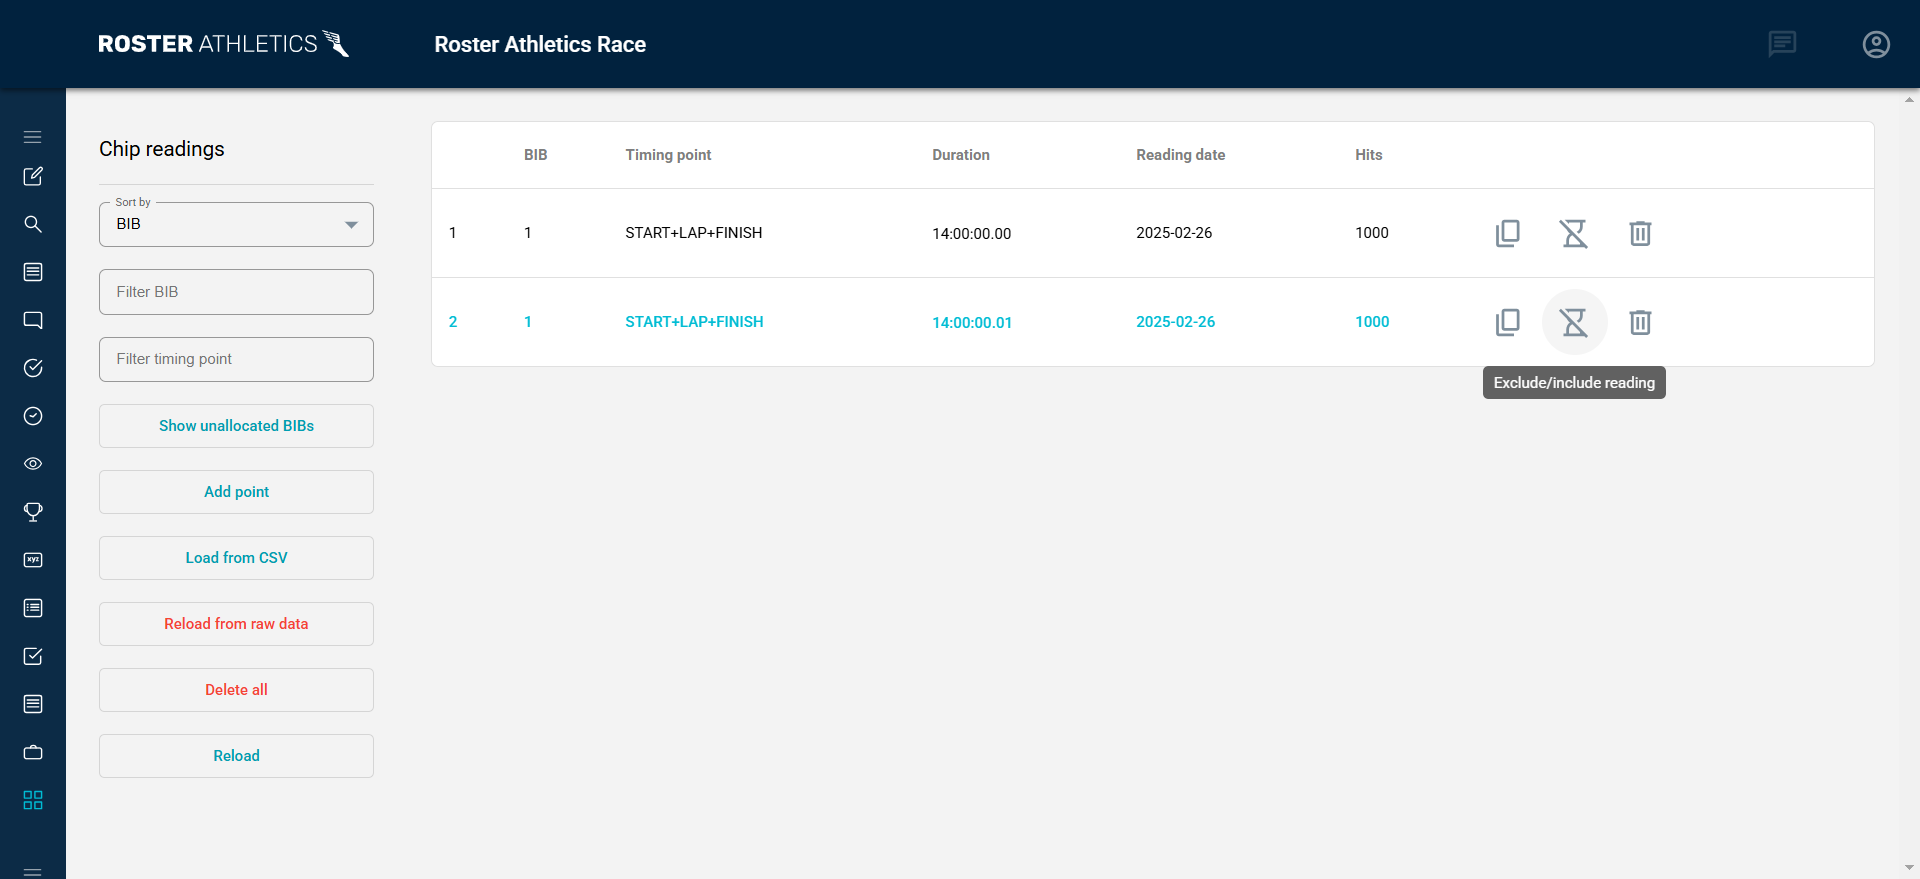
If everything is integrated correctly and the race has started, all chip readings will be automatically sent from the Ubidium device to the Roster Athletics platform. You can see them by clicking the COMPETITIONS → Chip timing → Chip readings link on the left-hand side menu.
Readings marked in blue are valid readings used to calculate results.
You can sort the list by BIB or duration, and filter by BIB and timing point.
If a chip reading is missing, you can manually add it by clicking the Add point button and adding a BIB, Timing point, Duration, and Reading date. You can also add multiple chip readings by importing a CSV file. To do so, click the Load from CSV button. The file should contain BIB, Timing point, Duration, IsMarker (defaults to false), Hits (defaults to 500), and Reading date (YYYY-MM-DD format).
33,START,10:00:05.00,false,500,2025-03-03
32,START,10:00:10.00,false,500,2025-03-03
16,START,10:00:09.00,false,500,2025-03-03
By clicking the Show Unallocated BIBs button, you can view a list of all BIBs with readings that have not been assigned to any athlete on the start list.
If you wish, you can add similar readings manually and exclude or remove the readings by clicking the icons.
Important note: Remember that all participants in the relevant event in Roster Athletics must be assigned BIB numbers. The transponder times transferred to Roster Athletics will be associated with a BIB number. If you are using active transponders (not BIBs), you must assign chip codes to BIBs.

Each active transponder has a unique identifier, which is a combination of letters and numbers. This identifier needs to be mapped with the correct BIB number in COMPETITIONS → Chip timing → Chip assignment.
Recovering missed readings
If you spotted missing readings (for example, due to a connection issue), you can recover them. To do so, go to COMPETITIONS → Chip timing → Device mapping and click the Recover missed readings button placed at the bottom of the page.
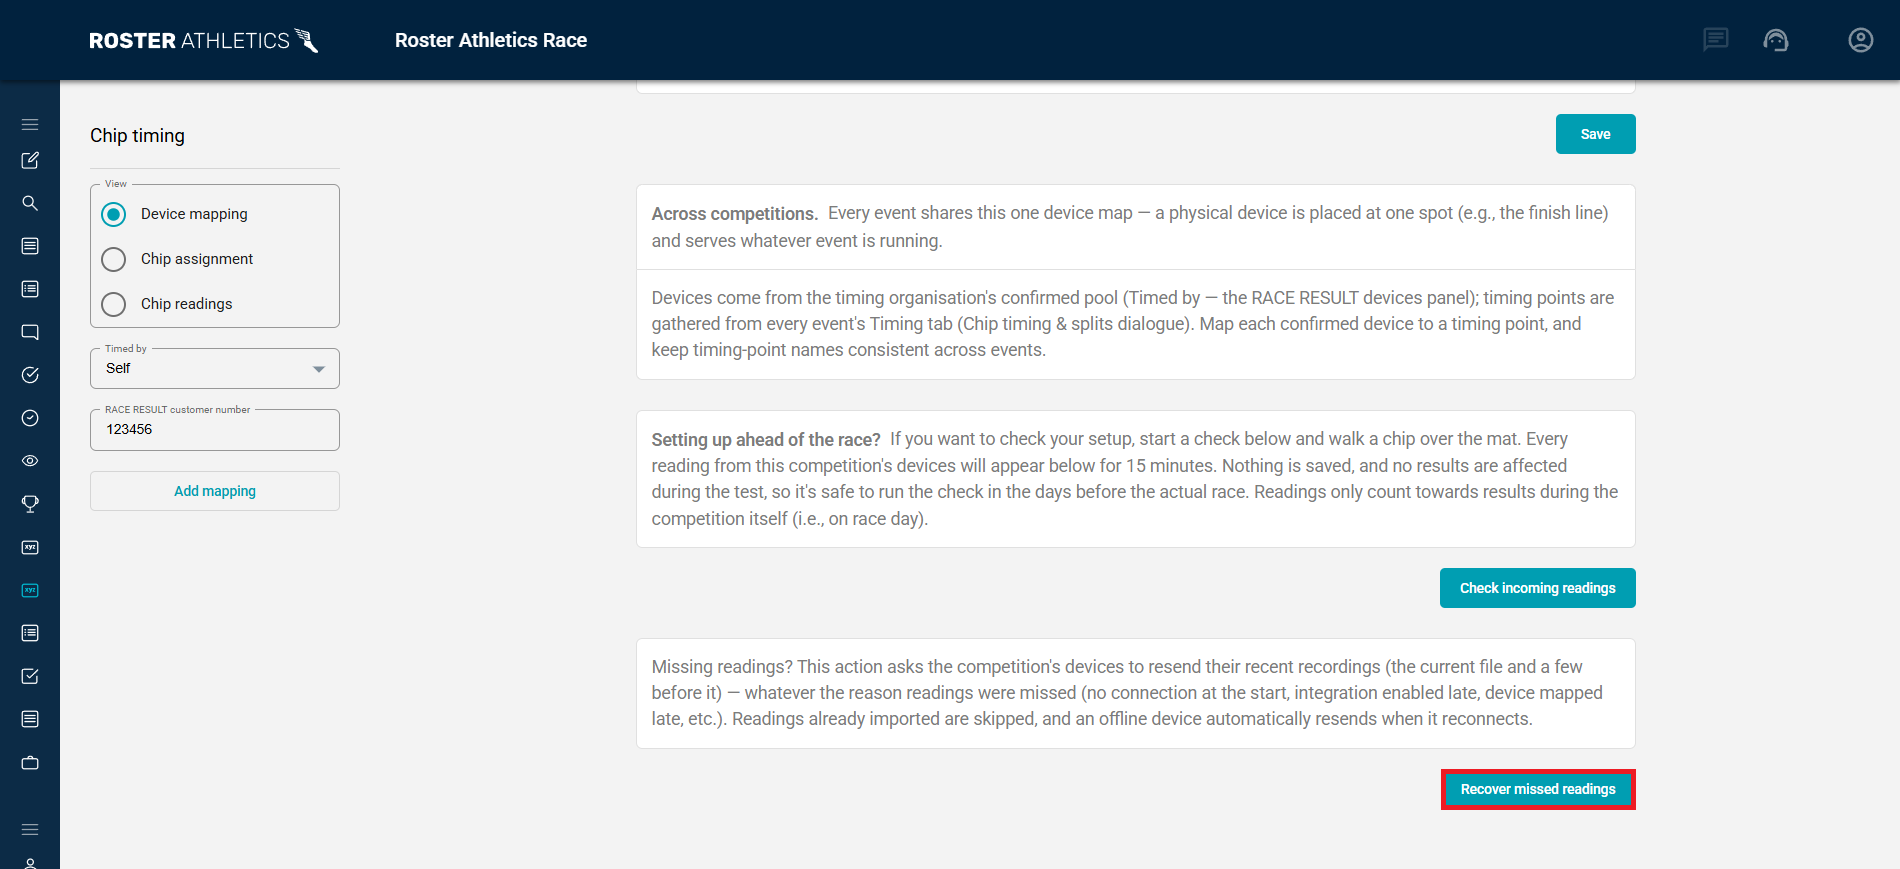
You can also recalculate all splits, results and places using raw data by clicking the Reload from raw data button under Chip timing → Chip readings.
Splits scoreboard
The splits scoreboard provides an easy way to project split counts onto a large-screen display in the stadium or venue. It can help organisers and participants track progress across laps more easily.
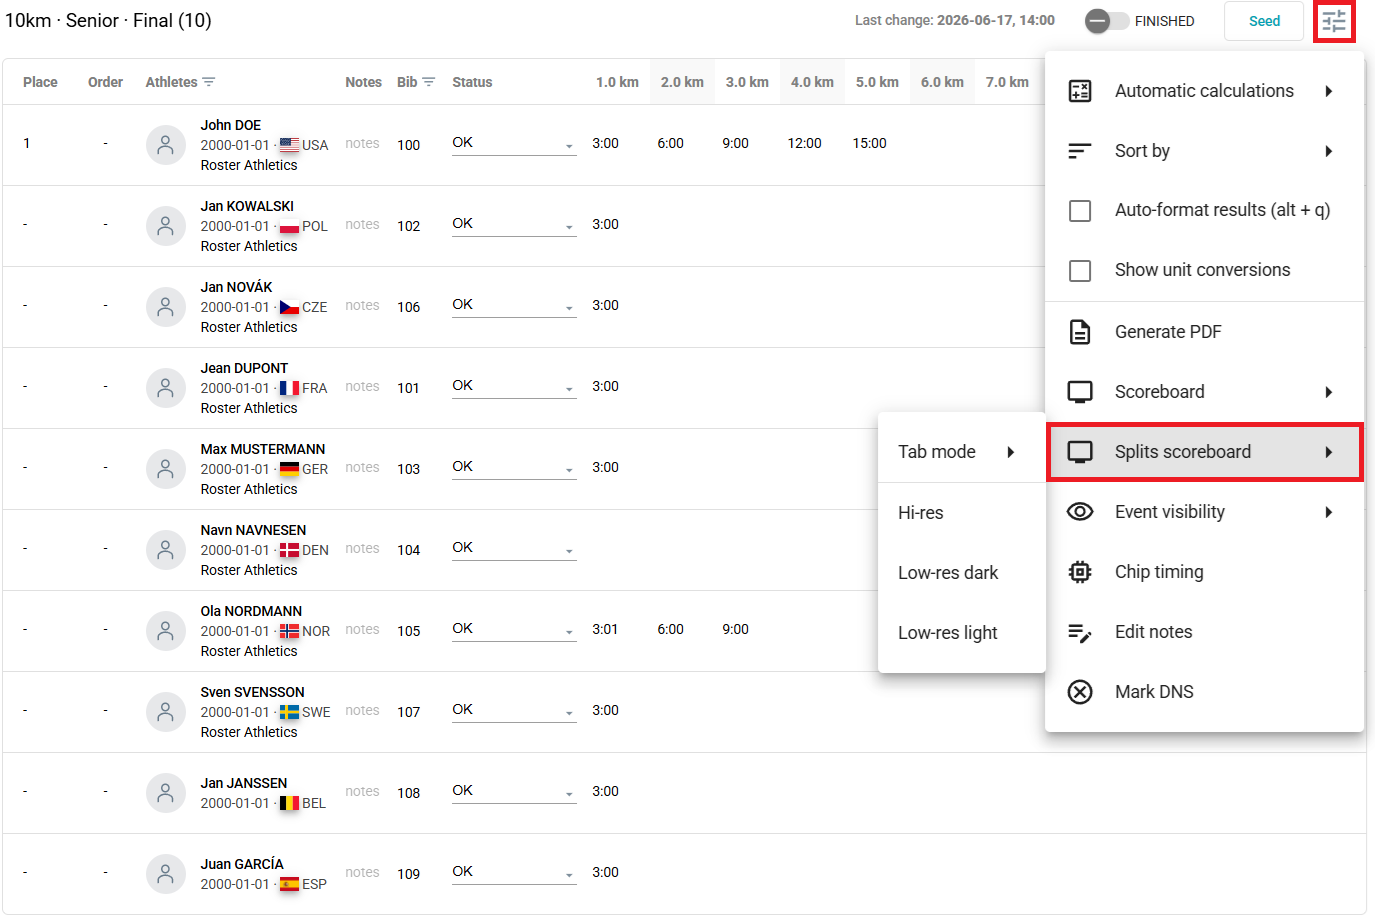
To access the scoreboard, go to COMPETITIONS → Results, click the menu in the top right corner, and select Splits scoreboard.
For more information, see the Splits Scoreboard guide.